
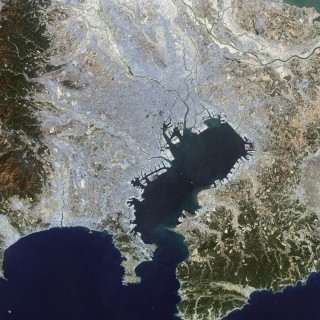
Bay of Japan area
POPULARITY

83 episodes with Tokyo Bay

25 episodes with Tokyo Bay

8 episodes with Tokyo Bay

4 episodes with Tokyo Bay

4 episodes with Tokyo Bay

4 episodes with Tokyo Bay

3 episodes with Tokyo Bay

2 episodes with Tokyo Bay

4 episodes with Tokyo Bay

This week Seth introduces a really good documentary film produced right after the war by General MacArthur's command entitled Appointment in Tokyo. The film focuses on Mac's theater of the Pacific war from the Fall of the Philippines to the surrender aboard USS Missouri in Tokyo Bay in 1945. Another couple weeks before the start of Season Six. Stand by! #wwiihistory #ww2 #usnavy #usa #usarmy #medalofhonor #enterprise #aircraft #aircraftcarrier #cv6 #midway #wwii #wwiihistory #ww2 #worldwar2 #usnavy #usnavyseals #usmc #usmarines #saipan #usa #usarmy #aircraft #aircraftcarrier #battleship #battleships #ussenterprise #aircraftcarriers #museum #essex #halsey #taskforce38 #wwii #wwiihistory #ww2 #usnavy #usa #usarmy #medalofhonor #enterprise #aircraft #aircraftcarrier #cv6 #midway #wwii #wwiihistory #ww2 #worldwar2 #usnavy #usnavyseals #usmc #usmarines #saipan #usa #usarmy #aircraft #aircraftcarrier #battleship #battleships #ussenterprise #aircraftcarriers #museum #hollywood #movie #movies #books #mastersoftheair #8thairforce #mightyeighth #100thbombgroup #bloodyhundredth #b17 #boeing #airforce wwii #wwiihistory #ww2 #usnavy #usa #usarmy #medalofhonor #enterprise #aircraft #aircraftcarrier #cv6 #midway #wwii #wwiihistory #ww2 #worldwar2 #usnavy #usnavyseals #usmc #usmarines #saipan #usa #usarmy #aircraft #aircraftcarrier #battleship #battleships #ussenterprise #aircraftcarriers #museum #hollywood #movie #movies #books #oldbreed #1stMarineDivision #thepacific #Peleliu #army #marines #marinecorps #worldwar2 #worldwar #worldwarii #leytegulf #battleofleytegulf #rodserling #twilightzone #liberation #blacksheep #power #prisoner #prisonerofwar #typhoon #hurricane #weather #iwojima#bullhalsey #ace #p47 #p38 #fighter #fighterpilot #b29 #strategicstudying #tokyo #boeing #incendiary #usa #franklin #okinawa #yamato #kamikaze #Q&A #questions #questionsandanswers #history #jaws #atomicbomb #nuclear #nationalarchives #nara #johnford #hollywood #fdr #president #roosevelt #doolittle #doolittleraid #pearlharborattack #salvaged #medalofhonor #tarawa #malayalam #singapore #guadalcanal #china #burma #oil

Last time we spoke about the first battle of Changsha. Japanese forces under General Okamura Yasuji, including the 6th, 13th, and 33rd Divisions, launched a multi-pronged offensive, crossing the Xin Qiang River and capturing Yingtian amid brutal fighting. Chinese defenses, commanded by Xue Yue in the Ninth War Zone, employed gradual resistance strategies, with units like the 195th Division under Qin Yizhi holding key positions such as Bijia Mountain and Fulinpu, inflicting heavy losses. Battalion Commander Luo Wenlang recaptured Dongtang in a midnight assault, grieving his fallen brother amid Mid-Autumn moonlight. Chiang Kai-shek, from Chongqing, oversaw operations while hosting a festive banquet, buoyed by international support like U.S. loans. By October, Japanese advances stalled; Okamura ordered a retreat on October 2, exposed by a downed plane yielding critical documents. Chinese forces pursued, reclaiming lines by October 8, annihilating over half the invaders per Chiang's commendation. #198 The Battle of South Guangxi Welcome to the Fall and Rise of China Podcast, I am your dutiful host Craig Watson. But, before we start I want to also remind you this podcast is only made possible through the efforts of Kings and Generals over at Youtube. Perhaps you want to learn more about the history of Asia? Kings and Generals have an assortment of episodes on history of asia and much more so go give them a look over on Youtube. So please subscribe to Kings and Generals over at Youtube and to continue helping us produce this content please check out www.patreon.com/kingsandgenerals. If you are still hungry for some more history related content, over on my channel, the Pacific War Channel where I cover the history of China and Japan from the 19th century until the end of the Pacific War. In January 1939, the Japanese General Headquarters, responding to naval needs, ordered the 21st Corps to seize Hainan Island. The goal was to establish a base for air operations against southwestern China and to enforce blockade measures. Supported by the Japanese Navy, the Corps deployed the Taiwan Brigade, which landed at Haikou on February 10. After initial defeats, Chinese peace preservation units withdrew to the island's interior and conducted harassment operations. Japanese troops soon occupied northern counties including Qiongshan, Wenchang, Ding'an, Qionghai, and Chengmai, followed by the port of Yulin, which positioned them for southward advances toward Guangxi. This invasion was part of a broader strategy to disrupt Chinese supply lines and secure a foothold in southern China. Although Chinese resistance on Hainan ultimately failed to repel the invaders, it highlighted the resilience that would define regional fighting. After the costly Battle of Wuhan, the Sino-Japanese War reached a stalemate in central China, despite ongoing large-scale conflicts and Japanese strategic bombings that caused heavy casualties without breaking the deadlock. Politically, Japan's alignment with the Axis powers and the start of World War II in Western Europe led European nations to bolster ties with China. With major coastal ports under Japanese control, the Nationalist government's main overseas supply route became the Haiphong-Kunming railway in French Indochina, which transported four times more war materials in 1938 than in 1937, including heavy equipment purchased abroad. The Hainan occupation negatively impacted Japan's war efforts, though diplomatic pressure on Britain and France proved ineffective. Meanwhile, the Imperial Japanese Navy proposed a southward advance: invading from Nanning to Longzhou County in Guangxi by sea to establish an airfield for strategic bombing. An April 15, 1939, Navy Department assessment deemed large-scale inland army operations challenging, recommending instead that the army and navy collaborate to occupy Shantou—the largest trading port on the South China coast—before pushing into Guangxi to seize Nanning and sever China's vital Indochina supply line. In June, the Japanese General Staff's "Military Geography" emphasized that occupying Nanning would provide convenient transportation in all directions, reaching Guangdong, Hunan, Guizhou, and Yunnan. The Nanning-Lang Son road had become a major artery for Chiang Kai-shek's regime to connect with the southwest. To cut it off directly, Nanning must be captured first. Once occupied, heavy troops near Tokyo Bay would not be needed to achieve the operation's purpose. This idea gained considerable support both politically and tactically. The Army's northward policy had been defeated by the Soviet Union in the Battle of Khalkhin Gol in September 1939. Major General Tominaga Kyoji, the newly appointed head of the First Department of the General Staff, sought to avoid further embarrassments. Supporting the proposal involved transferring the 5th Division of the Kwantung Army, originally intended for Khalkhin Gol, to the south. This prevented front-line units from misjudging higher-ups' positions and allowed implementation without affecting existing troops. In September, the European war broke out. The Japanese General Headquarters ordered the 21st Army to capture the vicinity of Nanning, cut off the international passage between Guangxi and Vietnam, and obtain a base for air operations in southwest China. Japan aimed to completely sever China's most important supply route. According to Japanese intelligence, the French Indochina line accounted for 85% of China's foreign aid in late 1939, with 12,500 tons transported in September alone. On September 1, 1939, Germany attacked Poland; on September 3, Britain and France declared war on Germany, igniting World War II. Japan, eager to resolve the China issue and free up troops to seize Western colonies in Asia and the Pacific, stated through Prime Minister Nobuyuki Abe on September 4: "At the outbreak of the European war, the Empire will not intervene and has decided to focus on resolving the China Incident." In Nanjing, the China Expeditionary Army Headquarters was established, with General Nishio Hisazo as Commander-in-Chief and Lieutenant General Itagaki Seishiro as Chief of Staff, overseeing the North China Area Army, the 11th Army, the 13th Army, and the 21st Army. On September 23, the Japanese General Headquarters issued an order to prepare for a swift response to the China Incident. On October 16, "Continental Order No. 375" directed the Commander-in-Chief of the China Expeditionary Army to swiftly cut off enemy supply routes from Nanning to Longzhou with a portion of the navy. Also on October 16, "Continental Order No. 582," a central Army-Navy agreement, aimed to cut off enemy routes along the Nanning-Longzhou line and strengthen naval air operations against the Yunnan-Vietnam Railway and the Burma Road. The operation was scheduled for mid-November. On October 19, Nishio Juzo issued orders for the Guangxi operation, involving the 5th Division, Taiwan Mixed Brigade, supporting units, the 5th Fleet (renamed the 2nd Expeditionary Fleet in mid-November), and the 3rd Combined Naval Air Group. Total strength: about 30,000 men, over 70 warships, 2 aircraft carriers, and about 100 aircraft. Tominaga Kyoji announced: "This is the last battle of the China Incident." Politically, the Guangxi Army was a key pillar of the National Government after retreating to Sichuan. Attacking Guangxi could impact the Guangxi clique's stance on continuing the war. Cutting off the Nanning-Longzhou line would affect Vietnam-China transportation security and allow actions against French Indochina amid Europe's distractions. With tactical and political alignment, the plan was approved. In September 1939, the Chinese repelled the Japanese attack on Changsha. In October, the National Government held the Second Nanyue Military Conference in Hengshan, summarizing the First Changsha Campaign and deciding on a new offensive. On October 29, Chiang Kai-shek announced: "Our future strategic application and the mentality of officers and soldiers must be completely transformed. We must start to turn defense into offense, turn stillness into movement, and actively take offensive measures." On November 5, after the meeting, intelligence indicated Japan's intention to invade the south. U.S. and British agencies reported the Japanese fleet gathering in Tokyo Bay, signaling an imminent operation against Nanning. Chiang flew from Hengshan to Guilin to arrange defenses. At this time, coastal defense was guarded by the 16th Army Group under Xia Wei (transferred, with Cai Tingkai taking over), a Guangxi clique force comprising the 46th and 31st Armies. Bai Chongxi, director of the Guilin Headquarters, was in Chongqing for the Sixth Plenary Session of the Fifth National Congress of the Kuomintang, while Chief of Staff Lin Wei was in Rong County mourning Xia Wei's mother. The headquarters was essentially deserted. Zhang Fakui, commander of the Fourth War Zone, and Chief of Staff Wu Shiyuan were in Shaoguan, Guangdong. The three-tiered command structure—headquarters, war zone, army group—was practically non-existent. The Chinese forces north of the pass were commanded by Bai Chongxi's Guilin Headquarters, with Lin Wei as Chief of Staff; they included the Fourth War Zone under Zhang Fakui and the 16th Army Group under Xia Wei. They commanded: the 31st Army (Commander Wei Yunsong; 131st Division under He Weizhen; 135th Division under Su Zuxin; 188th Division under Wei Zhen); the 46th Army (Commander He Xuan; 170th Division under Li Xingshu; 175th Division under Feng Huang; New 19th Division under Huang Gu); and a portion of the 200th Division of the 5th Army (Commander Dai Anlan). Together with the 1st-4th Independent Infantry Regiments of the Guangxi Training Corps, total strength was approximately 60,000 men. After the Japanese landing, Bai Chongxi was stationed in Qianjiang, while the 16th Army Group headquarters in Xiawei was at Heishiyan near Binyang. In early November 1939, the Japanese 5th Fleet and the aircraft carrier Kaga escorted the 5th Division and the Taiwan Brigade to concentrate in Haikou. Japanese aircraft bombed important cities in Guangxi. At that time, the Chinese army defended the coast from Nanning to Qinzhou Bay and Fangcheng with part of the 16th Army Group of the Fourth War Zone. The 46th Army was responsible for the coastline of Fangcheng, Qinxian, Hepu, and Liankou, and the 31st Army for key points along the Xijiang River. On November 9, Japanese troops assembled at Sanya Bay on Hainan Island. Lieutenant General Ando Rikichi, commander of the 21st Army, personally commanded from Sanya. On the 13th, the fleet set sail. On the 14th, vanguard ships feinted at Beihai with over ten ships. A battalion of the 175th Division retaliated and was ordered to destroy Beihai, but Commander Chao Wei of the 524th Regiment believed no landing was intended, avoiding complete destruction. That night, Japanese ships turned toward Qinzhou. To safeguard the international communications link between Guangxi and Indochina, the Chinese Generalissimo's Headquarters in Guilin assigned defensive missions. The 46th Corps of the 16th Army Group was tasked with defending the coastline from Fangcheng to Qinzhou, Hepu, and Lianjiang. The 31st Corps was responsible for key positions along the Xi River. Defensive positions were prepared in advance, and communications infrastructure was sabotaged to facilitate gradual resistance, aiming to attrition Japanese forces before a decisive engagement along the Yong River. On November 15, under air and naval fire support, the Japanese 5th Division and Taiwan Brigade executed a forced landing on the west coast of Qinzhou Bay. Following intense resistance, the Chinese New 19th Division withdrew to Pancheng and Shangsi. After capturing Qinzhou, the Japanese 5th Division advanced north along the Yong-Qin Highway, while the Taiwan Brigade moved along Xiaodong–Baiji–Bujin Road. On November 17, the Japanese army captured Qinzhou and Fangcheng. The 5th Division immediately split into three routes along the Yongqin Highway, while the Taiwan Brigade advanced north along Xiaodong-Baekje-Pujin. On the 18th, they attacked Xiaodong, the headquarters of the New 19th Division. Division Commander Huang Gu fled alone in the face of battle. His troops were routed, and the Japanese continued northward. Meanwhile, bandits from the Shiwan Mountains formed numerous plainclothes teams to lead the Japanese advance, accelerating their northward movement. By November 21, they approached the south bank of the Yu River. On December 1, they occupied Gaofeng Pass. On December 4, they occupied Kunlun Pass and then adopted a defensive posture. On November 16, Chiang Kai-shek summoned Bai Chongxi in Chongqing, ordering him to return to Guilin immediately to command the battle, without attending the plenary session. Bai requested full command without intervention from Zhang Fakui, and that all armies obey the Headquarters directly. Chiang approved and transferred his elite Fifth Army and other units to Bai's command. Bai telegraphed Du Yuming to lead troops by train from Hengyang to southern Guilin and reinstated Xia Wei as commander of the 16th Army Group, with Cai Tingkai awaiting orders. The 16th Army Group assembled, and Deputy Commander-in-Chief Wei Yunsong arrived in Nanning on the 19th. Units rushed to block Japanese advances. Bai flew to Guilin on the 19th and Qianjiang on the 21st, establishing the command post. Thus, as Japanese arrived in Nanning, Chinese reinforcements like the 170th Division reached Yongning on the 22nd, two regiments of the 135th Division entered Nanning on the 23rd, and the 600th Regiment of the 200th Division arrived at Ertang on the afternoon of the 24th. Other armies assembled in Liuzhou and Binyang. On November 21, Japanese troops approached the south bank of the Yu River. Wu Zongjun, commander of the 405th Regiment of the 135th Division, arbitrarily ordered his regiments to abandon positions and retreat. Wei Yunsong ordered Su Zuxin to intercept, but Wu disobeyed. No troops defended Nanning's front lines. At dawn on the 24th, the 170th Division fought fiercely in Yongning. In the morning, the Japanese 21st Regiment crossed the river. By afternoon, Nanning had fallen. Over the next two days, they swept surrounding positions. On the morning of the 25th, the 600th Regiment of the 200th Division fought alone against Japanese regiments at Ertang. Under air cover, Japanese attacked, but Chinese resisted stubbornly. Regiment Commander Shao Yizhi and Adjutant Wu Qisheng were killed. Given the situation, Division Commanders Li Xingshu and Dai Anlan retreated to Gaofeng Pass after dusk. Though they failed to stop the advance, this was the fiercest resistance since the landing, lasting two days and nights. On November 25, Japanese attacked the 175th Division near Luwu from Xiaodong and the highway. The division moved to Nalong, assembling in villages there. The 175th attacked key points along the Yongqin Highway, including Datang, Naxiao, Dongya, Nabian, Xincheng, Xiaodong, Dadong, and Bancheng. On November 20, the 21st Army opened its headquarters in Qinzhou. On November 26, Ando Rikichi announced the formation of the Yongqin Corps under Imamura Hitoshi. Ando left for Guangzhou on the 27th. Starting on the 26th, Japanese attacked Gaofeng Pass with aircraft cover. Despite fierce resistance, Chinese lost Gaofeng Pass on December 1. On the 4th, Japanese occupied Kunlun Pass, then adjusted deployment. The two sides confronted each other along the Kunlun Pass mountainous boundary. According to statistics up to December 1, Japanese suffered 145 dead and 315 wounded; Chinese had 6,125 dead bodies and 664 prisoners (but Japanese casualties were underreported; the 41st Infantry Regiment received 727 replacements on January 19, likely matching killed and wounded sent back). Seized in Nanning: 300 tons lead, 200 tons coal, 500 bundles cotton, 321 tons cotton thread, 30 tons iron, 60 tons tin. On December 2, the Japanese 5th Cavalry Regiment and Morimoto Battalion were attacked by about 1,500 Chinese with four tanks at Batang. Japanese dispatched the 21st Brigade (Nakamura Detachment), repelling a mixed force of the 200th and 188th Divisions. Japanese occupied Kunlun Pass but left only a battalion to defend it, withdrawing the rest to Nanning. Bai Chongxi, director of the Guilin Headquarters and deputy chief of staff, proposed a counter-offensive plan, which was approved by Chiang Kai-shek. On November 24, when Japanese had just occupied Nanning, Bai Chongxi demanded an immediate counterattack while Japanese were unstable and weak. After failing to gain approval, Bai asked Du Yuming to submit a request. Du sent a telegram on December 1: "The enemy occupying Nanning is less than two divisions. They succeeded by exploiting our dispersed forces, but lack heavy weapons and supplies. Our army should gather superior forces and launch a counter-offensive quickly (before December 10) to defeat them and restore international transportation." Chiang decided on a counter-offensive on December 7. On the 8th, Bai conveyed the objective: "capturing Kunlun Pass and then recovering Nanning." By mid-December, assembly was complete. Chiang dispatched Chen Cheng and Li Jishen to supervise, and Zhang Fakui arrived in Qianjiang. In the early stages, Guangxi lacked heavy armored forces for counterattacking beyond Guangxi clique troops. The fall of Kunlun Pass prompted Chongqing to deploy the reorganized Fifth Army and its armored corps for a strong attack. The Fifth Army was the main force at Kunlun Pass, with the National Revolutionary Army providing cover while launching a full-scale counterattack in Nanning. To recapture Kunlun Pass and Nanning, Bai Chongxi dispatched approximately nine armies and twenty-seven divisions, totaling 300,000 troops: Xia Wei of the 16th Army Group, Ye Zhao of the 37th Army Group, Deng Longguang of the 35th Army Group, and Cai Tingkai of the 26th Army Group (31st, 5th, 64th, 46th, and 43rd Armies, etc.) to attack Kunlun Pass. The Japanese, with the Nakamura Brigade as main force and special forces, had strong fortifications. Xu Tingyao of the 38th Army Group, with Li Yannian of the 2nd Army, Gan Lichu of the 6th Army, Yao Chun of the 36th Army, and Fu Zhongfang of the 99th Army. The 5th Army, plus the 1st Honorary Division (Zheng Dongguo), New 22nd Division (Qiu Qingquan), and all armored, cavalry, artillery, and engineer regiments, arrived. The Japanese forces consisted of the 5th Division (Lieutenant General Hitoshi Imamura; 9th Brigade under Major General Genichiro Ogawa; 21st Brigade under Major General Masao Nakamura; Taiwan Mixed Brigade under Major General Sadashiro Shiota), Marine Corps (over 70 warships), and Air Force (100 aircraft), totaling about 30,000. Later reinforcements: Imperial Guard Division and a brigade from the 18th Division. Total about 100,000, but only 45,000 fought. After a traitor reported over 100,000 Nationalist troops north of Kunlun Pass, Imamura dismissed it as "impossible." Higher Japanese ranks hoped to instigate rebellion by the Guangxi clique. On December 10, Imamura issued a telegram "Letter to Generals Li and Bai," expressing respect and stating the attack on Nanning was to cut off Chiang's lines, hoping for Japan-China cooperation. If insisted, the Japanese garrison would win. Finally: "The more than 4,200 brave soldiers who died in Nanning have been buried in Zhongshan Park and solemnly offered sacrifices. Please rest assured." On December 15, Bai Chongxi took a decisive step in the escalating conflict by issuing the first counter-offensive order, setting the stage for a coordinated push against enemy positions. He organized the forces into three main route armies, with additional reserves held back for support. The Northern Route Army, under Xu Tingyao's command, focused its efforts on Kunlun Pass. The 5th Army led the direct assault there, while the 92nd Division from the 99th Army skirted around Lingliwei to strike at Qitang, effectively flanking the pass and adding pressure from the side. Meanwhile, the Western Route Army, led by Xia Wei, split into two columns to cover multiple fronts. The First Column, commanded by Zhou Zuhuang, targeted Gaofeng Pass in a bold advance. The Second Column, under Wei Yunsong, positioned itself at Suwei to block any reinforcements heading toward Nanning, cutting off potential enemy supply lines. On the eastern flank, Cai Tingkai's Eastern Route Army aimed to disrupt key logistics. The 46th Army moved against Luwu and Lingshan, intent on severing the vital Yongqin Highway. At the same time, the 66th Army joined the assault on Kunlun Pass before pushing onward to Gula and Gantang. To bolster these efforts, the remaining two divisions of the 99th Army were kept in reserve, ready to reinforce wherever needed. The very next day, on December 16, Du Yuming—now serving as army commander—gathered his officers for a critical conference within the 5th Army. There, they crafted a clever encirclement strategy dubbed "close the gate and fight the tiger," designed to trap and overwhelm the opposition. The plan's core involved the 200th Division, led by Dai Anlan, and the 1st Honorary Division under Zheng Dongguo launching the primary attack on Kunlun Pass. Flanking from the right, Qiu Qingquan's New 22nd Division would seize Wutang and Liutang, then turn to intercept any incoming reinforcements. On the left wing, Peng Bisheng commanded two regiments in a daring bypass of Gantang and Chang'an, aiming to strike at Qitang and Batang and seal off the enemy's retreat routes. The enemy at Kunlun Pass was the Matsumoto Sozaburo Battalion of the 21st Brigade. Its 42nd and 21st Regiments were along Jiutang-Nanning. On December 16, Imamura ordered Major General Kawai Genshichi of the 9th Brigade to lead thousands in a surprise attack on Longzhou and Zhennan Pass, departing on the 17th. At 8 p.m. on December 17, the Battle of Kunlun Pass began. On December 18, Chinese forces began their attack and captured Kunlun Pass and Jiutang on the same day. On December 19, it captured Gaofeng Pass. On December 20, Gaofeng Pass, Jiutang, and Kunlun Pass fell into the hands of the Japanese army again. At dawn on December 18, the artillery of the 5th Army opened fire. After extension, the 200th and 1st Honorary Divisions attacked. Hundreds of Japanese planes bombed. By night, the 1st Honorary captured Fairy Mountain, Laomaoling, Wanfu Village, Luotang, and Hill 411; 200th captured Hills 653 and 600, taking Kunlun Pass. At noon on the 19th, massive Japanese air raid. Imamura dispatched the 21st Regiment under Colonel Miki Yoshinosuke, recapturing it. Positions were contested repeatedly. The New 22nd occupied Wutang and Liutang; Wutang recaptured by Japanese, but Liutang held, blocking reinforcements. When Imamura ordered Taiwan Mixed Brigade reinforcement, they were blocked at Liutang by Qiu Qingquan. Du Yuming ordered Zheng Dongguo to send Zheng Tingji's 3rd Regiment to encircle Jiutang from the right. They captured high ground west of Jiutang at night. On December 20, enemy at Kunlun Pass weakened, sending urgent reports. Imamura ordered Nakamura Masao with 42nd Regiment to reinforce, but blocked at Wutang for two days, reaching Qitang on the 22nd, blocked again. Nakamura was wounded on the 23rd morning. At 1:30 pm, Miki reported: "If the brigade cannot arrive before dusk, the front line will be difficult to secure." Imamura ordered Colonel Lin Yixiong's 1st Regiment and Colonel Watanabe Nobuyoshi's 2nd Regiment of the Taiwan Mixed Brigade to reinforce, but blocked by 175th Division on Yongqin Road. Watanabe's regiment blocked at Luwu by 524th Regiment (Chao Wei), and after three days, couldn't pass. Watanabe was killed, remnants fled to Qin County. On the 20th, Imamura ordered the 9th Brigade's 3rd Battalion of Ito's unit back in 105 vehicles to reinforce. The Japanese confirmed the attack and Imamura ordered Nakamura Detachment rescue. Over two weeks, encirclement and breakout battles occurred on the Nanning-Kunlun Pass highway. On the 18th, the 170th Division launched the Battle of Gaofeng Pass, capturing a hill on the 19th but ambushed that night. On the 20th, the pass fell, retreating to Gewei. Bai inspected but no improvement; failed to capture Gaofeng Pass or block reinforcements. Ito's unit on Yonglong Road intercepted by 131st at Xichangwei. On the 22nd, Imamura sent two companies from Nanning, intercepted by 188th near Suwei. Ito's battalion besieged in Xichangwei for three days, spared because 131st avoided close combat. Under air cover, both broke through to Nanning on the 26th. On November 21, Chiang was dissatisfied with Kunlun Pass progress, ordering: "If front-line troops and artillery fail to attack or complete tasks, they shall be punished for cowardice." By the 23rd, two divisions of 5th Army had over 2,000 casualties; Japanese over 1,000. Six days yielded no results, with reinforcements arriving. Du changed tactics to concentrate forces, tightening encirclement. On the 24th, Oikawa Detachment ordered back to Nanning, destroying captured materials and withdrawing from Longzhou and Zhennanguan. Bai learned some escaped, telegraphing Wei Yunsong: "If the second batch escapes, it affects the main force. The deputy commander-in-chief should be punished." Main force still escaped; local troops preserved strength, benefiting Japanese. On the main position, Zheng Tingji spotted Japanese officers meeting and ordered fire, inflicting heavy casualties, requiring airdropped officers. On the 25th, Second Regiment of First Division captured Luotang South Heights, annihilating over 200. From December 25, Fifth Army and 159th and 92nd Divisions occupied key high grounds. Fierce battle until December 31, capturing Kunlun Pass and Tianyin, killing Nakamura Masao, annihilating over 5,000. Following the intense clashes at Kunlun Pass, the battle's toll on the Japanese forces became starkly evident in the weeks that followed. On January 19, just a month after the fighting peaked, the Japanese rushed in 3,389 fresh replacements to replenish their battered 5th Division. This influx was distributed unevenly: 1,848 went to the 21st Infantry Regiment and 814 to the 42nd, figures that likely corresponded directly to the number of dead and seriously wounded who had been evacuated back home—though those with minor injuries weren't factored into these counts. The ferocity of the engagement was further underscored by the capture of numerous Japanese strongholds, where Chinese forces found that every defender had been killed, leaving no survivors behind. In many ways, this outcome represented a stunning annihilation for the Japanese, particularly the 21st Brigade, which was effectively wiped out. Key figures fell in the fray, including Brigade Commander Masao Nakamura, Acting Commander Sakata Genichi, Miki Yoshinosuke, along with various deputies and battalion commanders. The leadership losses were catastrophic: over 85% of officers above the squad leader level were killed. Japanese records themselves acknowledged more than 4,000 soldiers dead, painting a grim picture that their own war histories later described as "the darkest era for the army." On the Chinese side, the victory came at a heavy price, with over 10,000 casualties suffered, yet remarkably, the core officer corps remained largely intact, preserving command structure for future operations. Zooming out to the broader theater in December 1939, the Japanese 5th Division and the Taiwan Mixed Brigade found themselves holding the line against an overwhelming force of more than 150,000 Nationalist troops. At the same time, the Japanese 21st Army was shifting its focus to Guangdong Province in preparation for Operation Weng Ying, while the Oikawa Detachment—primarily composed of the 11th Infantry Regiment—pushed forward to Longzhou. They captured Zhennanguan on November 21, securing valuable stocks of fuel and arms in the process. However, these stretched deployments and insufficient troop numbers left the Japanese without adequate reserves when encirclement loomed at Kunlun Pass. Ultimately, they were forced to abandon their offensive plans in Guangdong, pulling back to consolidate defenses around Nanning. Meanwhile, from their base in Chongqing, Chinese commanders had meticulously planned the recapture, turning the tide through careful strategy and sheer determination. Shocked, Japanese dispatched Vice Chief of Staff Sawada Shigeru to Guangzhou. On December 29, 21st Army sent staff to Nanning. Failed to change 21st Brigade's defeat. Imamura planned personal charge for revenge on January 1, but Ando ordered holding Nanning for reinforcements: "The 21st Army is transferring powerful force to annihilate enemy. 5th Division secure Nanning and key locations." After capturing Kunlun Pass and annihilating two regiments of 21st Brigade, 5th Army thought to recapture Nanning. Remaining 21st Brigade and Taiwan regiments between Jiutang and Batang. At noon January 1, 1940, Oikawa's thousands arrived at Batang; Imamura ordered Oikawa replace killed Sakata. First battle on Hill 441. 1st Division held north side; Japanese south. On January 1, Japanese bombed and attacked; 1st Division reduced to hundred but held. At dawn 2nd, counterattack all day, no progress. On 3rd, Du mobilized 200th and part New 22nd; brutal fighting, heavy casualties. At nightfall, Japanese retreated to Jiutang. On 4th, Japanese abandoned Jiutang to Batang. New 22nd moved into Jiutang. 5th Army attacked Batang; by 12th, no progress. Exhausted with heavy casualties, 5th Army ordered to Silong for rest. Mission transferred to 36th Army. 5th Army withdrew. On January 7, Chiang flew to Guilin, visiting Qianjiang on 10th to discuss plans with Bai, Chen, Zhang, Xu, Lin. Bai proposed offensive with new armies to recapture Nanning. Chiang approved. On 11th, as Bai issued orders, Chiang overturned, changing to defensive. Japanese gained time for counter-offensive. To salvage defeat, Japanese transferred 18th Division and Konoye Brigade from Guangdong. Combined with existing, formed 22nd Corps under Seiichi Kuno, under South China Front Army commanded by Reikichi Ando, preparing counteroffensive. On January 25, a brigade from the Japanese 18th Division and elements of the 15th Division attacked frontally along Yongbin Road, while Konoye Brigade flanked toward Guizhou via Yongyong Road, in Binyang Campaign. Konoye crossed at Tingziwei, then Yongchun County, via Gantang, Luwei, Gula, Wuling to Binyang, cutting rear. Bai Chongxi rushed 175th Division of 46th Army north to tail Konoye. After reinforcements, 21st Army launched offensive to drive and encircle south of Binyang; accumulated supplies in Nanning. On January 22, 18th and Konoye reached attack points. 38th Army Group HQ in Binyang bombed, communications cut, independent combat. On January 28, Japanese launched offensive (Binyang Operation). On February 3, 41st Infantry of 5th Division occupied Kunlun Pass. On February 4, Ando reached captured Binyang. Nationalists lost Kunlun Pass, lines collapsed, many encircled. Battle ended with withdrawal; February 13, Japanese withdrew to Nanning, lines stalemated. In the wake of the Binyang clashes, the 18th Division was indeed shifted to Guangzhou. Japanese records from January 28 to February 13 painted a picture of their spoils: they claimed to have captured 19 tanks, 5 light armored vehicles, 30 automobiles, 20 field or mountain guns, 13 rapid-fire guns, and 41 mortars. Additionally, they reported counting 27,041 Chinese bodies on the battlefield and taking 1,167 prisoners. The Chinese forces, for their part, regrouped with their main strength positioned east of the Yongqin Highway, while some elements maneuvered west to harass Japanese rear lines and coordinate actions from the north bank. On February 21, 1940, Chiang arrived in Liuzhou, residing at Yangjiao Mountain. From February 22, he convened over 100 generals for a four-day Liuzhou Military Conference to review Guinan operations. Chiang demoted Bai Chongxi for poor supervision and Chen Cheng for poor guidance from first- to second-class generals. He also punished and rewarded other senior officers. The 46th Army and 175th Division were commended for discipline. On February 26, Fourth War Zone Commander Zhang Fakui announced: "No need for counterattack on Nanning currently." The entire Guinan Campaign ended. The defeat embarrassed Chongqing; not only disrupted Guangxi-Vietnam traffic, but massive effort ended in rout. Pre-battle, Guilin Headquarters misjudged Japanese intentions; during, both Guangxi and Huangpu clique leaders showed poor performance, infuriating Chiang. Post-battle punishments were unprecedented in the war. I would like to take this time to remind you all that this podcast is only made possible through the efforts of Kings and Generals over at Youtube. Please go subscribe to Kings and Generals over at Youtube and to continue helping us produce this content please check out www.patreon.com/kingsandgenerals. If you are still hungry after that, give my personal channel a look over at The Pacific War Channel at Youtube, it would mean a lot to me. In November 1939, Japanese forces, including the 5th Division and Taiwan Brigade, landed at Qinzhou Bay, captured Nanning, and advanced to Kunlun Pass. Chinese troops, under Bai Chongxi and reinforced by the elite 5th Army, launched fierce counteroffensives, recapturing Kunlun Pass in December with heavy casualties.
Pokemon Day 2026 is here! Celebrate the 30th anniversary of Pokemon with the Krewe by reliving the 25th anniversary of Pokemon! lol Digging deep in the vault to pull out a special Pokemon Day throwback to Season 1, Episode 3 of the podcast... where we have the WHOLE OG Krewe freshly hatched out of our podcast Pokemon egg! ++++++ In this episode, the Krewe gathers to discuss the iconic Japanese media franchise, Pokémon! Celebrating its 25th anniversary this February, Pokémon is the highest grossing media franchise in the world! From its anime and games, to trading cards and mobile apps, Pokémon truly unites people from across the world. Tune in to this episode to hear the krewe discuss the history, major moments, and each krewe member's favorite Pokémon! ------ About the Krewe ------ The Krewe of Japan Podcast is a weekly episodic podcast sponsored by the Japan Society of New Orleans. Check them out every Friday afternoon around noon CST on Apple, Google, Spotify, Amazon, Stitcher, or wherever you get your podcasts. Want to share your experiences with the Krewe? Or perhaps you have ideas for episodes, feedback, comments, or questions? Let the Krewe know by e-mail at kreweofjapanpodcast@gmail.com or on social media (Twitter: @kreweofjapan, Instagram: @kreweofjapanpodcast, Facebook: Krewe of Japan Podcast Page, TikTok: @kreweofjapanpodcast, LinkedIn: Krewe of Japan LinkedIn Page, Blue Sky Social: @kreweofjapan.bsky.social, & the Krewe of Japan Youtube Channel). Until next time, enjoy! ------ Support the Krewe! Offer Links for Affiliates ------ Use the referral links below & our promo code from the episode! Support your favorite NFL Team AND podcast! Shop NFLShop to gear up for football season! Zencastr Offer Link - Use my special link to save 30% off your 1st month of any Zencastr paid plan! ------ Past KOJ Pokemon/Nintendo Episodes ------ The History of Nintendo ft. Matt Alt (S4E18) The Evolution of PokéMania ft Daniel Dockery [Part 2] (S4E3) The Evolution of PokéMania ft Daniel Dockery [Part 1] (S4E2) We Love Pokemon: Celebrating 25 Years (S1E3) Why Japan? ft. Matt Alt (S1E1) ------ JSNO Upcoming Events ------ JSNO Event Calendar Join JSNO Today!
In the spirit of Carnival season, here's a special bonus rebroadcast of our Mardi Gras Super-Sized Special released in January 2025 about a unique connection between New Orleans, Japan & Mardi Gras that took place in 2024! ++++++2024 was a special year for Carnival and the Japan-New Orleans connection! Lafcadio Hearn's life & works inspired the theme for Rex Parade 2024: "The Two Worlds of Lafcadio Hearn - New Orleans & Japan". But why Hearn? What went into the float design? What other ways has Hearn left a lasting impact on both New Orleans & Japan? Find out today with a super-sized special Mardi Gras bonus episode, featuring insights from Rex historian/archivist Will French & historian/archivist emeritus Dr. Stephen Hales, Royal Artists float designer/artistic director Caroline Thomas, Lafcadio Hearn's great grandson Bon Koizumi, legendary chef John Folse, Captain of the Krewe of Lafcadio John Kelly, JSNO's resident Lafcadio Hearn expert Matthew Smith, and even the Mayor of Matsue Akihito Uesada! Get ready for Mardi Gras 2025 by reflecting on this unique connection between New Orleans & Japan!------ About the Krewe ------The Krewe of Japan Podcast is a weekly episodic podcast sponsored by the Japan Society of New Orleans. Check them out every Friday afternoon around noon CST on Apple, Google, Spotify, Amazon, Stitcher, or wherever you get your podcasts. Want to share your experiences with the Krewe? Or perhaps you have ideas for episodes, feedback, comments, or questions? Let the Krewe know by e-mail at kreweofjapanpodcast@gmail.com or on social media (Twitter: @kreweofjapan, Instagram: @kreweofjapanpodcast, Facebook: Krewe of Japan Podcast Page, TikTok: @kreweofjapanpodcast, LinkedIn: Krewe of Japan LinkedIn Page, Blue Sky Social: @kreweofjapan.bsky.social, & the Krewe of Japan Youtube Channel). Until next time, enjoy!------ Music Credits ------Background music provided by: Royalty Free Music by Giorgio Di Campo for Free Sound Music http://freesoundmusic.eu FreeSoundMusic on Youtube Link to Original Sound Clip------ Audio Clip Credits ------Thanks to Dominic Massa & everyone at WYES for allowing us to use some of the audio from the below Rex Clips:Segment about Royal Artist & Float DesignFull 2024 Rex Ball Coverage (Krewe of Lafcadio/Nicholls State segment)Thanks to Matsue City Hall & Mayor Akihito Uesada for their video message below:Message from Matsue Mayor Akihito Uesada------ Support the Krewe! Offer Links for Affiliates ------Use the referral links below & our promo code from the episode!Support your favorite NFL Team AND podcast! Shop NFLShop to gear up for football season!Zencastr Offer Link - Use my special link to save 30% off your 1st month of any Zencastr paid plan! ------ Past KOJ Hearn/Matsue/History Episodes ------30 Years, 2 Cities: The 2024 New Orleans-Matsue Exchange ft. Katherine Heller & Wade Trosclair (S6E11)From Tokyo to Treme: A Jazz Trombone Tale ft. Haruka Kikuchi (S6E10)Foreign-Born Samurai: William Adams ft. Nathan Ledbetter (Guest Host, Dr. Samantha Perez) (S5E17)Foreign-Born Samurai: Yasuke ft. Nathan Ledbetter (Guest Host, Dr. Samantha Perez) (S5E16)Explore Matsue ft. Nicholas McCullough (S4E19)Jokichi Takamine: The Earliest Bridge Between New Orleans & Japan ft. Stephen Lyman (S4E13)The Life & Legacy of Lafcadio Hearn ft. Bon & Shoko Koizumi (S1E9)Matsue & New Orleans: Sister Cities ft. Dr. Samantha Perez (S1E2)------ Links about Rex ------2024 Rex Parade/Float PDF with Full DesignsCaroline Thomas's Website------ JSNO Upcoming Events ------JSNO Event CalendarJoin JSNO Today!

Simon has a fascinating conversation with Iowa Mother & Son, Mary Jo Starnes and Chuck Bickel, about the incredible way their father/grandfather was not only a part of history but also documented one of the greatest days in American history. Joe Hightower was serving aboard the USS JEROME COUNTY, a LST-542 class tank landing ship, on Sept 2, 1945. He witnessed history that day in Tokyo Bay when the Japanese signed their surrender to the United States on the deck of the USS MISSOURI. Joe kept journals during his time in the military and decades later his daughter, Mary Jo, discovered and read them. With the help of her son, Chuck, they turned Joe's personal journals into an amazing book of his first-person account of history. Iowans - part of history, witnessing history, documenting history so history is never forgotten.
The teenagers who made up the US Naval Academy class of 1940 arrived in Annapolis as boys on the eve of Hitler's aggression and graduated as Europe collapsed, only to find themselves thrust into every major front of World War II, from Pearl Harbor to Tokyo Bay and Normandy. Renowned military historian Craig Symonds joins David M. Rubenstein to discuss the young men's sacrifice, loss, and extraordinary coming-of-age in history's deadliest conflict.Recorded on November 24, 2025

Send us a textHappy 2026. Thanks to Ona Christie Martin, if you listened to my end of year episode, then you know it is the year of the fire horse. She's incredible. And of the many mind-blowing statements she made during the course of that interview, one that has stood out again and again since we spoke, was be the rider, not the horse. Don't get caught leaning over the horse's head. Sit back in the saddle, hold the reigns and direct that fire horse. And one other gem? Turning circles with the horse IS productive. It calms the horse, and makes for a fruitful path forward.With fire on my mind, I got to thinking about Earth's Ring of Fire, a circle of fiery volcanoes in the Pacific Ocean.My first full panic attack occurred in a hotel room half a globe away from CASCADIA - but it was curiously part of Cascadia's legendary Ring of Fire. We were on the final days of a trip of a lifetime to Japan that included a visit to Disney's two parks - Disneyland and Tokyo Sea - which by the way was hands-down the best theme park I've ever been to before or since. Okay, back my first panic attack. We were staying in a hotel on Tokyo Bay and somewhere around 3am I woke up, heart racing, sweating, gasping in enough air not to faint. Everyone else remained asleep, which was better than them freaking out along with me. Heart pounding, sweating, crying. I basically thought I must be dying. If you've not experienced a panic attack, well, I hope you never do. As the worst of it began to subside, I had an urge to press my hands against something ice cold. The best I could find in the slim room was a window. I sobbed, wiping my face with a pajama sleeve. After fifteen minutes or so, the attack had run its course. Thinking back on that night, I believe while I slept in that hotel room on Tokyo Bay, a place rife with traumas, some as recent as World War II, I felt those residual energies, anger, fear, panic felt by Japanese citizens and soldiers alike. All those energies would be amplified by the geothermal activity, wouldn't they?The Ring of Fire is potent medicine for Earth, and maybe even for humanity. Let's get into it.Show Sources/MaterialsRing of Fire Basics, WikipediaWhat is the Pacific Ring of Fire? LiveScienceThe Cascade Range and the Ring of Fire, American Museum of Natural HistoryRing of Fire, Seismic Belt, Britannica.comThe Ring of Fire Is the Pacific'I don't accept sponsors and paid advertisers. I choose people, podcasts and authors I believe in to highlight in the ad segment. That's why I've been shining a spotlight on Derek Condit at Mystical Wares. He is both talented and generous with those gifts. Please give his books a look on the Mystical Wares website.Curious Cat Crew on Socials:Curious Cat on Twitter (X)Curious Cat on InstagramCurious Cat on TikTokArt Director, Nora, has a handmade, ethically-sourced jewelry company!

Note: This "Sound of Ideas" episode originally aired on Sept. 2, 2025 Sept. 2 is the 80th anniversary of the official end to World War II, weeks after fighting ended. It's the day when Japanese envoys formally signed the Instrument of Surrender aboard the U.S.S. Missouri in Tokyo Bay. And on this important anniversary, we wanted to talk about how this war completely changed the world order, transforming the U.S. to the leader of the free world. We'll discuss Ohio's role in the fight against fascism, and how locals are helping to preserve these experiences. Our collective memories of this war are fading, as each year, fewer and fewer people are alive to tell the stories of the men and women involved. According to the U.S. Department of Veterans Affairs, only about 45,000 of the 16 million Americans who served are still alive, and most are in their 90s or older. Tuesday on the “Sound of Ideas,” we'll look back on this milestone anniversary and how the echoes of World War II and the world order it created continue to influence policy and culture today. Guests:- Eric Rivet, Chief Curator, Western Reserve Historical Society- Paul Farace, President, U.S.S. Cod Submarine Memorial- Betsy Bashore, Chief Executive Officer & Vendor Coordinator, D-Day Ohio

Children are abducted by a suspicious man who calls himself a close friend of Kamen Rider. Later, Shocker schemes to turn Tokyo Bay into a sea of flames by pouring in petroleum from industrial areas.Twitter: @comicrundownInstagram: @comicbookrundownThreads: @comicbookrundownEmail: comicbookrundown@gmail.comHosted by Joe JaneroEdited by Joe JaneroOpen music from TokuSFXFind our t-shirts at TeePublic http://tee.pub/lic/vBbIJZ4eLQ0

What happens when the machinery of war is turned loose on the home front? In this episode of Built to Divide, host Dimitrius Lynch traces how the end of World War II, the GI Bill, and federal housing policy combined to build the largest middle-class expansion in U.S. history—while quietly deepening racial and economic division.Beginning with the surrender in Tokyo Bay and the massive demobilization of Operation Magic Carpet, Lynch follows millions of returning veterans back to a country racing to answer a simple question: Where will they all live? The answer reshaped the nation. FHA and VA loans, the rise of Fannie Mae, and the secondary mortgage market drove homeownership from 43% to nearly 62% by 1960, cementing the single-family house as the centerpiece of the American Dream.But this “great reset” came with a price. Lynch unpacks how zoning laws, redlining, racial covenants, and underwriting standards drew hard lines around who could belong in postwar suburbia. He contrasts the inclusive vision of Case Study Houses and Eichler Homes with the mass-produced segregation of Levittown, where black families were explicitly barred and violence met the first to cross the color line.From John Dean's warning about homeownership “booby traps” to the weaponization of media by business elites like Henry Regnery, this episode reveals how corporate interests used patriotism, racial fear, and Cold War anxiety to roll back New Deal gains and reframe government as the enemy. Along the way, Lynch explores how Fannie Mae's privatization, the birth of American Express credit cards, and the cultural glorification of the nuclear family turned housing into a speculative asset, a consumption engine, and a source of isolation.We end in Roseto, Pennsylvania, where a community's disappearing social bonds literally changed its heart attack rates—proof that how we house ourselves shapes how we live, connect, and survive.If you want to understand how postwar housing policy, suburbanization, zoning, media, and finance fused into a system that still determines who gets stability and who gets left behind, this episode shows how the board was reset—and who it was reset for.Episode Extras - Photos, videos, sources and links to additional content found during research. Episode Credits:Production in collaboration with Gābl MediaWritten & Executive Produced by Dimitrius LynchAudio Engineering and Sound Design by Jeff Alvarez

From the streets of London to the beaches of North Africa, Marines carried their purpose into every corner of a world at war. They trained with the Royal Marines, guarded embassies under fire, planned Allied landings, and fought in places where no division would ever march. When Japan fell, they raised the flag over Yokosuka and Nagasaki, guarded surrendered fleets, and kept order through the uneasy calm that followed. Peace offered no rest. The Corps faced demobilization, doubt, and then a new kind of war in Korea's frozen mountains. At Pusan, Inchon, and Chosin, they proved the spirit of the Pacific had not dimmed. Support the Series Listen ad-free and a week early on historyofthemarinecorps.supercast.com Donate directly at historyofthemarinecorps.com Try a free 30-day Audible trial at audible.com/marinehistory Social Media Instagram - @historyofthemarines Facebook - @marinehistory Twitter - @marinehistory
This week, the Krewe is joined by Loretta Scott (aka KemushiChan on YouTube Channel) for a personal, insightful, and often funny look at what it's like raising kids in Japan as an American parent. We dig into birth experiences, cultural differences from the U.S., unexpected parenting moments, and tips for families living in or visiting Japan. Curious about family life abroad or considering a trip to Japan with the munchkins? This episode is packed with helpful insight just for you!------ About the Krewe ------The Krewe of Japan Podcast is a weekly episodic podcast sponsored by the Japan Society of New Orleans. Check them out every Friday afternoon around noon CST on Apple, Google, Spotify, Amazon, Stitcher, or wherever you get your podcasts. Want to share your experiences with the Krewe? Or perhaps you have ideas for episodes, feedback, comments, or questions? Let the Krewe know by e-mail at kreweofjapanpodcast@gmail.com or on social media (Twitter: @kreweofjapan, Instagram: @kreweofjapanpodcast, Facebook: Krewe of Japan Podcast Page, TikTok: @kreweofjapanpodcast, LinkedIn: Krewe of Japan LinkedIn Page, Blue Sky Social: @kreweofjapan.bsky.social, & the Krewe of Japan Youtube Channel). Until next time, enjoy!------ Support the Krewe! Offer Links for Affiliates ------Use the referral links below!Zencastr Offer Link - Use my special link to save 30% off your 1st month of any Zencastr paid plan! ------ Links for Tobias Harris ------Loretta on InstagramKemushiChan YouTube Channel------ Past Language Learning Episodes ------Inside Japanese Language Schools ft. Langston Hill (S6E3)Japanese Self-Study Strategies ft. Walden Perry (S5E4)Learn the Kansai Dialect ft. Tyson of Nihongo Hongo (S4E14)Heisig Method ft. Dr. James Heisig (S4E5)Prepping for the JLPT ft. Loretta of KemushiCan (S3E16)Language Through Video Games ft. Matt of Game Gengo (S3E4)Pitch Accent (Part 2) ft. Dogen (S2E15)Pitch Accent (Part 1) ft. Dogen (S2E14)Language through Literature ft. Daniel Morales (S2E8)Immersion Learning ft. MattvsJapan (S1E10)Japanese Language Journeys ft. Saeko-Sensei (S1E4)------ JSNO Upcoming Events ------JSNO Event CalendarJoin JSNO Today!
Japan's political scene is changing—from new parties rising in visibility to historic moments in national leadership—so the Krewe is bringing you a timely crash course. Political analyst Tobias Harris (Founder & Principal of Japan Foresight) joins the pod to break down the foundations of Japan's government system, how it compares to the U.S., and why voters view politics the way they do. We explore the major and emerging parties shaping the landscape, the issues driving debate today, and how international pressures and global events influence domestic policy. Tobias also sheds light on the media's role in shaping public perception and political accountability.------ About the Krewe ------The Krewe of Japan Podcast is a weekly episodic podcast sponsored by the Japan Society of New Orleans. Check them out every Friday afternoon around noon CST on Apple, Google, Spotify, Amazon, Stitcher, or wherever you get your podcasts. Want to share your experiences with the Krewe? Or perhaps you have ideas for episodes, feedback, comments, or questions? Let the Krewe know by e-mail at kreweofjapanpodcast@gmail.com or on social media (Twitter: @kreweofjapan, Instagram: @kreweofjapanpodcast, Facebook: Krewe of Japan Podcast Page, TikTok: @kreweofjapanpodcast, LinkedIn: Krewe of Japan LinkedIn Page, Blue Sky Social: @kreweofjapan.bsky.social, & the Krewe of Japan Youtube Channel). Until next time, enjoy!------ Support the Krewe! Offer Links for Affiliates ------Use the referral links below!Zencastr Offer Link - Use my special link to save 30% off your 1st month of any Zencastr paid plan! ------ Links for Tobias Harris ------Japan ForesightObserving Japan on SubstackThe Iconoclast on AmazonTobias Harris on BlueSky------ Past History/Society Episodes ------The Castles of Japan ft. William de Lange S5E19)Foreign-Born Samurai: William Adams ft. Nathan Ledbetter (Guest Host, Dr. Samantha Perez) (S5E17)Foreign-Born Samurai: Yasuke ft. Nathan Ledbetter (Guest Host, Dr. Samantha Perez) (S5E16)Change in Urban & Rural Japanese Communities ft. Azby Brown (S5E15)Inside Japanese Homes & Architecture ft. Azby Brown (S5E6)Kendo: The Way of the Sword ft. Alexander Bennett, 7th Dan in Kendo (S4E16)Jokichi Takamine: The Earliest Bridge Between New Orleans & Japan ft. Stephen Lyman (S4E13)The Chrysanthemum Throne ft. Dr. Hiromu Nagahara [Part 2] (S2E18)The Chrysanthemum Throne ft. Dr. Hiromu Nagahara [Part 1] (S2E17)The Age of Lady Samurai ft. Tomoko Kitagawa (S1E12)------ JSNO Upcoming Events ------JSNO Event CalendarJoin JSNO Today!
Step into the world of tokusatsu with Ultraman Max director Takeshi Yagi! The Krewe chats with Yagi-san about the artistry, imagination, and behind-the-scenes magic that bring Ultraman and Japan's iconic heroes & monsters to life. Discover how tokusatsu continues to inspire fans around the world.------ About the Krewe ------The Krewe of Japan Podcast is a weekly episodic podcast sponsored by the Japan Society of New Orleans. Check them out every Friday afternoon around noon CST on Apple, Google, Spotify, Amazon, Stitcher, or wherever you get your podcasts. Want to share your experiences with the Krewe? Or perhaps you have ideas for episodes, feedback, comments, or questions? Let the Krewe know by e-mail at kreweofjapanpodcast@gmail.com or on social media (Twitter: @kreweofjapan, Instagram: @kreweofjapanpodcast, Facebook: Krewe of Japan Podcast Page, TikTok: @kreweofjapanpodcast, LinkedIn: Krewe of Japan LinkedIn Page, Blue Sky Social: @kreweofjapan.bsky.social, & the Krewe of Japan Youtube Channel). Until next time, enjoy!------ Support the Krewe! Offer Links for Affiliates ------Use the referral links below!Zencastr Offer Link - Use my special link to save 30% off your 1st month of any Zencastr paid plan! ------ Links for Takeshi Yagi ------Takeshi Yagi on InstagramTakeshi Yagi on X/TwitterTakeshi Yagi's WebsiteTakeshi Yagi's Blog (JP)Takeshi Yagi's New Book (Releasing Nov 19, 2025)Wikizilla Page on AKARI------ Past Tokusatsu/Pop Culture Episodes ------Enjoying Shojo Anime & Manga ft. Taryn of Manga Lela (S5E18)Akira Toriyama: Legacy of a Legend ft. Matt Alt (S5E3)The History & Evolution of Godzilla ft. Dr. William (Bill) Tsutsui (S5E1)Thoughts on Godzilla Minus One ft. Dr. William (Bill) Tsutsui (S4Bonus)The History of Nintendo ft. Matt Alt (S4E18)Japanese Mascot Mania ft. Chris Carlier of Mondo Mascots (S4E8)Tokusatsu Talk with a Super Sentai ft. Sotaro Yasuda aka GekiChopper (S4E6)The Evolution of PokéMania ft Daniel Dockery [Part 2] (S4E3)The Evolution of PokéMania ft Daniel Dockery [Part 1] (S4E2)Japanese Independent Film Industry ft. Award Winning Director Eiji Uchida (S3E18)How Marvel Comics Changed Tokusatsu & Japan Forever ft Gene & Ted Pelc (Guest Host, Matt Alt) (S3E13)Talking Shonen Anime Series ft. Kyle Hebert (S3E10)Japanese Arcades (S2E16)How to Watch Anime: Subbed vs. Dubbed ft. Dan Woren (S2E9)Manga: Literature & An Art Form ft. Danica Davidson (S2E3)The Fantastical World of Studio Ghibli ft. Steve Alpert (S2E1)The Greatest Anime of All Time Pt. 3: Modern Day Anime (2010's-Present) (S1E18)The Greatest Anime of All Time Pt. 2: The Golden Age (1990's-2010's) (S1E16)The Greatest Anime of All Time Pt. 1: Nostalgia (60's-80's) (S1E5)We Love Pokemon: Celebrating 25 Years (S1E3)Why Japan ft. Matt Alt (S1E1)------ JSNO Upcoming Events ------JSNO Event CalendarJoin JSNO Today!
In this week's episode, joined by 2024 New Orleans-Matsue Sister City Exchange Program participants Katherine Heller & Wade Trosclair, the Krewe looks back & celebrates 30 years of friendship between Matsue, Japan & New Orleans, Louisiana... a sister city relationship built on cultural exchange, mutual curiosity, &shared spirit. Together, they reflect on their time in Matsue during the exchange program, their experiences with host families, and the deep connections that form when two communities separated by an ocean come together.------ About the Krewe ------The Krewe of Japan Podcast is a weekly episodic podcast sponsored by the Japan Society of New Orleans. Check them out every Friday afternoon around noon CST on Apple, Google, Spotify, Amazon, Stitcher, or wherever you get your podcasts. Want to share your experiences with the Krewe? Or perhaps you have ideas for episodes, feedback, comments, or questions? Let the Krewe know by e-mail at kreweofjapanpodcast@gmail.com or on social media (Twitter: @kreweofjapan, Instagram: @kreweofjapanpodcast, Facebook: Krewe of Japan Podcast Page, TikTok: @kreweofjapanpodcast, LinkedIn: Krewe of Japan LinkedIn Page, Blue Sky Social: @kreweofjapan.bsky.social, & the Krewe of Japan Youtube Channel). Until next time, enjoy!------ Support the Krewe! Offer Links for Affiliates ------Use the referral links below & our promo code from the episode (timestamps [hh:mm:ss] where you can find the code)!Support your favorite NFL Team AND podcast! Shop NFLShop to gear up for football season!Zencastr Offer Link - Use my special link to save 30% off your 1st month of any Zencastr paid plan! (00:53:00)------ Past Matsue/Sister City Episodes ------Lafcadio Hearn: 2024 King of Carnival (S5Bonus)Explore Matsue ft. Nicholas McCullough (S4E19)Jokichi Takamine: The Earliest Bridge Between New Orleans & Japan ft. Stephen Lyman (S4E13)The Life & Legacy of Lafcadio Hearn ft. Bon & Shoko Koizumi (S1E9)Matsue & New Orleans: Sister Cities ft. Dr. Samantha Perez (S1E2)------ Links about the Exchange ------2024 Exchange Program Info/PicturesShogun Martial Arts Dojo (Katie's family's dojo)------ JSNO Upcoming Events ------JSNO Event CalendarJoin JSNO Today!
The Krewe sits down with Haruka Kikuchi, a Japanese jazz trombonist making waves in New Orleans. From discovering jazz in Japan to second-lining through the Crescent City, Haruka shares her story of finding home through music — and how jazz bridges cultures across oceans. ------ About the Krewe ------The Krewe of Japan Podcast is a weekly episodic podcast sponsored by the Japan Society of New Orleans. Check them out every Friday afternoon around noon CST on Apple, Google, Spotify, Amazon, Stitcher, or wherever you get your podcasts. Want to share your experiences with the Krewe? Or perhaps you have ideas for episodes, feedback, comments, or questions? Let the Krewe know by e-mail at kreweofjapanpodcast@gmail.com or on social media (Twitter: @kreweofjapan, Instagram: @kreweofjapanpodcast, Facebook: Krewe of Japan Podcast Page, TikTok: @kreweofjapanpodcast, LinkedIn: Krewe of Japan LinkedIn Page, Blue Sky Social: @kreweofjapan.bsky.social, & the Krewe of Japan Youtube Channel). Until next time, enjoy!------ Support the Krewe! Offer Links for Affiliates ------Use the referral links below & our promo code from the episode (timestamps [hh:mm:ss] where you can find the code)!Support your favorite NFL Team AND podcast! Shop NFLShop to gear up for football season!Zencastr Offer Link - Use my special link to save 30% off your 1st month of any Zencastr paid plan! (00:53:00)------ Past Music Episodes ------S5E13 - The Thunderous Sounds of Taiko ft. Takumi Kato (加藤 拓三), World Champion Taiko DrummerS5E10 - The Japanese Pop Music Scene ft. Patrick St. MichelS4E1 - Shamisen: Musical Sounds of Traditional Japan ft. Norm Nakamura of Tokyo LensS3E14 - City Pop & Yu ft. Yu HayamiS3E1 - Exploring Enka ft. Jerome White Jr aka ジェロ / Jero------ Links about Haruka ------Haruka's Website Haruka on IGHaruka on FacebookHaruka on YouTubeGoFundMe to Help Support Haruka's Family------ JSNO Upcoming Events ------JSNO Event CalendarJoin JSNO Today!
7. Kamikazes, Typhoons, and the Unstoppable Halsey AUTHOR: Professor Craig Symonds BOOK TITLE: Nimitz at War: Command Leadership from Pearl Harbor to Tokyo Bay Admiral Halsey recklessly navigated his fleet through two major typhoons (December 1944 and June 1945), causing severe losses including three ships sunk and 800 lives lost in the first storm. Despite recommendations for dismissal, Nimitz refused to fire Halsey, using calculated risk that removing the popular, iconic commander would negatively impact American morale. Nimitz moved his headquarters to Guam to be closer to the fighting. At Iwo Jima, Marine commanders argued the Navy provided inadequate preparatory gunfire, though the Japanese tactic of fighting to the death was the primary cause of casualties. During the Okinawa campaign, the Japanese introduced the terrifying Kamikaze tactic—the one element Nimitz noted the Naval War College had not anticipated. The Kamikazes inflicted horrific losses, but ultimately failed to force negotiations. 8. Blockade vs. Invasion: Ending the Pacific War and Post-War Command AUTHOR: Professor Craig Symonds BOOK TITLE: Nimitz at War: Command Leadership from Pearl Harbor to Tokyo Bay Nimitz and King opposed the planned invasion of the Japanese home islands (Operation Downfall), arguing that a strict naval blockade, executed primarily by submarines, combined with bombing, would force surrender. They calculated that an invasion would cost hundreds of thousands of American lives and millions of Japanese lives, given the culture of fighting to the death. Nimitz was informed about the secret development of a special weapon (the atomic bomb) in March 1945 to ensure targets were reserved. After the war ended, Nimitz was the logical candidate for Chief of Naval Operations (CNO), though he faced opposition from the aviation community (Towers). He accepted a two-year term as CNO. Admiral Spruance declined high command, instead choosing to become President of the Naval War College to teach future officers the lessons learned in the Pacific War.
8. Blockade vs. Invasion: Ending the Pacific War and Post-War Command AUTHOR: Professor Craig Symonds BOOK TITLE: Nimitz at War: Command Leadership from Pearl Harbor to Tokyo Bay Nimitz and King opposed the planned invasion of the Japanese home islands (Operation Downfall), arguing that a strict naval blockade, executed primarily by submarines, combined with bombing, would force surrender. They calculated that an invasion would cost hundreds of thousands of American lives and millions of Japanese lives, given the culture of fighting to the death. Nimitz was informed about the secret development of a special weapon (the atomic bomb) in March 1945 to ensure targets were reserved. After the war ended, Nimitz was the logical candidate for Chief of Naval Operations (CNO), though he faced opposition from the aviation community (Towers). He accepted a two-year term as CNO. Admiral Spruance declined high command, instead choosing to become President of the Naval War College to teach future officers the lessons learned in the Pacific War.
1. Nimitz Takes Command at Pearl Harbor: Manager vs. Fighter AUTHOR: Professor Craig Symonds BOOK TITLE: Nimitz at War: Command Leadership from Pearl Harbor to Tokyo Bay Chester Nimitz arrived at Pearl Harbor by seaplane on Christmas 1941 to take over a wrecked command, tasked with bringing stability and recovery. He was chosen by FDR and Secretary Knox, who knew him personally from his time as Bureau Chief of Naval Personnel. Admiral Ernest King, however, was initially skeptical, viewing Nimitz as a "fixer" or manager, doubting his toughness. Nimitz, despite private anxieties, maintained a calm, confident presence for his staff. A key irony is that Nimitz had previously suggested a more senior officer (Kimmel) take the Pacific Fleet command, saving himself from being the victim of the Japanese attack. The Navy's internal "brown shoes" (aviators) versus "black shoes" rivalry is also introduced. 1890 USS NAHUNT
2. Calculated Risk and Critical Intelligence: Setting the Stage for Midway AUTHOR: Professor Craig Symonds BOOK TITLE: Nimitz at War: Command Leadership from Pearl Harbor to Tokyo Bay Following the Pearl Harbor attack, Nimitz was urged by King to "Attack, attack, attack," despite inadequate resources. Nimitz applied his concept of calculated risk, developed at the Naval War College, assessing the benefit to be derived against the risk assumed. Nimitz viewed the Doolittle Raid as a "public relations stunt," but chose not to fight the scheme, even though it used 50% of his offensive carrier capability. Crucial to Nimitz's success was intelligence derived from Japanese radio traffic by Lieutenant Commander Joseph Rochefort's cryptanalysis group, relayed by Eddie Layton. Nimitz deployed forces for the Battle of the Coral Sea (the first battle where ships never sighted each other). For Midway, Nimitz replaced the ill Admiral Halsey with the quiet, non-aviator Raymond Spruance. Nimitz later temporarily relieved aviator Marc Mitscher for disguising a misstep in an after-action report.
3. Guadalcanal, Ghormley's Struggle, and Nimitz's Personal Management AUTHOR: Professor Craig Symonds BOOK TITLE: Nimitz at War: Command Leadership from Pearl Harbor to Tokyo Bay Despite the "Europe first" strategy, the success of Midway prompted King to push for an immediate offensive. The target shifted from the Santa Cruz Islands to Guadalcanal in August 1942 when news arrived that the Japanese were building an airfield there. This amphibious operation began "on a shoestring" with inadequate supplies. Nimitz managed the pressure by adhering to a routine, power walking up to 10 miles daily, and finding respite with the Walker family. Admiral Ghormley, commanding the operation from Noumea, struggled due to inadequate resources, illness, and excessive caution. Nimitz sympathized with Ghormley's dilemma but felt he needed to be more proactive. The segment also notes King's unjustified animosity toward Admiral Fletcher. 1905 DINNER WITH TR
4. The Aggressive Commander: Nimitz Appoints Bull Halsey AUTHOR: Professor Craig Symonds BOOK TITLE: Nimitz at War: Command Leadership from Pearl Harbor to Tokyo Bay Perceiving that Admiral Ghormley was too cautious and in poor health, Nimitz replaced him with Admiral William "Bull" Halsey to rescue the precarious situation at Guadalcanal. Nimitz knew Halsey's aggressive nature ("Kill Japs. Kill Japs. Kill more Japs.") and used him primarily for "cavalry charges," preferring Spruance for thoughtful planning. While Halsey's attack strategy led to some naval losses, Nimitz appreciated his belligerent approach against the Japanese strategy of attrition. Halsey and General Douglas MacArthur, co-commanders of separate theaters, met in Brisbane; MacArthur avoided a clash by charming Halsey to ensure cooperation. The strategic debate between MacArthur's South Pacific route to the Philippines and the Navy's preferred Central Pacific island-hopping campaign is introduced. 1911 USS MAINE IN HAVANA HARBOR
5. Tarawa, Towers' Rivalry, and the Kwajalein Calculated Risk AUTHOR: Professor Craig Symonds BOOK TITLE: Nimitz at War: Command Leadership from Pearl Harbor to Tokyo Bay The Central Pacific campaign began with the bloody amphibious landing at Tarawa in November 1943. High casualties resulted from a neap tide stranding landing craft on a coral shelf, infuriating Marine General Holland "Howling Mad" Smith. Nimitz had to manage internal conflicts, including Deputy Commander Admiral John Towers, who was foisted upon him by King. Towers was difficult because he believed only aviators should hold carrier command, creating tension with black shoe officers like Nimitz and Spruance. Nimitz, believing in second chances, restored Marc Mitscher to a carrier command, against Spruance's wishes. Learning lessons from Tarawa's bloodshed, Nimitz applied a calculated risk by overriding his subordinates and attacking the main Japanese base at Kwajalein directly, succeeding quickly with minimal loss.
6. Spruance vs. Halsey: Priorities at the Philippine Sea and Leyte Gulf AUTHOR: Professor Craig Symonds BOOK TITLE: Nimitz at War: Command Leadership from Pearl Harbor to Tokyo Bay During the Battle of the Philippine Sea ("Turkey Shoot") supporting the Marianas landings, Admiral Spruance prioritized protecting the Saipan beachhead. He refused Marc Mitscher's request to chase the Japanese fleet, resulting in the destruction of Japanese naval air power but generating resentment among aviators. The Battle of Leyte Gulf exposed Halsey's vulnerability to bait. The Japanese used their carriers as decoys to draw Halsey's Third Fleet north, allowing battleships to threaten the Leyte invasion force. Nimitz, hesitant to interfere, sent an inquiry asking, "Where's Task Force 34?" Halsey misinterpreted the message's padding, "The whole world wonders," as a rebuke, leading to a furious, hour-long sulk before he acted.
DIY Enthusiast & the man behind "Anton in Japan" YouTube Channel, Anton Wörmann joins the Krewe to talk about akiya, Japan's abandoned home phenomenon, and how he's transforming them into stunning spaces. We dig into what it's like to buy, clear out, & renovate an akiya and how Anton's journey from fashion to DIY restoration is reshaping what “home” means in Japan.------ About the Krewe ------The Krewe of Japan Podcast is a weekly episodic podcast sponsored by the Japan Society of New Orleans. Check them out every Friday afternoon around noon CST on Apple, Google, Spotify, Amazon, Stitcher, or wherever you get your podcasts. Want to share your experiences with the Krewe? Or perhaps you have ideas for episodes, feedback, comments, or questions? Let the Krewe know by e-mail at kreweofjapanpodcast@gmail.com or on social media (Twitter: @kreweofjapan, Instagram: @kreweofjapanpodcast, Facebook: Krewe of Japan Podcast Page, TikTok: @kreweofjapanpodcast, LinkedIn: Krewe of Japan LinkedIn Page, Blue Sky Social: @kreweofjapan.bsky.social, & the Krewe of Japan Youtube Channel). Until next time, enjoy!------ Support the Krewe! Offer Links for Affiliates ------Use the referral links below & our promo code from the episode (timestamps [hh:mm:ss] where you can find the code)!Support your favorite NFL Team AND podcast! Shop NFLShop to gear up for football season!Zencastr Offer Link - Use my special link to save 30% off your 1st month of any Zencastr paid plan! (00:53:00)------ Past Home & Architecture Episodes ------S5E15 - Change in Urban & Rural Japanese Communities ft. Azby BrownS5E6 - Inside Japanese Homes & Architecture ft. Azby BrownS3E2 - Buying Real Estate in Japan ft. Ziv Nakajima-Magen------ Links about Anton ------Anton in Japan YouTube ChannelAnton on IGAnton in Japan Website & ResourcesAnton on TikTokAnton's Live Master Class on Oct 12 @ 10am JST (Sign Up!)Anton's Akiya Master Class Program------ JSNO Upcoming Events ------JSNO Event CalendarJoin JSNO Today!

Welcome to Day 2709 of Wisdom-Trek. Thank you for joining me. This is Guthrie Chamberlain, Your Guide to Wisdom Day 2709 – A Clean Life - Strong Warnings About the World 1 John 2_12-17 Putnam Church Message – 08/31/2025 Sermon Series: 1, 2, & 3 John “A Clean Life – Strong Warnings About the World.” Last week, we explored 1 John 2:1-11 as we learned the seven rules on how to live a ‘Clean Life' with “Wise Words from a Family Meeting.” This week, we continue through the letter of 1 John, and we will cover 1 John 2:12-17 as we explore how to live a ‘Clean Life' with “Strong Warnings About the World.” Let's read 1 John 2:12-17 from the NIV, which is found on page 1900 of your Pew Bibles. 12 12 I am writing to you, dear children, because your sins have been forgiven on account of his name. 13 I am writing to you, fathers, because you know him who is from the beginning. I am writing to you, young men, because you have overcome the evil one. 14 I write to you, dear children, because you know the Father. I write to you, fathers, because you know him who is from the beginning. I write to you, young men, because you are strong, and the word of God lives in you, and you have overcome the evil one. On Not Loving the World 15 Do not love the world or anything in the world. If anyone loves the world, love for the Father[a] is not in them. 16 For everything in the world—the lust of the flesh, the lust of the eyes, and the pride of life—comes not from the Father but from the world. 17 The world and its desires pass away, but whoever does the will of God lives forever. Opening Prayer When danger draws near, a warning is in order. And the greater the danger, the more vital the warning. Let me share a story from a long-time pastor and President of Dallas Theological Seminary, Chuck Swindoll. I will share it in the first person as he did. /When I think of warnings, my mind goes back over sixty years to when I found myself standing on the deck of a massive troopship, seeing the city of Yokohama, Japan, in the distance, just across the Tokyo Bay. Our ship was slowly snaking its way through the bay because there were still some naval mines lurking beneath those waters—leftovers from World War II. As the pilot was guiding us carefully, a full colonel called some thirty-five hundred Marines to an assembly. He called us together to give us a warning. Great danger drew near. Not the physical danger of the naval mines. Those could be easily navigated. He had other dangers in mind … dangers lurking not in Tokyo Bay but in the streets of Yokohama, where thousands of pent-up Marines were about to be unleashed. “All of you, listen up,” he said. “For many of you, you will be the foreigner for the first time in your lives. You're going to be walking in an area you've never walked before. You'll be among people who speak a language you've never spoken before. You'll be...
Last time we spoke about the surrender of Japan. Emperor Hirohito announced the surrender on August 15, prompting mixed public reactions: grief, shock, and sympathy for the Emperor, tempered by fear of hardship and occupation. The government's response included resignations and suicide as new leadership was brought in under Prime Minister Higashikuni, with Mamoru Shigemitsu as Foreign Minister and Kawabe Torashiro heading a delegation to Manila. General MacArthur directed the occupation plan, “Blacklist,” prioritizing rapid, phased entry into key Japanese areas and Korea, while demobilizing enemy forces. The surrender ceremony occurred aboard the Missouri in Tokyo Bay on September 2, with Wainwright, Percival, Nimitz, and UN representatives in attendance. Civilians and soldiers across Asia began surrendering, and postwar rehabilitation, Indochina and Vietnam's independence movements, and Southeast Asian transitions rapidly unfolded as Allied forces established control. This episode is the Aftermath of the Pacific War Welcome to the Pacific War Podcast Week by Week, I am your dutiful host Craig Watson. But, before we start I want to also remind you this podcast is only made possible through the efforts of Kings and Generals over at Youtube. Perhaps you want to learn more about world war two? Kings and Generals have an assortment of episodes on world war two and much more so go give them a look over on Youtube. So please subscribe to Kings and Generals over at Youtube and to continue helping us produce this content please check out www.patreon.com/kingsandgenerals. If you are still hungry for some more history related content, over on my channel, the Pacific War Channel you can find a few videos all the way from the Opium Wars of the 1800's until the end of the Pacific War in 1945. The Pacific War has ended. Peace has been restored by the Allies and most of the places conquered by the Japanese Empire have been liberated. In this post-war period, new challenges would be faced for those who won the war; and from the ashes of an empire, a defeated nation was also seeking to rebuild. As the Japanese demobilized their armed forces, many young boys were set to return to their homeland, even if they had previously thought that they wouldn't survive the ordeal. And yet, there were some cases of isolated men that would continue to fight for decades even, unaware that the war had already ended. As we last saw, after the Japanese surrender, General MacArthur's forces began the occupation of the Japanese home islands, while their overseas empire was being dismantled by the Allies. To handle civil administration, MacArthur established the Military Government Section, commanded by Brigadier-General William Crist, staffed by hundreds of US experts trained in civil governance who were reassigned from Okinawa and the Philippines. As the occupation began, Americans dispatched tactical units and Military Government Teams to each prefecture to ensure that policies were faithfully carried out. By mid-September, General Eichelberger's 8th Army had taken over the Tokyo Bay region and began deploying to occupy Hokkaido and the northern half of Honshu. Then General Krueger's 6th Army arrived in late September, taking southern Honshu and Shikoku, with its base in Kyoto. In December, 6th Army was relieved of its occupation duties; in January 1946, it was deactivated, leaving the 8th Army as the main garrison force. By late 1945, about 430,000 American soldiers were garrisoned across Japan. President Truman approved inviting Allied involvement on American terms, with occupation armies integrated into a US command structure. Yet with the Chinese civil war and Russia's reluctance to place its forces under MacArthur's control, only Australia, Britain, India, and New Zealand sent brigades, more than 40,000 troops in southwestern Japan. Japanese troops were gradually disarmed by order of their own commanders, so the stigma of surrender would be less keenly felt by the individual soldier. In the homeland, about 1.5 million men were discharged and returned home by the end of August. Demobilization overseas, however, proceeded, not quickly, but as a long, difficult process of repatriation. In compliance with General Order No. 1, the Japanese Imperial General Headquarters disbanded on September 13 and was superseded by the Japanese War Department to manage demobilization. By November 1, the homeland had demobilized 2,228,761 personnel, roughly 97% of the Homeland Army. Yet some 6,413,215 men remained to be repatriated from overseas. On December 1, the Japanese War Ministry dissolved, and the First Demobilization Ministry took its place. The Second Demobilization Ministry was established to handle IJN demobilization, with 1,299,868 sailors, 81% of the Navy, demobilized by December 17. Japanese warships and merchant ships had their weapons rendered inoperative, and suicide craft were destroyed. Forty percent of naval vessels were allocated to evacuations in the Philippines, and 60% to evacuations of other Pacific islands. This effort eventually repatriated about 823,984 men to Japan by February 15, 1946. As repatriation accelerated, by October 15 only 1,909,401 men remained to be repatriated, most of them in the Soviet Union. Meanwhile, the Higashikuni Cabinet and Foreign Minister Shigemitsu Mamoru managed to persuade MacArthur not to impose direct military rule or martial law over all of Japan. Instead, the occupation would be indirect, guided by the Japanese government under the Emperor's direction. An early decision to feed occupation forces from American supplies, and to allow the Japanese to use their own limited food stores, helped ease a core fear: that Imperial forces would impose forced deliveries on the people they conquered. On September 17, MacArthur transferred his headquarters from Yokohama to Tokyo, setting up primary offices on the sixth floor of the Dai-Ichi Mutual Life Insurance Building, an imposing edifice overlooking the moat and the Imperial palace grounds in Hibiya, a symbolic heart of the nation. While the average soldier did not fit the rapacious image of wartime Japanese propagandists, occupation personnel often behaved like neo-colonial overlords. The conquerors claimed privileges unimaginable to most Japanese. Entire trains and train compartments, fitted with dining cars, were set aside for the exclusive use of occupation forces. These silenced, half-empty trains sped past crowded platforms, provoking ire as Japanese passengers were forced to enter and exit packed cars through punched-out windows, or perch on carriage roofs, couplings, and running boards, often with tragic consequences. The luxury express coaches became irresistible targets for anonymous stone-throwers. During the war, retrenchment measures had closed restaurants, cabarets, beer halls, geisha houses, and theatres in Tokyo and other large cities. Now, a vast leisure industry sprang up to cater to the needs of the foreign occupants. Reopened restaurants and theatres, along with train stations, buses, and streetcars, were sometimes kept off limits to Allied personnel, partly for security, partly to avoid burdening Japanese resources, but a costly service infrastructure was built to the occupiers' specifications. Facilities reserved for occupation troops bore large signs reading “Japanese Keep Out” or “For Allied Personnel Only.” In downtown Tokyo, important public buildings requisitioned for occupation use had separate entrances for Americans and Japanese. The effect? A subtle but clear colour bar between the predominantly white conquerors and the conquered “Asiatic” Japanese. Although MacArthur was ready to work through the Japanese government, he lacked the organizational infrastructure to administer a nation of 74 million. Consequently, on October 2, MacArthur dissolved the Military Government Section and inaugurated General Headquarters, Supreme Commander for the Allied Powers, a separate headquarters focused on civil affairs and operating in tandem with the Army high command. SCAP immediately assumed responsibility for administering the Japanese home islands. It commandeered every large building not burned down to house thousands of civilians and requisitioned vast tracts of prime real estate to quarter several hundred thousand troops in the Tokyo–Yokohama area alone. Amidst the rise of American privilege, entire buildings were refurbished as officers' clubs, replete with slot machines and gambling parlours installed at occupation expense. The Stars and Stripes were hoisted over Tokyo, while the display of the Rising Sun was banned; and the downtown area, known as “Little America,” was transformed into a US enclave. The enclave mentality of this cocooned existence was reinforced by the arrival within the first six months of roughly 700 American families. At the peak of the occupation, about 14,800 families employed some 25,000 Japanese servants to ease the “rigours” of overseas duty. Even enlisted men in the sparse quonset-hut towns around the city lived like kings compared with ordinary Japanese. Japanese workers cleaned barracks, did kitchen chores, and handled other base duties. The lowest private earned a 25% hardship bonus until these special allotments were discontinued in 1949. Most military families quickly adjusted to a pampered lifestyle that went beyond maids and “boys,” including cooks, laundresses, babysitters, gardeners, and masseuses. Perks included spacious quarters with swimming pools, central heating, hot running water, and modern plumbing. Two observers compared GHQ to the British Raj at its height. George F. Kennan, head of the State Department's Policy Planning Staff, warned during his 1948 mission to Japan that Americans had monopolized “everything that smacks of comfort or elegance or luxury,” criticizing what he called the “American brand of philistinism” and the “monumental imperviousness” of MacArthur's staff to the Japanese suffering. This conqueror's mentality also showed in the bullying attitudes many top occupation officials displayed toward the Japanese with whom they dealt. Major Faubion Bowers, MacArthur's military secretary, later said, “I and nearly all the occupation people I knew were extremely conceited and extremely arrogant and used our power every inch of the way.” Initially, there were spasms of defiance against the occupation forces, such as anonymous stone-throwing, while armed robbery and minor assaults against occupation personnel were rife in the weeks and months after capitulation. Yet active resistance was neither widespread nor organized. The Americans successfully completed their initial deployment without violence, an astonishing feat given a heavily armed and vastly superior enemy operating on home terrain. The average citizen regarded the occupation as akin to force majeure, the unfortunate but inevitable aftermath of a natural calamity. Japan lay prostrate. Industrial output had fallen to about 10% of pre-war levels, and as late as 1946, more than 13 million remained unemployed. Nearly 40% of Japan's urban areas had been turned to rubble, and some 9 million people were homeless. The war-displaced, many of them orphans, slept in doorways and hallways, in bombed-out ruins, dugouts and packing crates, under bridges or on pavements, and crowded the hallways of train and subway stations. As winter 1945 descended, with food, fuel, and clothing scarce, people froze to death. Bonfires lit the streets to ward off the chill. "The only warm hands I have shaken thus far in Japan belonged to Americans," Mark Gayn noted in December 1945. "The Japanese do not have much of a chance to thaw out, and their hands are cold and red." Unable to afford shoes, many wore straw sandals; those with geta felt themselves privileged. The sight of a man wearing a woman's high-buttoned shoes in winter epitomized the daily struggle to stay dry and warm. Shantytowns built of scrap wood, rusted metal, and scavenged odds and ends sprang up everywhere, resembling vast junk yards. The poorest searched smouldering refuse heaps for castoffs that might be bartered for a scrap to eat or wear. Black markets (yami'ichi) run by Japanese, Koreans, and For-mosans mushroomed to replace collapsed distribution channels and cash in on inflated prices. Tokyo became "a world of scarcity in which every nail, every rag, and even a tangerine peel [had a] market value." Psychologically numbed, disoriented, and disillusioned with their leaders, demobilized veterans and civilians alike struggled to get their bearings, shed militaristic ideologies, and begin to embrace new values. In the vacuum of defeat, the Japanese people appeared ready to reject the past and grasp at the straw held out by the former enemy. Relations between occupier and occupied were not smooth, however. American troops comported themselves like conquerors, especially in the early weeks and months of occupation. Much of the violence was directed against women, with the first attacks beginning within hours after the landing of advance units. When US paratroopers landed in Sapporo, an orgy of looting, sexual violence, and drunken brawling ensued. Newspaper accounts reported 931 serious offences by GIs in the Yokohama area during the first week of occupation, including 487 armed robberies, 411 thefts of currency or goods, 9 rapes, 5 break-ins, 3 cases of assault and battery, and 16 other acts of lawlessness. In the first 10 days of occupation, there were 1,336 reported rapes by US soldiers in Kanagawa Prefecture alone. Americans were not the only perpetrators. A former prostitute recalled that when Australian troops arrived in Kure in early 1946, they “dragged young women into their jeeps, took them to the mountain, and then raped them. I heard them screaming for help nearly every night.” Such behaviour was commonplace, but news of criminal activity by occupation forces was quickly suppressed. On September 10, 1945, SCAP issued press and pre-censorship codes outlawing the publication of reports and statistics "inimical to the objectives of the occupation." In the sole instance of self-help General Eichelberger records in his memoirs, when locals formed a vigilante group and retaliated against off-duty GIs, 8th Army ordered armored vehicles into the streets and arrested the ringleaders, who received lengthy prison terms. Misbehavior ranged from black-market activity, petty theft, reckless driving, and disorderly conduct to vandalism, arson, murder, and rape. Soldiers and sailors often broke the law with impunity, and incidents of robbery, rape, and even murder were widely reported. Gang rapes and other sex atrocities were not infrequent; victims, shunned as outcasts, sometimes turned to prostitution in desperation, while others took their own lives to avoid bringing shame to their families. Military courts arrested relatively few soldiers for these offenses and convicted even fewer; Japanese attempts at self-defense were punished severely, and restitution for victims was rare. Fearing the worst, Japanese authorities had already prepared countermeasures against the supposed rapacity of foreign soldiers. Imperial troops in East Asia and the Pacific had behaved brutally toward women, so the government established “sexual comfort-stations” manned by geisha, bar hostesses, and prostitutes to “satisfy the lust of the Occupation forces,” as the Higashikuni Cabinet put it. A budget of 100 million yen was set aside for these Recreation and Amusement Associations, financed initially with public funds but run as private enterprises under police supervision. Through these, the government hoped to protect the daughters of the well-born and middle class by turning to lower-class women to satisfy the soldiers' sexual appetites. By the end of 1945, brothel operators had rounded up an estimated 20,000 young women and herded them into RAA establishments nationwide. Eventually, as many as 70,000 are said to have ended up in the state-run sex industry. Thankfully, as military discipline took hold and fresh troops replaced the Allied veterans responsible for the early crime wave, violence subsided and the occupier's patronising behavior and the ugly misdeeds of a lawless few were gradually overlooked. However, fraternisation was frowned upon by both sides, and segregation was practiced in principle, with the Japanese excluded from areas reserved for Allied personnel until September 1949, when MacArthur lifted virtually all restrictions on friendly association, stating that he was “establishing the same relations between occupation personnel and the Japanese population as exists between troops stationed in the United States and the American people.” In principle, the Occupation's administrative structure was highly complex. The Far Eastern Commission, based in Washington, included representatives from all 13 countries that had fought against Japan and was established in 1946 to formulate basic principles. The Allied Council for Japan was created in the same year to assist in developing and implementing surrender terms and in administering the country. It consisted of representatives from the USA, the USSR, Nationalist China, and the British Commonwealth. Although both bodies were active at first, they were largely ineffectual due to unwieldy decision-making, disagreements between the national delegations (especially the USA and USSR), and the obstructionism of General Douglas MacArthur. In practice, SCAP, the executive authority of the occupation, effectively ruled Japan from 1945 to 1952. And since it took orders only from the US government, the Occupation became primarily an American affair. The US occupation program, effectively carried out by SCAP, was revolutionary and rested on a two-pronged approach. To ensure Japan would never again become a menace to the United States or to world peace, SCAP pursued disarmament and demilitarization, with continuing control over Japan's capacity to make war. This involved destroying military supplies and installations, demobilizing more than five million Japanese soldiers, and thoroughly discrediting the military establishment. Accordingly, SCAP ordered the purge of tens of thousands of designated persons from public service positions, including accused war criminals, military officers, leaders of ultranationalist societies, leaders in the Imperial Rule Assistance Association, business leaders tied to overseas expansion, governors of former Japanese colonies, and national leaders who had steered Japan into war. In addition, MacArthur's International Military Tribunal for the Far East established a military court in Tokyo. It had jurisdiction over those charged with Class A crimes, top leaders who had planned and directed the war. Also considered were Class B charges, covering conventional war crimes, and Class C charges, covering crimes against humanity. Yet the military court in Tokyo wouldn't be the only one. More than 5,700 lower-ranking personnel were charged with conventional war crimes in separate trials convened by Australia, China, France, the Dutch East Indies, the Philippines, the United Kingdom, and the United States. Of the 5,700 Japanese individuals indicted for Class B war crimes, 984 were sentenced to death; 475 received life sentences; 2,944 were given more limited prison terms; 1,018 were acquitted; and 279 were never brought to trial or not sentenced. Among these, many, like General Ando Rikichi and Lieutenant-General Nomi Toshio, chose to commit suicide before facing prosecution. Notable cases include Lieutenant-General Tani Hisao, who was sentenced to death by the Nanjing War Crimes Tribunal for his role in the Nanjing Massacre; Lieutenant-General Sakai Takashi, who was executed in Nanjing for the murder of British and Chinese civilians during the occupation of Hong Kong. General Okamura Yasuji was convicted of war crimes by the Tribunal, yet he was immediately protected by the personal order of Nationalist leader Chiang Kai-Shek, who kept him as a military adviser for the Kuomintang. In the Manila trials, General Yamashita Tomoyuki was sentenced to death as he was in overall command during the Sook Ching massacre, the Rape of Manila, and other atrocities. Lieutenant-General Homma Masaharu was likewise executed in Manila for atrocities committed by troops under his command during the Bataan Death March. General Imamura Hitoshi was sentenced to ten years in prison, but he considered the punishment too light and even had a replica of the prison built in his garden, remaining there until his death in 1968. Lieutenant-General Kanda Masatane received a 14-year sentence for war crimes on Bougainville, though he served only four years. Lieutenant-General Adachi Hatazo was sentenced to life imprisonment for war crimes in New Guinea and subsequently committed suicide on September 10, 1947. Lieutenant-General Teshima Fusataro received three years of forced labour for using a hospital ship to transport troops. Lieutenant-General Baba Masao was sentenced to death for ordering the Sandakan Death Marches, during which over 2,200 Australian and British prisoners of war perished. Lieutenant-General Tanabe Moritake was sentenced to death by a Dutch military tribunal for unspecified war crimes. Rear-Admiral Sakaibara Shigematsu was executed in Guam for ordering the Wake Island massacre, in which 98 American civilians were murdered. Lieutenant-General Inoue Sadae was condemned to death in Guam for permitting subordinates to execute three downed American airmen captured in Palau, though his sentence was commuted to life imprisonment in 1951 and he was released in 1953. Lieutenant-General Tachibana Yoshio was sentenced to death in Guam for his role in the Chichijima Incident, in which eight American airmen were cannibalized. By mid-1945, due to the Allied naval blockade, the 25,000 Japanese troops on Chichijima had run low on supplies. However, although the daily rice ration had been reduced from 400 grams per person per day to 240 grams, the troops were not at risk of starvation. In February and March 1945, in what would later be called the Chichijima incident, Tachibana Yoshio's senior staff turned to cannibalism. Nine American airmen had escaped from their planes after being shot down during bombing raids on Chichijima, eight of whom were captured. The ninth, the only one to evade capture, was future US President George H. W. Bush, then a 20-year-old pilot. Over several months, the prisoners were executed, and reportedly by the order of Major Matoba Sueyo, their bodies were butchered by the division's medical orderlies, with the livers and other organs consumed by the senior staff, including Matoba's superior Tachibana. In the Yokohama War Crimes Trials, Lieutenant-Generals Inada Masazumi and Yokoyama Isamu were convicted for their complicity in vivisection and other human medical experiments performed at Kyushu Imperial University on downed Allied airmen. The Tokyo War Crimes Trial, which began in May 1946 and lasted two and a half years, resulted in the execution by hanging of Generals Doihara Kenji and Itagaki Seishiro, and former Prime Ministers Hirota Koki and Tojo Hideki, for war crimes, crimes against humanity, and crimes against peace, specifically for the escalation of the Pacific War and for permitting the inhumane treatment of prisoners of war. Also sentenced to death were Lieutenant-General Muto Akira for his role in the Nanjing and Manila massacres; General Kimura Heitaro for planning the war strategy in China and Southeast Asia and for laxity in preventing atrocities against prisoners of war in Burma; and General Matsui Iwane for his involvement in the Rape of Nanjing. The seven defendants who were sentenced to death were executed at Sugamo Prison in Ikebukuro on December 23, 1948. Sixteen others were sentenced to life imprisonment, including the last Field Marshal Hata Shunroku, Generals Araki Sadao, Minami Hiro, and Umezu Shojiro, Admiral Shimada Shigetaro, former Prime Ministers Hiranuma Kiichiro and Koiso Kuniaki, Marquis Kido Koichi, and Colonel Hashimoto Kingoro, a major instigator of the second Sino-Japanese War. Additionally, former Foreign Ministers Togo Shigenori and Shigemitsu Mamoru received seven- and twenty-year sentences, respectively. The Soviet Union and Chinese Communist forces also held trials of Japanese war criminals, including the Khabarovsk War Crime Trials, which tried and found guilty some members of Japan's bacteriological and chemical warfare unit known as Unit 731. However, those who surrendered to the Americans were never brought to trial, as MacArthur granted immunity to Lieutenant-General Ishii Shiro and all members of the bacteriological research units in exchange for germ-w warfare data derived from human experimentation. If you would like to learn more about what I like to call Japan's Operation Paper clip, whereupon the US grabbed many scientists from Unit 731, check out my exclusive podcast. The SCAP-turn to democratization began with the drafting of a new constitution in 1947, addressing Japan's enduring feudal social structure. In the charter, sovereignty was vested in the people, and the emperor was designated a “symbol of the state and the unity of the people, deriving his position from the will of the people in whom resides sovereign power.” Because the emperor now possessed fewer powers than European constitutional monarchs, some have gone so far as to say that Japan became “a republic in fact if not in name.” Yet the retention of the emperor was, in fact, a compromise that suited both those who wanted to preserve the essence of the nation for stability and those who demanded that the emperor system, though not necessarily the emperor, should be expunged. In line with the democratic spirit of the new constitution, the peerage was abolished and the two-chamber Diet, to which the cabinet was now responsible, became the highest organ of state. The judiciary was made independent and local autonomy was granted in vital areas of jurisdiction such as education and the police. Moreover, the constitution stipulated that “the people shall not be prevented from enjoying any of the fundamental human rights,” that they “shall be respected as individuals,” and that “their right to life, liberty, and the pursuit of happiness shall … be the supreme consideration in legislation.” Its 29 articles guaranteed basic human rights: equality, freedom from discrimination on the basis of race, creed, sex, social status or family origin, freedom of thought and freedom of religion. Finally, in its most controversial section, Article 9, the “peace clause,” Japan “renounce[d] war as a sovereign right of the nation” and vowed not to maintain any military forces and “other war potential.” To instill a thoroughly democratic ethos, reforms touched every facet of society. The dissolution of the zaibatsu decentralised economic power; the 1945 Labour Union Law and the 1946 Labour Relations Act guaranteed workers the right to collective action; the 1947 Labour Standards Law established basic working standards for men and women; and the revised Civil Code of 1948 abolished the patriarchal household and enshrined sexual equality. Reflecting core American principles, SCAP introduced a 6-3-3 schooling system, six years of compulsory elementary education, three years of junior high, and an optional three years of senior high, along with the aim of secular, locally controlled education. More crucially, ideological reform followed: censorship of feudal material in media, revision of textbooks, and prohibition of ideas glorifying war, dying for the emperor, or venerating war heroes. With women enfranchised and young people shaped to counter militarism and ultranationalism, rural Japan was transformed to undermine lingering class divisions. The land reform program provided for the purchase of all land held by absentee landlords, allowed resident landlords and owner-farmers to retain a set amount of land, and required that the remaining land be sold to the government so it could be offered to existing tenants. In 1948, amid the intensifying tensions of the Cold War that would soon culminate in the Korean War, the occupation's focus shifted from demilitarization and democratization toward economic rehabilitation and, ultimately, the remilitarization of Japan, an shift now known as the “Reverse Course.” The country was thus rebuilt as the Pacific region's primary bulwark against the spread of Communism. An Economic Stabilisation Programme was introduced, including a five-year plan to coordinate production and target capital through the Reconstruction Finance Bank. In 1949, the anti-inflationary Dodge Plan was adopted, advocating balanced budgets, fixing the exchange rate at 360 yen to the dollar, and ending broad government intervention. Additionally, the Ministry of International Trade and Industry was formed and supported the formation of conglomerates centered around banks, which encouraged the reemergence of a somewhat weakened set of zaibatsu, including Mitsui and Mitsubishi. By the end of the Occupation era, Japan was on the verge of surpassing its 1934–1936 levels of economic growth. Equally important was Japan's rearmament in alignment with American foreign policy: a National Police Reserve of about 75,000 was created with the outbreak of the Korean War; by 1952 it had expanded to 110,000 and was renamed the Self-Defense Force after the inclusion of an air force. However, the Reverse Course also facilitated the reestablishment of conservative politics and the rollback of gains made by women and the reforms of local autonomy and education. As the Occupation progressed, the Americans permitted greater Japanese initiative, and power gradually shifted from the reformers to the moderates. By 1949, the purge of the right came under review, and many who had been condemned began returning to influence, if not to the Diet, then to behind-the-scenes power. At the same time, Japanese authorities, with MacArthur's support, began purging left-wing activists. In June 1950, for example, the central office of the Japan Communist Party and the editorial board of The Red Flag were purged. The gains made by women also seemed to be reversed. Women were elected to 8% of available seats in the first lower-house election in 1946, but to only 2% in 1952, a trend not reversed until the so-called Madonna Boom of the 1980s. Although the number of women voting continued to rise, female politicisation remained more superficial than might be imagined. Women's employment also appeared little affected by labour legislation: though women formed nearly 40% of the labor force in 1952, they earned only 45% as much as men. Indeed, women's attitudes toward labor were influenced less by the new ethos of fulfilling individual potential than by traditional views of family and workplace responsibilities. In the areas of local autonomy and education, substantial modifications were made to the reforms. Because local authorities lacked sufficient power to tax, they were unable to realise their extensive powers, and, as a result, key responsibilities were transferred back to national jurisdiction. In 1951, for example, 90% of villages and towns placed their police forces under the control of the newly formed National Police Agency. Central control over education was also gradually reasserted; in 1951, the Yoshida government attempted to reintroduce ethics classes, proposed tighter central oversight of textbooks, and recommended abolishing local school board elections. By the end of the decade, all these changes had been implemented. The Soviet occupation of the Kurile Islands and the Habomai Islets was completed with Russian troops fully deployed by September 5. Immediately after the onset of the occupation, amid a climate of insecurity and fear marked by reports of sporadic rape and physical assault and widespread looting by occupying troops, an estimated 4,000 islanders fled to Hokkaido rather than face an uncertain repatriation. As Soviet forces moved in, they seized or destroyed telephone and telegraph installations and halted ship movements into and out of the islands, leaving residents without adequate food and other winter provisions. Yet, unlike Manchuria, where Japanese civilians faced widespread sexual violence and pillage, systematic violence against the civilian population on the Kuriles appears to have been exceptional. A series of military government proclamations assured islanders of safety so long as they did not resist Soviet rule and carried on normally; however, these orders also prohibited activities not explicitly authorized by the Red Army, which imposed many hardships on civilians. Residents endured harsh conditions under Soviet rule until late 1948, when Japanese repatriation out of the Kurils was completed. The Kuriles posed a special diplomatic problem, as the occupation of the southernmost islands—the Northern Territories—ignited a long-standing dispute between Tokyo and Moscow that continues to impede the normalisation of relations today. Although the Kuriles were promised to the Soviet Union in the Yalta agreement, Japan and the United States argued that this did not apply to the Northern Territories, since they were not part of the Kurile Islands. A substantial dispute regarding the status of the Kurile Islands arose between the United States and the Soviet Union during the preparation of the Treaty of San Francisco, which was intended as a permanent peace treaty between Japan and the Allied Powers of World War II. The treaty was ultimately signed by 49 nations in San Francisco on September 8, 1951, and came into force on April 28, 1952. It ended Japan's role as an imperial power, allocated compensation to Allied nations and former prisoners of war who had suffered Japanese war crimes, ended the Allied post-war occupation of Japan, and returned full sovereignty to Japan. Effectively, the document officially renounced Japan's treaty rights derived from the Boxer Protocol of 1901 and its rights to Korea, Formosa and the Pescadores, the Kurile Islands, the Spratly Islands, Antarctica, and South Sakhalin. Japan's South Seas Mandate, namely the Mariana Islands, Marshall Islands, and Caroline Islands, had already been formally revoked by the United Nations on July 18, 1947, making the United States responsible for administration of those islands under a UN trusteeship agreement that established the Trust Territory of the Pacific Islands. In turn, the Bonin, Volcano, and Ryukyu Islands were progressively restored to Japan between 1953 and 1972, along with the Senkaku Islands, which were disputed by both Communist and Nationalist China. In addition, alongside the Treaty of San Francisco, Japan and the United States signed a Security Treaty that established a long-lasting military alliance between them. Although Japan renounced its rights to the Kuriles, the U.S. State Department later clarified that “the Habomai Islands and Shikotan ... are properly part of Hokkaido and that Japan is entitled to sovereignty over them,” hence why the Soviets refused to sign the treaty. Britain and the United States agreed that territorial rights would not be granted to nations that did not sign the Treaty of San Francisco, and as a result the Kurile Islands were not formally recognized as Soviet territory. A separate peace treaty, the Treaty of Taipei (formally the Sino-Japanese Peace Treaty), was signed in Taipei on April 28, 1952 between Japan and the Kuomintang, and on June 9 of that year the Treaty of Peace Between Japan and India followed. Finally, Japan and the Soviet Union ended their formal state of war with the Soviet–Japanese Joint Declaration of 1956, though this did not settle the Kurile Islands dispute. Even after these formal steps, Japan as a nation was not in a formal state of war, and many Japanese continued to believe the war was ongoing; those who held out after the surrender came to be known as Japanese holdouts. Captain Oba Sakae and his medical company participated in the Saipan campaign beginning on July 7, 1944, and took part in what would become the largest banzai charge of the Pacific War. After 15 hours of intense hand-to-hand combat, almost 4,300 Japanese soldiers were dead, and Oba and his men were presumed among them. In reality, however, he survived the battle and gradually assumed command of over a hundred additional soldiers. Only five men from his original unit survived the battle, two of whom died in the following months. Oba then led over 200 Japanese civilians deeper into the jungles to evade capture, organizing them into mountain caves and hidden jungle villages. When the soldiers were not assisting the civilians with survival tasks, Oba and his men continued their battle against the garrison of US Marines. He used the 1,552‑ft Mount Tapochau as their primary base, which offered an unobstructed 360-degree view of the island. From their base camp on the western slope of the mountain, Oba and his men occasionally conducted guerrilla-style raids on American positions. Due to the speed and stealth of these operations, and the Marines' frustrated attempts to find him, the Saipan Marines eventually referred to Oba as “The Fox.” Oba and his men held out on the island for 512 days, or about 16 months. On November 27, 1945, former Major-General Amo Umahachi was able to draw out some of the Japanese in hiding by singing the anthem of the Japanese infantry branch. Amo was then able to present documents from the defunct IGHQ to Oba ordering him and his 46 remaining men to surrender themselves to the Americans. On December 1, the Japanese soldiers gathered on Tapochau and sang a song of departure to the spirits of the war dead; Oba led his people out of the jungle and they presented themselves to the Marines of the 18th Anti-Aircraft Artillery Company. With great formality and commensurate dignity, Oba surrendered his sword to Lieutenant Colonel Howard G. Kirgis, and his men surrendered their arms and colors. On January 2, 1946, 20 Japanese soldiers hiding in a tunnel at Corregidor Island surrendered after learning the war had ended from a newspaper found while collecting water. In that same month, 120 Japanese were routed after a battle in the mountains 150 miles south of Manila. In April, during a seven-week campaign to clear Lubang Island, 41 more Japanese emerged from the jungle, unaware that the war had ended; however, a group of four Japanese continued to resist. In early 1947, Lieutenant Yamaguchi Ei and his band of 33 soldiers renewed fighting with the small Marine garrison on Peleliu, prompting reinforcements under Rear-Admiral Charles Pownall to be brought to the island to hunt down the guerrilla group. Along with them came former Rear-Admiral Sumikawa Michio, who ultimately convinced Yamaguchi to surrender in April after almost three years of guerrilla warfare. Also in April, seven Japanese emerged from Palawan Island and fifteen armed stragglers emerged from Luzon. In January 1948, 200 troops surrendered on Mindanao; and on May 12, the Associated Press reported that two unnamed Japanese soldiers had surrendered to civilian policemen in Guam the day before. On January 6, 1949, two former IJN soldiers, machine gunners Matsudo Rikio and Yamakage Kufuku, were discovered on Iwo Jima and surrendered peacefully. In March 1950, Private Akatsu Yūichi surrendered in the village of Looc, leaving only three Japanese still resisting on Lubang. By 1951 a group of Japanese on Anatahan Island refused to believe that the war was over and resisted every attempt by the Navy to remove them. This group was first discovered in February 1945, when several Chamorros from Saipan were sent to the island to recover the bodies of a Saipan-based B-29. The Chamorros reported that there were about thirty Japanese survivors from three ships sunk in June 1944, one of which was an Okinawan woman. Personal aggravations developed from the close confines of a small group on a small island and from tuba drinking; among the holdouts, 6 of 11 deaths were the result of violence, and one man displayed 13 knife wounds. The presence of only one woman, Higa Kazuko, caused considerable difficulty as she would transfer her affections among at least four men after each of them mysteriously disappeared, purportedly “swallowed by the waves while fishing.” According to the more sensational versions of the Anatahan tale, 11 of the 30 navy sailors stranded on the island died due to violent struggles over her affections. In July 1950, Higa went to the beach when an American vessel appeared offshore and finally asked to be removed from the island. She was taken to Saipan aboard the Miss Susie and, upon arrival, told authorities that the men on the island did not believe the war was over. As the Japanese government showed interest in the situation on Anatahan, the families of the holdouts were contacted in Japan and urged by the Navy to write letters stating that the war was over and that the holdouts should surrender. The letters were dropped by air on June 26 and ultimately convinced the holdouts to give themselves up. Thus, six years after the end of World War II, “Operation Removal” commenced from Saipan under the command of Lt. Commander James B. Johnson, USNR, aboard the Navy Tug USS Cocopa. Johnson and an interpreter went ashore by rubber boat and formally accepted the surrender on the morning of June 30, 1951. The Anatahan femme fatale story later inspired the 1953 Japanese film Anatahan and the 1998 novel Cage on the Sea. In 1953, Murata Susumu, the last holdout on Tinian, was finally captured. The next year, on May 7, Corporal Sumada Shoichi was killed in a clash with Filipino soldiers, leaving only two Japanese still resisting on Lubang. In November 1955, Seaman Kinoshita Noboru was captured in the Luzon jungle but soon after committed suicide rather than “return to Japan in defeat.” That same year, four Japanese airmen surrendered at Hollandia in Dutch New Guinea; and in 1956, nine soldiers were located and sent home from Morotai, while four men surrendered on Mindoro. In May 1960, Sergeant Ito Masashi became one of the last Japanese to surrender at Guam after the capture of his comrade Private Minagawa Bunzo, but the final surrender at Guam would come later with Sergeant Yokoi Shoichi. Sergeant Yokoi Shoichi survived in the jungles of Guam by living for years in an elaborately dug hole, subsisting on snails and lizards, a fate that, while undignified, showcased his ingenuity and resilience and earned him a warm welcome on his return to Japan. His capture was not heroic in the traditional sense: he was found half-starving by a group of villagers while foraging for shrimp in a stream, and the broader context included his awareness as early as 1952 that the war had ended. He explained that the wartime bushido code, emphasizing self-sacrifice or suicide rather than self-preservation, had left him fearing that repatriation would label him a deserter and likely lead to execution. Emerging from the jungle, Yokoi also became a vocal critic of Japan's wartime leadership, including Emperor Hirohito, which fits a view of him as a product of, and a prisoner within, his own education, military training, and the censorship and propaganda of the era. When asked by a young nephew how he survived so long on an island just a short distance from a major American airbase, he replied simply, “I was really good at hide and seek.” That same year, Private Kozuka Kinshichi was killed in a shootout with Philippine police in October, leaving Lieutenant Onoda Hiroo still resisting on Lubang. Lieutenant Onoda Hiroo had been on Lubang since 1944, a few months before the Americans retook the Philippines. The last instructions he had received from his immediate superior ordered him to retreat to the interior of the island and harass the Allied occupying forces until the IJA eventually returned. Despite efforts by the Philippine Army, letters and newspapers left for him, radio broadcasts, and even a plea from Onoda's brother, he did not believe the war was over. On February 20, 1974, Onoda encountered a young Japanese university dropout named Suzuki Norio, who was traveling the world and had told friends that he planned to “look for Lieutenant Onoda, a panda, and the abominable snowman, in that order.” The two became friends, but Onoda stated that he was waiting for orders from one of his commanders. On March 9, 1974, Onoda went to an agreed-upon place and found a note left by Suzuki. Suzuki had brought along Onoda's former commander, Major Taniguchi, who delivered the oral orders for Onoda to surrender. Intelligence Officer 2nd Lt. Onoda Hiroo thus emerged from Lubang's jungle with his .25 caliber rifle, 500 rounds of ammunition, and several hand grenades. He surrendered 29 years after Japan's formal surrender, and 15 years after being declared legally dead in Japan. When he accepted that the war was over, he wept openly. He received a hero's welcome upon his return to Japan in 1974. The Japanese government offered him a large sum of money in back pay, which he refused. When money was pressed on him by well-wishers, he donated it to Yasukuni Shrine. Onoda was reportedly unhappy with the attention and what he saw as the withering of traditional Japanese values. He wrote No Surrender: My Thirty-Year War, a best-selling autobiography published in 1974. Yet the last Japanese to surrender would be Private Nakamura Teruo, an Amis aborigine from Formosa and a member of the Takasago Volunteers. Private Nakamura Teruo spent the tail end of World War II with a dwindling band on Morotai, repeatedly dispersing and reassembling in the jungle as they hunted for food. The group suffered continuous losses to starvation and disease, and survivors described Nakamura as highly self-sufficient. He left to live alone somewhere in the Morotai highlands between 1946 and 1947, rejoined the main group in 1950, and then disappeared again a few years later. Nakamura hinted in print that he fled into the jungle because he feared the other holdouts might murder him. He survives for decades beyond the war, eventually being found by 11 Indonesian soldiers. The emergence of an indigenous Taiwanese soldier among the search party embarrassed Japan as it sought to move past its imperial past. Many Japanese felt Nakamura deserved compensation for decades of loyalty, only to learn that his back pay for three decades of service amounted to 68,000 yen. Nakamura's experience of peace was complex. When a journalist asked how he felt about “wasting” three decades of his life on Morotai, he replied that the years had not been wasted; he had been serving his country. Yet the country he returned to was Taiwan, and upon disembarking in Taipei in early January 1975, he learned that his wife had a son he had never met and that she had remarried a decade after his official death. Nakamura eventually lived with a daughter, and his story concluded with a bittersweet note when his wife reconsidered and reconciled with him. Several Japanese soldiers joined local Communist and insurgent groups after the war to avoid surrender. Notably, in 1956 and 1958, two soldiers returned to Japan after service in China's People's Liberation Army. Two others who defected with a larger group to the Malayan Communist Party around 1945 laid down their arms in 1989 and repatriated the next year, becoming among the last to return home. That is all for today, but fear not I will provide a few more goodies over the next few weeks. I will be releasing some of my exclusive podcast episodes from my youtube membership and patreon that are about pacific war subjects. Like I promised the first one will be on why Emperor Hirohito surrendered. Until then if you need your fix you know where to find me: eastern front week by week, fall and rise of china, echoes of war or on my Youtube membership of patreon at www.patreon.com/pacificwarchannel.
Last time we spoke about the Soviet Victory in Asia. After atomic bombings and Japan's surrender, the Soviets launched a rapid Manchurian invasion, driving toward Harbin, Mukden, Changchun, and Beijing. Shenyang was taken, seeing the capture of the last Emperor of China, Pu Yi. The Soviets continued their advances into Korea with port captures at Gensan and Pyongyang, and occupation of South Sakhalin and the Kuril Islands, ahead of anticipated American intervention. Stalin pushed for speed to avoid US naval landings, coordinating with Chinese forces and leveraging the Sino-Soviet pact while balancing relations with Chiang Kai-shek. As fronts closed, tens of thousands of Japanese POWs were taken, while harsh wartime reprisals, looting, and mass sexual violence against Japanese, Korean, and Chinese civilians were reported. This episode is the Surrender of Japan Welcome to the Pacific War Podcast Week by Week, I am your dutiful host Craig Watson. But, before we start I want to also remind you this podcast is only made possible through the efforts of Kings and Generals over at Youtube. Perhaps you want to learn more about world war two? Kings and Generals have an assortment of episodes on world war two and much more so go give them a look over on Youtube. So please subscribe to Kings and Generals over at Youtube and to continue helping us produce this content please check out www.patreon.com/kingsandgenerals. If you are still hungry for some more history related content, over on my channel, the Pacific War Channel you can find a few videos all the way from the Opium Wars of the 1800's until the end of the Pacific War in 1945. With the Manchurian Campaign over and Japan's surrender confirmed, we've reached the end of the Pacific War and the ushering of a new era. This journey took us 3 years, 8 months, and 27 days and it's been a rollercoaster. We've gone over numerous stories of heroism and horror, victory and defeat, trying to peel back a part of WW2 that often gets overshadowed by the war in Europe. Certainly the China War is almost completely ignored by the west, but fortunately for you all, as I end this series we have just entered the China war over at the Fall and Rise of China Podcast. Unlike this series where, to be blunt, I am hamstrung by the week by week format, over there I can tackle the subject as I see fit, full of personal accounts. I implore you if you want to revisit some of that action in China, jump over to the other podcast, I will be continuing it until the end of the Chinese civil war. One could say it will soon be a bit of a sequel to this one. Of course if you love this format and want more, you can check out the brand new Eastern Front week by week podcast, which really does match the horror of the Pacific war. Lastly if you just love hearing my dumb voice, come check out my podcast which also is in video format on the Pacific War Channel on Youtube, the Echoes of War podcast. Me and my co-host Gaurav tackle history from Ancient to Modern, often with guests and we blend the dialogue with maps, photos and clips. But stating all of that, lets get into it, the surrender of Japan. As we last saw, while the Soviet invasion of Manchuria raged, Emperor Hirohito announced the unconditional surrender of the Japanese Empire on August 15. Public reaction varied, yet most were stunned and bewildered, unable to grasp that Japan had surrendered for the first time in its history. Many wept openly as they listened to the Emperor's solemn message; others directed swift anger at the nation's leaders and the fighting services for failing to avert defeat; and some blamed themselves for falling short in their war effort. Above all, there was a deep sympathy for the Emperor, who had been forced to make such a tragic and painful decision. In the wake of the Emperor's broadcast, war factories across the country dismissed their workers and shut their doors. Newspapers that had been ordered to pause their usual morning editions appeared in the afternoon, each carrying the Imperial Rescript, an unabridged translation of the Potsdam Declaration, and the notes exchanged with the Allied Powers. In Tokyo, crowds of weeping citizens gathered all afternoon in the vast plaza before the Imperial Palace and at the Meiji and Yasukuni Shrines to bow in reverence and prayer. The shock and grief of the moment, coupled with the dark uncertainty about the future, prevented any widespread sense of relief that the fighting had ended. Bombings and bloodshed were over, but defeat seemed likely to bring only continued hardship and privation. Starvation already gripped the land, and the nation faced the looming breakdown of public discipline and order, acts of violence and oppression by occupying forces, and a heavy burden of reparations. Yet despite the grim outlook, the Emperor's assurance that he would remain to guide the people through the difficult days ahead offered a measure of solace and courage. His appeal for strict compliance with the Imperial will left a lasting impression, and the refrain “Reverent Obedience to the Rescript” became the rallying cry as the nation prepared to endure the consequences of capitulation. Immediately after the Emperor's broadcast, Prime Minister Suzuki's cabinet tendered its collective resignation, yet Hirohito commanded them to remain in office until a new cabinet could be formed. Accordingly, Suzuki delivered another broadcast that evening, urging the nation to unite in absolute loyalty to the throne in this grave national crisis, and stressing that the Emperor's decision to end the war had been taken out of compassion for his subjects and in careful consideration of the circumstances. Thus, the shocked and grief-stricken population understood that this decision represented the Emperor's actual will rather than a ratified act of the Government, assuring that the nation as a whole would obediently accept the Imperial command. Consequently, most Japanese simply went on with their lives as best they could; yet some military officers, such as General Anami, chose suicide over surrender. Another key figure who committed seppuku between August 15 and 16 was Vice-Admiral Onishi Takijiro, the father of the kamikaze. Onishi's suicide note apologized to the roughly 4,000 pilots he had sent to their deaths and urged all surviving young civilians to work toward rebuilding Japan and fostering peace among nations. Additionally, despite being called “the hero of the August 15 incident” for his peacekeeping role in the attempted coup d'état, General Tanaka felt responsible for the damage done to Tokyo and shot himself on August 24. Following the final Imperial conference on 14 August, the Army's “Big Three”, War Minister Anami, Chief of the Army General Staff Umezu, and Inspectorate-General of Military Training General Kenji Doihara, met at the War Ministry together with Field Marshals Hata and Sugiyama, the senior operational commanders of the homeland's Army forces. These five men affixed their seals to a joint resolution pledging that the Army would “conduct itself in accordance with the Imperial decision to the last.” The resolution was endorsed immediately afterward by General Masakazu Kawabe, the overall commander of the Army air forces in the homeland. In accordance with this decision, General Anami and General Umezu separately convened meetings of their senior subordinates during the afternoon of the 14th, informing them of the outcome of the final Imperial conference and directing strict obedience to the Emperor's command. Shortly thereafter, special instructions to the same effect were radioed to all top operational commanders jointly in the names of the War Minister and Chief of Army General Staff. The Army and Navy authorities acted promptly, and their decisive stance proved, for the most part, highly effective. In the Army, where the threat of upheaval was most acute, the final, unequivocal decision of its top leaders to heed the Emperor's will delivered a crippling blow to the smoldering coup plot by the young officers to block the surrender. The conspirators had based their plans on unified action by the Army as a whole; with that unified stance effectively ruled out, most of the principal plotters reluctantly abandoned the coup d'état scheme on the afternoon of 14 August. At the same time, the weakened Imperial Japanese Navy took steps to ensure disciplined compliance with the surrender decision. Only Admiral Ugaki chose to challenge this with his final actions. After listening to Japan's defeat, Admiral Ugaki Kayō's diary recorded that he had not yet received an official cease-fire order, and that, since he alone was to blame for the failure of Japanese aviators to stop the American advance, he would fly one last mission himself to embody the true spirit of bushido. His subordinates protested, and even after Ugaki had climbed into the back seat of a Yokosuka D4Y4 of the 701st Kokutai dive bomber piloted by Lieutenant Tatsuo Nakatsuru, Warrant Officer Akiyoshi Endo, whose place in the kamikaze roster Ugaki had usurped, also climbed into the same space that the admiral had already occupied. Thus, the aircraft containing Ugaki took off with three men piloted by Nakatsuru, with Endo providing reconnaissance, and Ugaki himself, rather than the two crew members that filled the other ten aircraft. Before boarding his aircraft, Ugaki posed for pictures and removed his rank insignia from his dark green uniform, taking only a ceremonial short sword given to him by Admiral Yamamoto. Elements of this last flight most likely followed the Ryukyu flyway southwest to the many small islands north of Okinawa, where U.S. forces were still on alert at the potential end of hostilities. Endo served as radioman during the mission, sending Ugaki's final messages, the last of which at 19:24 reported that the plane had begun its dive onto an American vessel. However, U.S. Navy records do not indicate any successful kamikaze attack on that day, and it is likely that all aircraft on the mission with the exception of three that returned due to engine problems crashed into the ocean, struck down by American anti-aircraft fire. Although there are no precise accounts of an intercept made by Navy or Marine fighters or Pacific Fleet surface units against enemy aircraft in this vicinity at the time of surrender. it is likely the aircraft crashed into the ocean or was shot down by American anti-aircraft fire. In any event, the crew of LST-926 reported finding the still-smoldering remains of a cockpit with three bodies on the beach of Iheyajima Island, with Ugaki's remains allegedly among them. Meanwhile, we have already covered the Truman–Stalin agreement that Japanese forces north of the 38th parallel would surrender to the Soviets while those to the south would surrender to the Americans, along with the subsequent Soviet occupation of Manchuria, North Korea, South Sakhalin, and the Kurile Islands. Yet even before the first atomic bomb was dropped, and well before the Potsdam Conference, General MacArthur and his staff were planning a peaceful occupation of Japan and the Korean Peninsula. The first edition of this plan, designated “Blacklist,” appeared on July 16 and called for a progressive, orderly occupation in strength of an estimated fourteen major areas in Japan and three to six areas in Korea, so that the Allies could exercise unhampered control over the various phases of administration. These operations would employ 22 divisions and 3 regiments, together with air and naval elements, and would utilize all United States forces immediately available in the Pacific. The plan also provided for the maximum use of existing Japanese political and administrative organizations, since these agencies already exerted effective control over the population and could be employed to good advantage by the Allies. The final edition of “Blacklist,” issued on August 8, was divided into three main phases of occupation. The first phase included the Kanto Plain, the Kobe–Osaka–Kyoto areas, the Nagasaki–Sasebo area in Kyushu, the Keijo district in Korea, and the Aomori–Ominato area of northern Honshu. The second phase covered the Shimonoseki–Fukuoka and Nagoya areas, Sapporo in Hokkaido, and Fusan in Korea. The third phase comprised the Hiroshima–Kure area, Kochi in Shikoku, the Okayama, Tsuruga, and Niigata areas, Sendai in northern Honshu, Otomari in Karafuto, and the Gunzan–Zenshu area in Korea. Although the Joint Chiefs of Staff initially favored Admiral Nimitz's “Campus” Plan, which envisioned entry into Japan by Army forces only after an emergency occupation of Tokyo Bay by advanced naval units and the seizure of key positions ashore near each anchorage, MacArthur argued that naval forces were not designed to perform the preliminary occupation of a hostile country whose ground divisions remained intact, and he contended that occupying large land areas was fundamentally an Army mission. He ultimately convinced them that occupation by a weak Allied force might provoke resistance from dissident Japanese elements among the bomb-shattered population and could therefore lead to grave repercussions. The formal directive for the occupation of Japan, Korea, and the China coast was issued by the Joint Chiefs of Staff on August 11. The immediate objectives were to secure the early entry of occupying forces into major strategic areas, to control critical ports, port facilities, and airfields, and to demobilize and disarm enemy troops. First priority went to the prompt occupation of Japan, second to the consolidation of Keijo in Korea, and third to operations on the China coast and in Formosa. MacArthur was to assume responsibility for the forces entering Japan and Korea; General Wedemeyer was assigned operational control of the forces landing on the China coast and was instructed to coordinate his plans with the Generalissimo Chiang Kai-Shek; and Japanese forces in Southeast Asia were earmarked for surrender to Admiral Mountbatten. With the agreement of the Soviet, Chinese, and British governments, President Truman designated MacArthur as Supreme Commander for the Allied Powers on August 15, thereby granting him final authority for the execution of the terms of surrender and occupation. In this capacity, MacArthur promptly notified the Emperor and the Japanese Government that he was authorized to arrange for the cessation of hostilities at the earliest practicable date and directed that the Japanese forces terminate hostilities immediately and that he be notified at once of the effective date and hour of such termination. He further directed that Japan send to Manila on August 17 “a competent representative empowered to receive in the name of the Emperor of Japan, the Japanese Imperial Government, and the Japanese Imperial General Headquarters certain requirements for carrying into effect the terms of surrender.” General MacArthur's stipulations to the Japanese Government included specific instructions regarding the journey of the Japanese representatives to Manila. The emissaries were to leave Sata Misaki, at the southern tip of Kyushu, on the morning of August 17. They were to travel in a Douglas DC-3-type transport plane, painted white and marked with green crosses on the wings and fuselage, and to fly under Allied escort to an airdrome on Lejima in the Ryukyus. From there, the Japanese would be transported to Manila in a United States plane. The code designation chosen for communication between the Japanese plane and US forces was the symbolic word “Bataan.” Implementation challenges arose almost immediately due to disagreements within Imperial General Headquarters and the Foreign Office over the exact nature of the mission. Some officials interpreted the instructions as requiring the delegates to carry full powers to receive and agree to the actual terms of surrender, effectively making them top representatives of the Government and High Command. Others understood the mission to be strictly preparatory, aimed only at working out technical surrender arrangements and procedures. Late in the afternoon of August 16, a message was sent to MacArthur's headquarters seeking clarification and more time to organize the mission. MacArthur replied that signing the surrender terms would not be among the tasks of the Japanese representatives dispatched to Manila, assured the Japanese that their proposed measures were satisfactory, and pledged that every precaution would be taken to ensure the safety of the Emperor's representatives on their mission. Although preparations were made with all possible speed, on August 16 the Japanese notified that this delegation would be somewhat delayed due to the scarcity of time allowed for its formation. At the same time, MacArthur was notified that Hirohito had issued an order commanding the entire armed forces of his nation to halt their fighting immediately. The wide dispersion and the disrupted communications of the Japanese forces, however, made the rapid and complete implementation of such an order exceedingly difficult, so it was expected that the Imperial order would take approximately two to twelve days to reach forces throughout the Pacific and Asiatic areas. On August 17, the Emperor personally backed up these orders with a special Rescript to the armed services, carefully worded to assuage military aversion to surrender. Suzuki was also replaced on this date, with the former commander of the General Defense Army, General Prince Higashikuni Naruhiko, becoming the new Prime Minister with the initial tasks to hastily form a new cabinet capable of effecting the difficult transition to peace swiftly and without incident. The Government and Imperial General Headquarters moved quickly to hasten the preparations, but the appointment of the mission's head was held up pending the installation of the Higashikuni Cabinet. The premier-designate pressed for a rapid formation of the government, and on the afternoon of the 17th the official ceremony of installation took place in the Emperor's presence. Until General Shimomura could be summoned to Tokyo from the North China Area Army, Prince Higashikuni himself assumed the portfolio of War Minister concurrently with the premiership, Admiral Mitsumasa Yonai remaining in the critical post of Navy Minister, and Prince Ayamaro Konoe, by Marquis Kido's recommendation, entered the Cabinet as Minister without Portfolio to act as Higashikuni's closest advisor. The Foreign Minister role went to Mamoru Shigemitsu, who had previously served in the Koiso Cabinet. With the new government installed, Prince Higashikuni broadcast to the nation on the evening of 17 August, declaring that his policies as Premier would conform to the Emperor's wishes as expressed in the Imperial mandate to form a Cabinet. These policies were to control the armed forces, maintain public order, and surmount the national crisis, with scrupulous respect for the Constitution and the Imperial Rescript terminating the war. The cabinet's installation removed one delay, and in the afternoon of the same day a message from General MacArthur's headquarters clarified the mission's nature and purpose. Based on this clarification, it was promptly decided that Lieutenant General Torashiro Kawabe, Deputy Chief of the Army General Staff, should head a delegation of sixteen members, mainly representing the Army and Navy General Staffs. Kawabe was formally appointed by the Emperor on 18 August. By late afternoon that same day, the data required by the Allied Supreme Commander had largely been assembled, and a message was dispatched to Manila informing General MacArthur's headquarters that the mission was prepared to depart the following morning. The itinerary received prompt approval from the Supreme Commander. Indeed, the decision to appoint a member of the Imperial Family who had a respectable career in the armed forces was aimed both at appeasing the population and at reassuring the military. MacArthur appointed General Eichelberger's 8th Army to initiate the occupation unassisted through September 22, at which point General Krueger's 6th Army would join the effort. General Hodge's 24th Corps was assigned to execute Operation Blacklist Forty, the occupation of the Korean Peninsula south of the 38th Parallel. MacArthur's tentative schedule for the occupation outlined an initial advance party of 150 communications experts and engineers under Colonel Charles Tench, which would land at Atsugi Airfield on August 23. Naval forces under Admiral Halsey's 3rd Fleet were to enter Tokyo Bay on August 24, followed by MacArthur's arrival at Atsugi the next day and the start of the main landings of airborne troops and naval and marine forces. The formal surrender instrument was to be signed aboard an American battleship in Tokyo Bay on August 28, with initial troop landings in southern Kyushu planned for August 29–30. By September 4, Hodge's 24th Corps was to land at Inchon and begin the occupation of South Korea. In the meantime, per MacArthur's directions, a sixteen-man Japanese delegation headed by Lieutenant-General Kawabe Torashiro, Vice-Chief of the Army General Staff, left Sata Misaki on the morning of August 19; after landing at Iejima, the delegation transferred to an American transport and arrived at Nichols Field at about 18:00. That night, the representatives held their first conference with MacArthur's staff, led by Lieutenant-General Richard Sutherland. During the two days of conference, American linguists scanned, translated, and photostated the various reports, maps, and charts the Japanese had brought with them. Negotiations also resulted in permission for the Japanese to supervise the disarmament and demobilization of their own armed forces under Allied supervision, and provided for three extra days of preparation before the first occupying unit landed on the Japanese home islands on August 26. At the close of the conference, Kawabe was handed the documents containing the “Requirements of the Supreme Commander for the Allied Powers,” which concerned the arrival of the first echelons of Allied forces, the formal surrender ceremony, and the reception of the occupation forces. Also given were a draft Imperial Proclamation by which the Emperor would accept the terms of the Potsdam Declaration and command his subjects to cease hostilities, a copy of General Order No. 1 by which Imperial General Headquarters would direct all military and naval commanders to lay down their arms and surrender their units to designated Allied commanders, and the Instrument of Surrender itself, which would later be signed on board an American battleship in Tokyo Bay. After the Manila Conference ended, the Japanese delegation began its return to Japan at 13:00 on August 20; but due to mechanical problems and a forced landing near Hamamatsu, they did not reach Tokyo until August 21. With the scheduled arrival of the advanced party of the Allied occupation forces only five days away, the Japanese immediately began disarming combat units in the initial-occupation areas and evacuating them from those areas. The basic orders stated that Allied forces would begin occupying the homeland on 26 August and reaffirmed the intention ofImperial General Headquarters "to insure absolute obedience to the Imperial Rescript of 14 August, to prevent the occurrence of trouble with the occupying forces, and thus to demonstrate Japan's sincerity to the world." The Japanese government announced that all phases of the occupation by Allied troops would be peaceful and urged the public not to panic or resort to violence against the occupying forces. While they sought to reassure the population, they faced die-hard anti-surrender elements within the IJN, with ominous signs of trouble both from Kyushu, where many sea and air special-attack units were poised to meet an invasion, and from Atsugi, the main entry point for Allied airborne troops into the Tokyo Bay area. At Kanoya, Ugaki's successor, Vice-Admiral Kusaka Ryonosuke, hastened the separation of units from their weapons and the evacuation of naval personnel. At Atsugi, an even more threatening situation developed in the Navy's 302nd Air Group. Immediately after the announcement of the surrender, extremist elements in the group led by Captain Kozono Yasuna flew over Atsugi and the surrounding area, scattering leaflets urging the continuation of the war on the ground and claiming that the surrender edict was not the Emperor's true will but the machination of "traitors around the Throne." The extremists, numbering 83 junior officers and noncommissioned officers, did not commit hostile acts but refused to obey orders from their superior commanders. On August 19, Prince Takamatsu, the Emperor's brother and a navy captain, telephoned Atsugi and personally appealed to Captain Kozono and his followers to obey the Imperial decision. This intervention did not end the incident; on August 21 the extremists seized a number of aircraft and flew them to Army airfields in Saitama Prefecture in hopes of gaining support from Army air units. They failed in this attempt, and it was not until August 25 that all members of the group had surrendered. As a result of the Atsugi incident, on August 22 the Emperor dispatched Captain Prince Takamatsu Nabuhito and Vice-Admiral Prince Kuni Asaakira to various naval commands on Honshu and Kyushu to reiterate the necessity of strict obedience to the surrender decision. Both princes immediately left Tokyo to carry out this mission, but the situation improved over the next two days, and they were recalled before completing their tours. By this point, a typhoon struck the Kanto region on the night of August 22, causing heavy damage and interrupting communications and transport vital for evacuating troops from the occupation zone. This led to further delays in Japanese preparations for the arrival of occupation forces, and the Americans ultimately agreed to a two-day postponement of the preliminary landings. On August 27 at 10:30, elements of the 3rd Fleet entered Sagami Bay as the first step in the delayed occupation schedule. At 09:00 on August 28, Tench's advanced party landed at Atsugi to complete technical arrangements for the arrival of the main forces. Two days later, the main body of the airborne occupation forces began streaming into Atsugi, while naval and marine forces simultaneously landed at Yokosuka on the south shore of Tokyo Bay. There were no signs of resistance, and the initial occupation proceeded successfully. Shortly after 1400, a famous C-54 the name “Bataan” in large letters on its nose circled the field and glided in for a landing. General MacArthur stepped from the aircraft, accompanied by General Sutherland and his staff officers. The operation proceeded smoothly. MacArthur paused momentarily to inspect the airfield, then climbed into a waiting automobile for the drive to Yokohama. Thousands of Japanese troops were posted along the fifteen miles of road from Atsugi to Yokohama to guard the route of the Allied motor cavalcade as it proceeded to the temporary SCAP Headquarters in Japan's great seaport city. The Supreme Commander established his headquarters provisionally in the Yokohama Customs House. The headquarters of the American Eighth Army and the Far East Air Force were also established in Yokohama, and representatives of the United States Pacific Fleet were attached to the Supreme Commander's headquarters. The intensive preparation and excitement surrounding the first landings on the Japanese mainland did not interfere with the mission of affording relief and rescue to Allied personnel who were internees or prisoners in Japan. Despite bad weather delaying the occupation operation, units of the Far East Air Forces and planes from the Third Fleet continued their surveillance missions. On 25 August they began dropping relief supplies, food, medicine, and clothing, to Allied soldiers and civilians in prisoner-of-war and internment camps across the main islands. While the advance echelon of the occupation forces was still on Okinawa, “mercy teams” were organized to accompany the first elements of the Eighth Army Headquarters. Immediately after the initial landings, these teams established contact with the Swiss and Swedish Legations, the International Red Cross, the United States Navy, and the Japanese Liaison Office, and rushed to expedite the release and evacuation, where necessary, of thousands of Allied internees. On September 1, the Reconnaissance Troop of the 11th Airborne Division conducted a subsidiary airlift operation, flying from Atsugi to occupy Kisarazu Airfield; and on the morning of September 2, the 1st Cavalry Division began landing at Yokohama to secure most of the strategic areas along the shores of Tokyo Bay, with Tokyo itself remaining unoccupied. Concurrently, the surrender ceremony took place aboard Halsey's flagship, the battleship Missouri, crowded with representatives of the United Nations that had participated in the Pacific War. General MacArthur presided over the epoch-making ceremony, and with the following words he inaugurated the proceedings which would ring down the curtain of war in the Pacific “We are gathered here, representatives of the major warring powers, to conclude a solemn agreement whereby peace may be restored. The issues, involving divergent ideals and ideologies, have been determined on the battlefields of the world and hence are not for our discussion or debate. Nor is it for us here to meet, representing as we do a majority of the people of the earth, in a spirit of distrust, malice or hatred. But rather it is for us, both victors and vanquished, to rise to that higher dignity which alone befits the sacred purposes we are about to serve, committing all our peoples unreservedly to faithful compliance with the understandings they are here formally to assume. It is my earnest hope, and indeed the hope of all mankind, that from this solemn occasion a better world shall emerge out of the blood and carnage of the past — a world dedicated to the dignity of man and the fulfillment of his most cherished wish for freedom, tolerance and justice. The terms and conditions upon which surrender of the Japanese Imperial Forces is here to be given and accepted are contained in the instrument of surrender now before you…”. The Supreme Commander then invited the two Japanese plenipotentiaries to sign the duplicate surrender documents : Foreign Minister Shigemitsu, on behalf of the Emperor and the Japanese Government, and General Umezu, for the Japanese Imperial General Headquarters. He then called forward two famous former prisoners of the Japanese to stand behind him while he himself affixed his signature to the formal acceptance of the surrender : Gen. Jonathan M. Wainwright, hero of Bataan and Corregidor and Lt. Gen. Sir Arthur E. Percival, who had been forced to yield the British stronghold at Singapore. General MacArthur was followed in turn by Admiral Nimitz, who signed on behalf of the United States. Alongside the recently liberated Generals Wainwright and Percival, who had been captured during the Japanese conquest of the Philippines and Singapore respectively, MacArthur then signed the surrender documents, followed by Admiral Nimitz and representatives of the other United Nations present. The Instrument of Surrender was completely signed within twenty minutes. Shortly afterwards, MacArthur broadcast the announcement of peace to the world, famously saying, “Today the guns are silent.” Immediately following the signing of the surrender articles, the Imperial Proclamation of capitulation was issued, commanding overseas forces to cease hostilities and lay down their arms; however, it would take many days, and in some cases weeks, for the official word of surrender to be carried along Japan's badly disrupted communications channels. Various devices were employed by American commanders to transmit news of final defeat to dispersed and isolated enemy troops, such as plane-strewn leaflets, loudspeaker broadcasts, strategically placed signboards, and prisoner-of-war volunteers. Already, the bypassed Japanese garrison at Mille Atoll had surrendered on August 22; yet the first large-scale surrender of Japanese forces came on August 27, when Lieutenant-General Ishii Yoshio surrendered Morotai and Halmahera to the 93rd Division. On August 30, a British Pacific Fleet force under Rear-Admiral Cecil Harcourt entered Victoria Harbour to begin the liberation of Hong Kong; and the following day, Rear-Admiral Matsubara Masata surrendered Minami-Torishima. In the Marianas, the Japanese commanders on Rota and Pagan Islands relinquished their commands almost simultaneously with the Tokyo Bay ceremony of September 2. Later that day, the same was done by Lieutenant-General Inoue Sadae in the Palaus and by Lieutenant-General Mugikura Shunzaburo and Vice-Admiral Hara Chuichi at Truk in the Carolines. Additionally, as part of Operation Jurist, a British detachment under Vice-Admiral Harold Walker received the surrender of the Japanese garrison on Penang Island. In the Philippines, local commanders in the central Bukidnon Province, Infanta, the Bataan Peninsula, and the Cagayan Valley had already surrendered by September 2. On September 3, General Yamashita and Vice-Admiral Okawachi Denshichi met with General Wainwright, General Percival, and Lieutenant-General Wilhelm Styer, Commanding General of Army Forces of the Western Pacific, to sign the formal surrender of the Japanese forces in the Philippines. With Yamashita's capitulation, subordinate commanders throughout the islands began surrendering in increasing numbers, though some stragglers remained unaware of the capitulation. Concurrently, while Yamashita was yielding his Philippine forces, Lieutenant-General Tachibana Yoshio's 109th Division surrendered in the Bonins on September 3. On September 4, Rear-Admiral Sakaibara Shigematsu and Colonel Chikamori Shigeharu surrendered their garrison on Wake Island, as did the garrison on Aguigan Island in the Marianas. Also on September 4, an advanced party of the 24th Corps landed at Kimpo Airfield near Keijo to prepare the groundwork for the occupation of South Korea; and under Operation Tiderace, Mountbatten's large British and French naval force arrived off Singapore and accepted the surrender of Japanese forces there. On September 5, Rear-Admiral Masuda Nisuke surrendered his garrison on Jaluit Atoll in the Marshalls, as did the garrison of Yap Island. The overall surrender of Japanese forces in the Solomons and Bismarcks and in the Wewak area of New Guinea was finally signed on September 6 by General Imamura Hitoshi and Vice-Admiral Kusaka Jinichi aboard the aircraft carrier Glory off Rabaul, the former center of Japanese power in the South Pacific. Furthermore, Lieutenant-General Nomi Toshio, representing remaining Japanese naval and army forces in the Ryukyus, officially capitulated on September 7 at the headquarters of General Stilwell's 10th Army on Okinawa. The following day, Tokyo was finally occupied by the Americans, and looking south, General Kanda and Vice-Admiral Baron Samejima Tomoshige agreed to travel to General Savige's headquarters at Torokina to sign the surrender of Bougainville. On September 8, Rear-Admiral Kamada Michiaki's 22nd Naval Special Base Force at Samarinda surrendered to General Milford's 7th Australian Division, as did the Japanese garrison on Kosrae Island in the Carolines. On September 9, a wave of surrenders continued: the official capitulation of all Japanese forces in the China Theater occurred at the Central Military Academy in Nanking, with General Okamura surrendering to General He Yingqin, the commander-in-chief of the Republic of China National Revolutionary Army; subsequently, on October 10, 47 divisions from the former Imperial Japanese Army officially surrendered to Chinese military officials and allied representatives at the Forbidden City in Beijing. The broader context of rehabilitation and reconstruction after the protracted war was daunting, with the Nationalists weakened and Chiang Kai-shek's policies contributing to Mao Zedong's strengthened position, shaping the early dynamics of the resumption of the Chinese Civil War. Meanwhile, on September 9, Hodge landed the 7th Division at Inchon to begin the occupation of South Korea. In the throne room of the Governor's Palace at Keijo, soon to be renamed Seoul, the surrender instrument was signed by General Abe Nobuyuki, the Governor-General of Korea; Lieutenant-General Kozuki Yoshio, commander of the 17th Area Army and of the Korean Army; and Vice-Admiral Yamaguchi Gisaburo, commander of the Japanese Naval Forces in Korea. The sequence continued with the 25th Indian Division landing in Selangor and Negeri Sembilan on Malaya to capture Port Dickson, while Lieutenant-General Teshima Fusataro's 2nd Army officially surrendered to General Blamey at Morotai, enabling Australian occupation of much of the eastern Dutch East Indies. On September 10, the Japanese garrisons on the Wotje and Maloelap Atolls in the Marshalls surrendered, and Lieutenant-General Baba Masao surrendered all Japanese forces in North Borneo to General Wootten's 9th Australian Division. After Imamura's surrender, Major-General Kenneth Eather's 11th Australian Division landed at Rabaul to begin occupation, and the garrison on Muschu and Kairiru Islands also capitulated. On September 11, General Adachi finally surrendered his 18th Army in the Wewak area, concluding the bloody New Guinea Campaign, while Major-General Yamamura Hyoe's 71st Independent Mixed Brigade surrendered at Kuching and Lieutenant-General Watanabe Masao's 52nd Independent Mixed Brigade surrendered on Ponape Island in the Carolines. Additionally, the 20th Indian Division, with French troops, arrived at Saigon as part of Operation Masterdom and accepted the surrender of Lieutenant-General Tsuchihashi Yuitsu, who had already met with Viet Minh envoys and agreed to turn power over to the Democratic Republic of Vietnam. When the Japanese surrendered to the Allies on 15 August 1945, the Viet Minh immediately launched the insurrection they had prepared for a long time. Across the countryside, “People's Revolutionary Committees” took over administrative positions, often acting on their own initiative, and in the cities the Japanese stood by as the Vietnamese took control. By the morning of August 19, the Viet Minh had seized Hanoi, rapidly expanding their control over northern Vietnam in the following days. The Nguyen dynasty, with its puppet government led by Tran Trong Kim, collapsed when Emperor Bao Dai abdicated on August 25. By late August, the Viet Minh controlled most of Vietnam. On 2 September, in Hanoi's Ba Dinh Square, Ho Chi Minh proclaimed the independence of the Democratic Republic of Vietnam. As the Viet Minh began extending control across the country, the new government's attention turned to the arrival of Allied troops and the French attempt to reassert colonial authority, signaling the onset of a new and contentious phase in Vietnam's struggle. French Indochina had been left in chaos by the Japanese occupation. On 11 September British and Indian troops of the 20th Indian Division under Major General Douglas Gracey arrived at Saigon as part of Operation Masterdom. After the Japanese surrender, all French prisoners had been gathered on the outskirts of Saigon and Hanoi, and the sentries disappeared on 18 September; six months of captivity cost an additional 1,500 lives. By 22 September 1945, all prisoners were liberated by Gracey's men, armed, and dispatched in combat units toward Saigon to conquer it from the Viet Minh, later joined by the French Far East Expeditionary Corps, established to fight the Japanese arriving a few weeks later. Around the same time, General Lu Han's 200,000 Chinese National Revolutionary Army troops of the 1st Front Army occupied Indochina north of the 16th parallel, with 90,000 arriving by October; the 62nd Army came on 26 September to Nam Dinh and Haiphong, Lang Son and Cao Bang were occupied by the Guangxi 62nd Army Corps, and the Red River region and Lai Cai were occupied by a column from Yunnan. Lu Han occupied the French governor-general's palace after ejecting the French staff under Sainteny. Consequently, while General Lu Han's Chinese troops occupied northern Indochina and allowed the Vietnamese Provisional Government to remain in control there, the British and French forces would have to contest control of Saigon. On September 12, a surrender instrument was signed at the Singapore Municipal Building for all Southern Army forces in Southeast Asia, the Dutch East Indies, and the eastern islands; General Terauchi, then in a hospital in Saigon after a stroke, learned of Burma's fall and had his deputy commander and leader of the 7th Area Army, Lieutenant-General Itagaki Seishiro, surrender on his behalf to Mountbatten, after which a British military administration was formed to govern the island until March 1946. The Japanese Burma Area Army surrendered the same day as Mountbatten's ceremony in Singapore, and Indian forces in Malaya reached Kuala Lumpur to liberate the Malay capital, though the British were slow to reestablish control over all of Malaya, with eastern Pahang remaining beyond reach for three more weeks. On September 13, the Japanese garrisons on Nauru and Ocean Islands surrendered to Brigadier John Stevenson, and three days later Major-General Okada Umekichi and Vice-Admiral Fujita Ruitaro formally signed the instrument of surrender at Hong Kong. In the meantime, following the Allied call for surrender, Japan had decided to grant Indonesian independence to complicate Dutch reoccupation: Sukarno and Mohammad Hatta signed Indonesia's Proclamation of Independence on August 17 and were appointed president and vice-president the next day, with Indonesian youths spreading news across Java via Japanese news and telegraph facilities and Bandung's news broadcast by radio. The Dutch, as the former colonial power, viewed the republicans as collaborators with the Japanese and sought to restore their colonial rule due to lingering political and economic interests in the former Dutch East Indies, a stance that helped trigger a four-year war for Indonesian independence. Fighting also erupted in Sumatra and the Celebes, though the 26th Indian Division managed to land at Padang on October 10. On October 21, Lieutenant-General Tanabe Moritake and Vice-Admiral Hirose Sueto surrendered all Japanese forces on Sumatra, yet British control over the country would dwindle in the ensuing civil conflict. Meanwhile, Formosa (Taiwan) was placed under the control of the Kuomintang-led Republic of China by General Order No. 1 and the Instrument of Surrender; Chiang Kai-shek appointed General Chen Yi as Chief Executive of Taiwan Province and commander of the Taiwan Garrison Command on September 1. After several days of preparation, an advance party moved into Taihoku on October 5, with additional personnel arriving from Shanghai and Chongqing between October 5 and 24, and on October 25 General Ando Rikichi signed the surrender document at Taipei City Hall. But that's the end for this week, and for the Pacific War. Boy oh boy, its been a long journey hasn't it? Now before letting you orphans go into the wild, I will remind you, while this podcast has come to an end, I still write and narrate Kings and Generals Eastern Front week by week and the Fall and Rise of China Podcasts. Atop all that I have my own video-podcast Echoes of War, that can be found on Youtube or all podcast platforms. I really hope to continue entertaining you guys, so if you venture over to the other podcasts, comment you came from here! I also have some parting gifts to you all, I have decided to release a few Pacific War related exclusive episodes from my Youtuber Membership / patreon at www.patreon.com/pacificwarchannel. At the time I am writing this, over there I have roughly 32 episodes, one is uploaded every month alongside countless other goodies. Thank you all for being part of this long lasting journey. Kings and Generals literally grabbed me out of the blue when I was but a small silly person doing youtube videos using an old camera, I have barely gotten any better at it. I loved making this series, and I look forward to continuing other series going forward! You know where to find me, if you have any requests going forward the best way to reach me is just comment on my Youtube channel or email me, the email address can be found on my youtube channel. This has been Craig of the Pacific War Channel and narrator of the Pacific war week by week podcast, over and out!

Darrell Castle talks about the 80th anniversary of the end of World War Two. How have the allied leaders handled the inheritance of the victory they were given by the blood of their ancestors? Are they behaving like victors? Transcription / Notes EIGHTY YEARS AFTER WORLD WAR TWO Hello, this is Darrell Castle with today's Castle Report. This is Friday the 29th day of August in the year of our Lord 2025. This is Labor Day weekend and a 3-day vacation for most of us but the day after Labor Day is an anniversary to remember. It is the 80th anniversary of the end of World War Two. Where do we stand today with the inheritance that all those men gave us so many years ago. How have the allied leaders handled the victory they were given by the blood of their ancestors. I will look at some of the things that are happening in our world today to see if the allies have truly behaved like victors. Next Tuesday, the 2nd of September is the 80th anniversary of the signing of the Japanese surrender documents ending World War ll. The surrender was signed on the deck of the battleship USS Missouri while it was sitting at anchor in Tokyo Bay. The Americans had the people you would expect in attendance such as Chester Nimitz, the Commander of the U.S. Pacific Fleet, and General Douglas MacArthur Commander of the Southern Pacific Region, who accepted the surrender on behalf of the victorious allied nations. General MacArthur was appointed Proconsul of Japan which made him the virtual ruler of that nation on behalf of the occupying American forces. General MacArthur ruled with a compassionate, but firm hand and in a few short years the nation of Japan once a radioactive, burned our wasteland was a G-20 economy. The Japanese were resistant at first but with the encouragement of their emperor they started to buy into MacArthur's program and they rebuilt their country as a model of American capitalism. There were many other people on board the Missouri that day including people honored because they were seriously wounded in the Pacific War but also ex-prisoners of the Japanese who survived years of harsh treatment. When I was a child one of our neighbors was boy scour leader for my scout group. He had served on the Missouri and was pretty good at crafts so he built a scale model of the ship about 3 feet long and kept it in a separate room of his house. He had tremendous pride in his service and in being present for history. There are very few of the veterans of that war still living and soon there will be none so every chance we get to honor them should be taken. August 14th the last fighter ace of the war died at the age of 103. His name was Thomas McPherson and he was the pilot of an F6F Hellcat fighter flying off the carrier USS Essex. In case you don't know a fighter ace is someone who shoots down five enemy planes in aerial combat. When the war was over Tom went back home to Nebraska and became a mail carrier where he spent his working life. He was a boy scout leader and worked in his church just living a quiet and peaceful life of service. Many gallant aces, many empty places as the pilots would say at dinner. There were many aces, but none still alive from WWll. We still have aces from Korea and Vietnam of course although they are going quickly as well. So, how the world has changed in 80 years. The U.S. dropped two atomic bombs thus ending the war but today 9 nations are believed to have nuclear weapons with about 12000 warheads in existence. Sometimes when I look at it all and I see where we are today I have to wonder who won the war. There are so many places today where the world seems to have turned upside down. Old friends are now bitter enemies and vice versa. China and Russia, our friends during the war but now enemies. Dr. Ron Paul, who just celebrated his 90th birthday a few days ago talked about America first in one of his Liberty Reports. He pointed out that the President promised us that he would p...
Last time we spoke about Operation Downfall. The Allies, under General Krueger, initiated a decisive campaign to clear the Japanese from Luzon. As they faced the entrenched Shobu Group, challenges included treacherous terrain and a resilient enemy. Simultaneously, Japan braced for an invasion, mobilizing reinforcements and devising defensive strategies to ward off the impending Allied assault. As July approached, General Yamashita's forces prepared to execute a final breakout, but progress was hampered by relentless guerrilla attacks and adverse weather conditions. With Operation Downfall looming, Allied troops focused on strategic landings in Kyushu and Honshu, driven by a relentless determination to defeat the Japanese militarily. The intense battles of Luzon became a precursor to this monumental operation, marking a turning point in the Pacific War. This episode is The Siege of Japan Welcome to the Pacific War Podcast Week by Week, I am your dutiful host Craig Watson. But, before we start I want to also remind you this podcast is only made possible through the efforts of Kings and Generals over at Youtube. Perhaps you want to learn more about world war two? Kings and Generals have an assortment of episodes on world war two and much more so go give them a look over on Youtube. So please subscribe to Kings and Generals over at Youtube and to continue helping us produce this content please check out www.patreon.com/kingsandgenerals. If you are still hungry for some more history related content, over on my channel, the Pacific War Channel you can find a few videos all the way from the Opium Wars of the 1800's until the end of the Pacific War in 1945. Boy I have been waiting a long time to come to this point. One of the most significant events in human history that deeply affects us to this very day. Nuclear war is as much a threat today as it was during the cold war. The dropping of the Atomic bombs on Hiroshima and Nagasaki were deeply complicated events fraught with issues of morality. It goes without saying whether or not the bombs needed to be dropped, their actual impact on the surrender of Japan and so forth are still issues hotly debated to this very day. I have spoken on the issue countless times on my personal channel and podcast, but I figure to do this subject justice I will create a full episode for it. Thus in this episode we are going to just cover what happened, but rest assured I will come back to this later on. As we last explored, following the successful invasion of Luzon in the Philippines, along with the fall of Iwo Jima and Okinawa, American forces began preparing for the final invasion of the Japanese Home Islands. This operation was codenamed Operation Downfall. One key initiative leading up to this invasion was a comprehensive air-sea blockade and bombardment campaign against Japan itself. Previously, we detailed the extensive firebombing and precision bombing efforts executed by General LeMay's 21st Bomber Command. However, during this crucial period, the B-29 Superfortress bombers undertook a distinct operation under the codename Starvation. This single operation would be one of the largest factors that contributed to the surrender of Japan and its one most people have never heard of. In July 1944, Admiral Chester W. Nimitz proposed a bold plan to use B-29 Superfortress bombers to mine the waterways surrounding the Japanese Home Islands. Although Generals Henry H. Arnold and Walter Hansell expressed concerns that this mining campaign could distract from the B-29's primary role as a strategic bombardment aircraft, they eventually agreed to assign one bomber group to focus on aerial mining when conditions permitted. On December 22, Hansell's 21st Bomber Command was directed to formulate a naval mining program aimed at executing between 150 to 200 sorties each month, which was set to begin in April 1945. However, by this time, General Curtis LeMay had taken command of the 21st Bomber Command. LeMay was notably enthusiastic about the idea and successfully recommended to Washington an upgraded mining program that aimed to deploy up to 1,500 mines each month using a full B-29 wing. LeMay viewed aerial mining in a different light than Arnold or Hansell, seeing it as a vital extension of strategic bombing. He recognized that most of Japan's war production materials, as well as a significant portion of its food supplies, were imported from regions such as China, Southeast Asia, and the Dutch East Indies. Japan's industrial heartland is primarily found on Honshu, its largest and most industrialized island, while Shikoku, another island, also lacks essential resources such as iron ore and high-quality coal. These crucial materials were sourced from Kyushu and Hokkaido, both of which are other Japanese islands. All these resources were transported by sea, so without easy access to raw materials, Japan's industrial output would come to a grinding halt. The only aircraft capable of deploying mines effectively where they were needed were the B-29s. Areas such as the Inland Sea, the Sea of Japan, and the Korean Peninsula were out of reach for other Allied aircraft. Additionally, Allied submarines could only venture into these perilous waters with great risk. Notably, about 80% of Japan's merchant fleet utilized the Shimonoseki Strait, a critical waterway that separates Kyushu from Honshu. Understanding the strategic advantage of closing this strait, LeMay decided to allocate an entire wing of B-29s specifically to mine this vital route. Brigadier General John Davies commanded the 313th Bombardment Wing, tasked with deploying approximately 2,000 naval mines each month into Japanese waters. The primary goals of this operation were to prevent essential raw materials and food supplies from reaching the Home Islands, hinder the supply and mobilization of Japanese military forces, and disrupt transportation routes in the Inland Sea of Japan. Between March 27 and April 12, Davies' bombers targeted key enemy shipping bases located in Kure, Sasebo, and Hiroshima. They also focused on the Shimonoseki Strait, a narrow and strategically important waterway that links the Inland Sea with the Tsushima Strait. Notably, after these attacks, this strait was successfully closed for two weeks. On May 3 and 5, the 313th Bombardment Wing laid down a total of 1,422 mines in the waters surrounding the Shimonoseki Strait, as well as near major urban centers like Tokyo, Nagoya, Kobe, and Osaka. These efforts aimed to severely disrupt maritime commerce between Japan's major industrial areas. Just a week later, the minefields expanded from the Shimonoseki Strait to include Kyushu, the southernmost of Japan's four main islands, and northwest Honshu, the largest island containing Tokyo. By the end of that month, these mines were proving remarkably effective, accounting for the sinking of more ships than Japanese submarines. In fact, within the Shimonoseki Strait alone, 113 ships had been sunk. Between June 7 and July 8, American forces expanded and fortified minefields along the western coast of Japan while also replenishing the existing minefields in the Shimonoseki Strait and the Inland Sea. During this effort, they successfully laid a total of 3,542 mines across 14 missions. The "total blockade" officially commenced on July 9 and continued until the end of the war. Throughout this period, American forces executed 474 sorties, dropping another 3,746 mines that replenished existing minefields and extended coverage to harbors in Korea. In total, Brigadier General Davies conducted 46 missions that laid down 26 minefields containing 12,135 mines. Remarkably, only 15 B-29s were lost during these operations. In turn, the mines accounted for the sinking or damaging of 670 Japanese ships, with a total loss of 1.25 million tons. This mining campaign effectively strangled Japanese industry, as the denial of essential raw materials to factories proved more disruptive than the direct bombing of the plants themselves. Despite the clear vulnerability of Japan's economy to disruptions in coastal shipping, Japanese authorities were alarmingly unprepared to address the threat posed by air-dropped mines. By August 1945, Japan had committed 349 ships and 20,000 personnel to counter the Starvation campaign, but these efforts were overwhelmingly ineffective. The shipping crisis escalated to such a degree that searchlights and anti-aircraft batteries were redeployed from urban centers to defend expected mining targets. Additionally, suicide boats were employed in desperate attempts to clear the minefields. Royal Navy historian S.W. Roskill commented on the situation, stating, “The blockade had, in fact, been far more successful than we realized at the time. Although submarines initially played a critical role in enforcing the blockade, it was the air-laid mines that ultimately strangled Japan.” Japanese officials shared this assessment. A director from a Tokyo steel company reflected on the situation, noting that the denial of essential raw materials to factories caused far greater disruption than the direct bombing of the plants themselves. This contradicted the views of US Army Air Forces experts back in Washington. In a striking remark after the war, a Japanese minesweeping officer told American forces, “The result of B-29 mining was so effective against shipping that it eventually starved the country. You could have likely shortened the war by starting this campaign earlier.” Meanwhile, General LeMay continued his firebombing campaign against Japan. By the end of May, urban areas around Tokyo Bay had been devastated, prompting the 21st Bomber Command to shift focus westward toward the densely populated industrial complexes lining Osaka Bay. On June 1, 521 B-29s were dispatched to bomb industrial targets situated along the Yodo River, with an escort of 148 P-51 fighters. Unfortunately, an undetected thunderstorm struck en route, which meant only 27 P-51s reached Osaka, while another 27 crashed, and the remaining fighters had to return to Iwo Jima. Despite these complications, the B-29s bombed from altitudes ranging between 18,000 and 28,500 feet, successfully dropping 2,788 tons of incendiary bombs on Osaka. The attack resulted in the burning of 3.15 square miles, destroying 136,107 houses and 4,222 factories. Four days later, on June 3, 530 unescorted B-29 Superfortresses launched a bombing raid on the city of Kobe. Of those, 473 aircraft targeted the city, resulting in the destruction of 4.35 square miles. This devastating strike led to the demolition of 51,399 buildings, while another 928 suffered significant damage. The raid, however, came with losses, as 11 bombers were downed, and 176 were damaged in the operation. On June 7, 449 B-29s returned to Osaka. Despite facing heavy cloud cover that restricted visibility, they managed to burn an additional 2.21 square miles of the city, destroying another 55,333 buildings. By the conclusion of General Curtis LeMay's maximum-effort area bombing campaign, the six most significant industrial cities in Japan, Tokyo, Nagoya, Kobe, Osaka, Yokohama, and Kawasaki, had been left in ruins. Major factories were either destroyed or severely damaged, while thousands of smaller household and feeder industrial units were consumed by flames. Casualty figures surged into six figures, leaving millions of people homeless. The evacuation of survivors further complicated efforts to secure labor for the factories that remained operational. Japan's air-raid protection system proved woefully inadequate to withstand a protracted siege by very heavy bombers. The system lacked sufficient organization, trained personnel, shelters, fire-fighting equipment, and facilities for relief and evacuation. Additionally, there was a significant deficiency in civilian indoctrination regarding emergency procedures. Under the relentless pressure of repeated major attacks, local Air Raid Precaution organizations collapsed, adding strain to an already overburdened imperial government. Japanese civilians, who had been conditioned by victory propaganda, displayed little of the discipline that helped German citizens endure years of aerial bombardment. As news of military defeats and the impact of B-29 precision strikes filtered into the great cities, residents began to lose confidence in their leaders' ability to protect them or care for the victims of the attacks. Abe Motoki, the Minister of Home Affairs at the time, later remarked, “I believe that after the raids on Tokyo on May 23-24, 1945, civilian defense measures in that city, as well as in other parts of Japan, were considered a futile effort.” Regarding the operational cost of this campaign for the 21st Bomber Command, it was not considered excessively burdensome. Over the course of 17 maximum-effort incendiary attacks, LeMay dispatched a total of 6,960 B-29s, which dropped 41,592 tons of bombs. The losses amounted to 136 B-29s, averaging only 1.9% of the sorties, a rate significantly lower than what had been endured in earlier months, and quite acceptable by the standards of conventional strategic bombing. Meteorologists predicted that the summer monsoon would keep Japan's skies covered with clouds for most of the upcoming months, from June to August. As a result, LeMay shifted strategies under what became known as the Empire Plan. This approach prioritized targeting industrial and military sites during daylight hours when the weather permitted, while secondary cities that had sufficient industrial capability became targets for nighttime area attacks. This change meant that since no single target warranted a full four-wing maximum effort, multiple missions could be scheduled in a single day. Accordingly, on June 9, 110 B-29s attacked three aircraft factories located in Narao, Atsuta, and Akashi. The strikes successfully destroyed the factories in Narao and Atsuta, but an unfortunate miscalculation led to the bombing of the town near Akashi. The following day, June 10, a force of 280 B-29s, escorted by 107 P-51 Mustang fighters, targeted six distinct sites in the Tokyo Bay area. The mission yielded significant results, with all targets sustaining heavy damage. Finally, on June 15, 516 B-29s were dispatched for one last firebombing raid against Osaka and the neighboring city of Amagasaki. In this combined assault, 444 bombers dropped over 1,350 tons of incendiary bombs, incinerating an additional 1.9 square miles in Osaka and more than half a square mile in Amagasaki. Starting on June 17, General Curtis LeMay's firebombing campaigns began to focus on medium-sized secondary cities across Japan. On that day, 477 B-29 Superfortresses targeted the cities of Omuta, Hamamatsu, Yokkaichi, and Kagoshima, burning a combined total of six square miles in these urban areas. The success of this initial multi-target mission ensured the continuation of the program, establishing an operational pattern that would remain standard during the final weeks of the war. In total, multiple incendiary attacks were conducted on sixteen occasions, averaging about two missions per week. Between June 17 and August 14, American forces carried out 8,014 sorties, dropping a staggering 54,184 tons of incendiaries across 58 secondary cities. On June 22, 446 B-29s were dispatched to strike six targets located in southern Honshu, including the crucial Kure Naval Arsenal. In this mission, 382 bombers released 2,103 tons of bombs, inflicting heavy damage to these essential manufacturing facilities. Just four days later, on June 26, a force of 510 B-29s, accompanied by 148 P-51 Mustang escorts, targeted locations in southern Honshu and the nearby island of Shikoku. However, dense clouds over much of the area complicated assembly and forced many aircraft to attack targets of opportunity individually or in small groups. As a result, adverse weather conditions would delay subsequent daytime raids until July 24. In the coordinated strike program that commenced in June, the decision to focus on either the Empire Plan or urban industrial targets was largely influenced by weather conditions. As the program took shape, the 315th Bombardment Wing (VH) became available for combat operations. This wing operated somewhat independently from the other bomber units, with its activities significantly guided by the specialized equipment of its aircraft. Authorized for deployment in the Pacific in December 1944, the 315th settled at Northwest Field, Guam, during May and June. Its commander, Brigadier General Frank A. Armstrong, Jr., was a seasoned veteran of the strategic air offensive against Germany. The B-29s of the 315th Wing differed in two key respects from those of other units. They were equipped with the AN/APQ-7 (Eagle) radar, a sophisticated radar system designed for bombing, instead of the conventional AN/APQ-13 radar. The latter had primarily served as a navigational aid. While crews had become adept at using the AN/APQ-13 for night or poor-weather bombing, it lacked the precision necessary for accurate strikes. The Eagle radar, however, offered significantly greater definition and, although it required a long bomb run averaging seventy miles, this was not considered a serious hindrance in the tactical context of Japan. To further enhance its night-bombing capabilities, the Superfortresses had been stripped of all armament except for the tail gun. This modification, along with the Eagle radar, clearly marked the 315th as a dedicated night-bombing unit. There were various proposals for the use of these specially equipped B-29s, including high-altitude bombing, area bombing, and aerial mining. However, by the time the 315th Wing was ready for combat, the 313th Bombardment Wing had already gained proficiency in aerial mining, while all wings had become adept at area bombing using the AN/APQ-13. Training for the 315th had focused heavily on night radar tactics, with less emphasis on visual bombing and daytime formation flights. It was evident that if the Eagle radar was to undergo a thorough scientific evaluation, it should be tested against a specific set of targets that were preferably large in size and located along the coastline. In the view of the 21st Bomber Command, the oil industry met these requirements perfectly. The 315th Bombardment Wing initiated its specialized campaign on June 26 with a targeted strike against the Utsube Oil Refinery in Yokkaichi, the top-priority target. By August 14, the wing had conducted 15 additional missions against a total of 10 targets, which included various petroleum refineries and synthetic plants, such as the Maruzen Oil Company in Wakayama, Mitsubishi Oil Company in Kawasaki, and Nippon Oil Company plants spread across Akita, Kansai, Kudamatsu, and Amagasaki, as well as the Imperial Fuel Industry Company in Ube and Toa Fuel Industry in Wakayama. During the campaign, the 315th Wing dispatched a total of 1,200 B-29s, 1,095 of which successfully bombed their primary targets, dropping 9,084 tons of 500-pound general-purpose bombs deemed particularly effective against the scattered installations. The increase in bomb load capacity was made possible by stripping the planes of unnecessary equipment and conducting bombing missions individually at night. As the crews gained experience, they were able to increase the average weight carried from 14,631 pounds during the first mission to 20,684 pounds by August 9. Despite concerns about safety from removing most of the aircraft's armaments, only four planes were lost and 66 sustained damage throughout the campaign. The 20th Air Force estimated that the B-29 attacks led to the destruction of approximately 6 million barrels of tank storage capacity, and the United States Strategic Bombing Survey (USSBS) reported that refining capacity had been reduced from 90,000 barrels a day in December 1941 to around 17,000 barrels. However, the strategic impact was more apparent than real, as many storage tanks were empty and refinery production had fallen to just 4% of capacity before the very heavy bomber campaign began. The lack of precise intelligence regarding the state of Japan's economy had justified the emphasis on the oil program as a form of reinsurance. Nevertheless, the blockade had effectively severed the nation's oil resources, resulting in tankers remaining idle at the docks. On July 1, Admiral Halsey's 3rd Fleet departed San Pedro Bay to initiate the first preliminary strikes in preparation for Operation Olympic. This operation involved battleships and heavy cruisers conducting surface bombardments of industrial targets in eastern Japan, while lighter forces performed anti-shipping sweeps along the coast. Additionally, a fleet of submarines advanced ahead of Admiral McCain's Task Force 38 to eliminate picket boats and establish lifeguard positions. At 18:15 on July 9, the force began its 25-knot approach toward the Home Islands, launching its first strikes against the Tokyo area at 04:00 on July 10. A total of 1,732 sorties were executed, targeting locations from Koriyama to Hamamatsu, dropping 454 tons of bombs and 1,648 rockets over Honshu with negligible opposition. American airmen reported the destruction of 109 enemy aircraft and damage to 231 during these strikes. Following this, Halsey's fleet moved north to bombard Hokkaido and northern Honshu, which were beyond the effective range of the B-29s and had previously evaded attack. At 05:59 on July 14, Rear-Admiral John Shafroth's Bombardment Group Able, consisting primarily of three battleships and two heavy cruisers, was tasked with attacking the Kamaishi Works of the Japan Iron Company. By midday, Shafroth's forces had opened fire on Kamaishi, marking the first surface bombardment of Japan by a hostile fleet in over 80 years. Between 12:10 and 14:19, a total of 802 16-inch shells, 728 8-inch shells, and 825 5-inch shells were expended, setting the town ablaze as key industrial and residential targets were hit and resulting in the sinking of one oil tanker, two barges, and one small ship in the harbor. Simultaneously, McCain's carriers closed to within 80 nautical miles of Japan, launching 1,391 sorties against Hokkaido and northern Honshu to target railways, shipping, and airfields, again facing only light resistance. In the ensuing strikes, American planes sank over 50,000 tons of shipping and naval craft, including the destroyer Tachibana, four minesweepers, eight naval auxiliaries, and around 20 merchant vessels, with significant losses occurring at Muroran and Hakodate. In addition, 25 enemy planes were destroyed, while American losses totaled 24 aircraft and 17 airmen, about half of whom were lost in combat. Task Force 38 launched another assault on July 15, executing 966 combat sorties that dropped 355 tons of bombs and expended 2,093 rockets. This operation resulted in the sinking of 65 vessels and damaging 128 others, as well as the destruction of 48 locomotives and damage to 28. Widespread destruction was inflicted on several facilities, particularly the Aomori–Hakodate railcar ferry system, which transported 30% of the coal between Hokkaido and Honshu. The strikes devastated the ferry system, sinking eight ferries, beaching eight more, and damaging two. In total, 70 auxiliary sailing colliers were sunk, and 11 were damaged, along with 10 steel freighters lost and 7 damaged. The ferry strikes were the brainchild of Halsey's operations officer, Captain Ralph “Rollo” Wilson. “When the first action reports began to sift in,” Halsey related: He snatched them up and pored over them; the ferries were not mentioned. Later reports also ignored them. Rollo was sulking and cursing when the final reports arrived. I heard him whistle and saw him beam. “Six ferries sunk!” he said. “Pretty soon we'll have ‘em moving their stuff by oxcarts and skiffs!” Additionally, 20 city blocks in Kushiro were razed. The most significant outcome of these operations was the virtual severance of Hokkaido from Honshu. By the end of the raids, Halsey's 3rd Fleet had achieved the sinking of 140 ships and small craft, damaging 235 others, and destroying 38 planes while damaging 46. Meanwhile, Rear-Admiral Oscar Badger's Bombardment Group Baker, composed of three battleships, two light cruisers, and eight destroyers, was assigned to bombard Muroran. Between 09:36 and 10:25, this group fired 860 16-inch shells at the Nihon Steel Company and the Wanishi Ironworks, targeting both the coal liquefaction plant and coke ovens. This bombardment inflicted severe damage on those facilities and resulted in the destruction or damage of 2,541 houses in Muroran. As Hasley recalled “These sweeps and bombardments accomplished more than destruction. they showed the enemy that we made no bones about playing in his front yard. From now on, we patrolled his channels and shelled his coast almost every night that the weather permitted.” Additionally, Rear-Admiral James Cary Jones' four light cruisers conducted a sweep along the east coast of Honshu to hunt for Japanese shipping; however, they reported no contacts during their mission. Early on July 16, Task Force 38 retired east of Honshu to begin refueling and rendezvoused with Admiral Rawlings' Task Force 37, which agreed to operate closely as an additional task group for Admiral Halsey. At 03:50 on July 17, the two task forces began launching strikes against central Honshu despite adverse weather conditions. The American forces executed 205 sorties targeting the Mito area, while British aircraft flew 87 sorties against airfields and railyards along the northwest coast of Honshu. Despite the bad weather, several small craft and locomotives were destroyed, though the operation resulted in the loss of nine aircraft and four airmen. Later that afternoon, Halsey detached Badger's augmented Bombardment Group to attack Hitachi, a significant industrial and electronics-producing city. The 53-minute bombardment commenced in fog and rain at 23:14, during which 1,207 16-inch shells, 267 14-inch shells, and 292 6-inch rounds were expended against the Tago and Mito Works of the Hitachi Manufacturing Company, as well as the Yamate Plant and copper refining facilities of Hitachi Mine, resulting in severe devastation. On July 18, McCain's two leading carriers launched a total of 592 sorties against Yokosuka, specifically targeting the heavily camouflaged battleship Nagato at the naval base. The attacks resulted in the sinking of one old cruiser, one minesweeper, one submarine, one incomplete destroyer, and three patrol vessels, in addition to damaging one subchaser, one old destroyer, and one old battleship. Although Nagato was hit multiple times and suffered heavy damage, it managed to stay afloat. Meanwhile, three carriers also targeted airfields and other opportunities in Tokyo, while Task Force 37 attacked a seaplane base at Kitaura and airfields at Nobara, Naruto, Chosi, Kanoike, Natori, and Kitakawa. The recent raids resulted in the destruction of 43 enemy planes and damage to 77 others on the ground, along with the destruction of three locomotives and the derailing of four electrified train cars by rockets. However, the American forces incurred losses of 14 aircraft and 18 aircrew, as the 3rd Fleet flyers reported encountering the fiercest anti-aircraft fire they had yet experienced. Additionally, Rear-Admiral Carl Holden's four light cruisers were detached during the night to sweep shipping off Sagami Bay and to target the radar site at Cape Nojima. On July 21, Captain Thomas Hederman's Destroyer Squadron 61, consisting of nine destroyers, was assigned to conduct another anti-shipping sweep off Sagami Bay. Pursuing four radar contacts, the destroyers engaged targets at midnight on July 22, firing guns and torpedoes from 7,000 yards. This action resulted in the sinking of the 800-ton freighter No.5 Hakutetsu Maru and damaging the 6,919-ton Enbun Maru. In response, Japanese coastal artillery, the minesweeper W-1, and subchaser Ch-42 returned fire, but Hederman's squadron successfully retired without damage. Although minor in scale, the Battle of Sagami Bay would ultimately be the last surface action of the war. Meanwhile, as part of Operation Barney, a planned submarine penetration of the Sea of Japan, nine submarines succeeded in sinking 27 Japanese merchant vessels and one submarine, totaling 54,786 tons. On June 8, the submarine Barb commenced her twelfth patrol, tasked with terrorizing the Sea of Okhotsk using her newly installed 5-inch rocket launchers. Over the following weeks, Skipper Commander Eugene “Luckey” Fluckey executed successful rocket bombardments on Shari, Hokkaido, and targets in Shikuka, Kashiho, and Shiritoru on Karafuto (southern Sakhalin), also employing the submarine's deck guns to destroy 35 sampans in the town of Kaihyo To. Observing Karafuto trains transporting military supplies to ports, Fluckey devised a plan to intercept these trains. Engineman Third Class Billy Hatfield recalled how, as a child, he had placed nuts on railroad ties and watched as the weight of passing trains cracked them between rail and tie. Realizing this principle could be adapted, he suggested rigging an automatic detonator. Fluckey had many volunteers for the mission, including a Japanese POW, and carefully selected Hatfield and seven others, deciding against leading the shore party himself. Just after midnight on July 23, 1945, Fluckey maneuvered Barb to within 950 yards of the Karafuto coast. Led by Lieutenant William Walker, the team launched two rubber rafts at 00:30. Before they left, Fluckey instructed them, “Boys, if you get stuck, head for Siberia, 130 miles north, following the mountain ranges. Good luck.” Upon reaching the shore, the Americans located the tracks and buried a 55-pound scuttling charge and battery beneath the rails, positioning it under a water tower they planned to use as a lookout. As Motor Machinist's Mate First Class John Markuson climbed up, he unexpectedly found he was scaling a sentry tower, causing him to retreat without alerting the sleeping guard. When a train passed, the team dove for cover before resuming their work after it had gone by. Shortly after 01:30, Walker's team signaled their return to Barb, which was now just 600 yards offshore. Fifteen minutes later, while the boats were halfway back, Fluckey heard the rumble of an approaching train. He hoisted a megaphone and urged the crew to “Paddle like the devil, boys!” At 01:47, a 16-car Japanese train struck Hatfield's detonator, resulting in a massive explosion that sent debris soaring 200 feet into the air and reportedly killed 150 Japanese. Minutes later, all eight Americans were safely aboard Barb, which then slipped back into the night, having successfully executed the only amphibious invasion of Japan during World War II. Returning to the main action, Halsey aimed to eliminate the remnants of the Combined Fleet at the heavily fortified Kure Naval Base. Consequently, Task Force 38 began launching the first of 1,363 sorties against ships and airfields in Kyushu, Shikoku, and Honshu, ringing the Inland Sea at 04:40 on July 24. A total of 599 tons of bombs and 1,615 rockets were unleashed over Kure, resulting in the sinking or damaging of 22 warships, which totaled 258,000 tons. Among the affected vessels were the battleships Hyuga, Ise, and Haruna; fleet carriers Amagi and Katsuragi; the escort carrier Kaiyo; heavy cruisers Tone and Aoba; as well as light cruisers Oyodo and Kitakami. In addition, another 53 vessels amounting to 17,000 tons were sunk at various locations, including Hiroshima Bay, Niihama, Bungo Channel, and Kii Channel. At Kobe, the incomplete fleet carrier Aso was also attacked and damaged. American Hellcats and Corsairs effectively swept aside Japanese aerial opposition, shooting down 18 enemy planes while destroying 40 aircraft and damaging another 80 on the ground. Furthermore, around the Inland Sea, 16 locomotives were destroyed and five were damaged, while 20 hangars sustained damage. Three oil tanks were set ablaze at Kure and one at Tano. Additionally, four electric trains and a roundhouse were strafed at Hamamatsu, and various military installations, including barracks, warehouses, power plants, and factories around the airfields, received significant damage. Simultaneously, Rear-Admiral Rawlings' Task Force 37 conducted 257 sorties against targets in Japan and the surrounding offshore areas, sinking the escort carrier Shimane Maru in Shido Bay, along with a number of destroyers, small escorts, and coasters. Meanwhile, Jones' light cruisers swept through the Kii Channel before bombarding the Kushimoto seaplane base and airfields at Cape Shionomisaki during the night. Supporting these efforts, General LeMay dispatched 625 B-29s against seven targets in the Nagoya and Osaka areas, successfully inflicting heavy damage on all of them despite the spotty weather, marking this as the last major attack on the Japanese mainland during the war, as two weeks of cloudy weather ensued. In the early hours of July 25, McCain's aircraft carriers resumed launching strikes against airfields and shipping in the Inland Sea and the Nagoya-Osaka areas. During this operation, they executed a total of 655 sorties, expending 185 tons of bombs and 1,162 rockets, successfully sinking nine ships totaling 8,000 tons and damaging another 35 vessels. The strikes also resulted in the downing of 21 Japanese planes, with an additional 61 aircraft destroyed on the ground and 68 damaged. After refueling on July 27, Halsey's carrier forces moved to launch points located 96 nautical miles off Shikoku. At 04:43 on July 28, they resumed strikes over the Inland Sea, focusing on targets from northern Kyushu to Nagoya, as well as airfields across Honshu along the Sea of Japan. This resulted in McCain flying a total of 1,602 sorties, dropping 605 tons of bombs and expending 2,050 rockets. These attacks sank 27 ships, amounting to 43,000 tons, including the battleships Ise and Haruna, the fleet carrier Amagi, and the Combined Fleet flagship Oyodo. Additionally, 78 vessels totaling 216,000 tons were reported damaged, among them the fleet carrier Katsuragi, heavy cruiser Tone, and light cruiser Kitakami. American pilots reported the destruction of 21 Japanese aircraft in the air and claimed 115 destroyed on the ground across 30 area airfields. They also successfully destroyed 14 locomotives, four oil cars, two roundhouses, three oil tanks, three warehouses, one hangar, and a transformer station. In support of these efforts, Task Force 37 conducted 260 sorties against the eastern Inland Sea, targeting the dockyard at Harima and sinking or severely damaging four corvettes at Maizuru. Meanwhile, the 7th Air Force's 11th and 494th Bombardment Groups carried out a day-long raid on Kure, successfully sinking the heavy cruiser Aoba. By sunset that evening, the Imperial Japanese Navy had effectively ceased to exist, though the cost for the Americans was steep, with losses amounting to 101 planes and 88 men since July 24. As Halsey moved east to target the Osaka-Nagoya area, Shafroth's reinforced Bombardment Group was detached on July 29 to bombard Hamamatsu. During the night, they successfully unloaded 810 16-inch shells, 265 14-inch shells, and 1,035 8-inch shells, damaging the Imperial Government Railway locomotive works, igniting a blaze at the Japanese Musical Instrument Company, and wreaking havoc on infrastructure along the critical Tokaido main line. The following day, McCain's carriers conducted 1,224 sorties against airfields in Osaka, Kobe, Maizuru, and Nagoya, expending 397 tons of bombs and 2,532 rockets. These strikes resulted in the sinking of 20 vessels totaling 6,000 tons and damaging another 56 ships. The pilots also claimed destruction of 115 enemy aircraft on the ground, while inflicting severe damage on numerous industrial targets, including aircraft factories and naval docks in Maizuru. In Miyazu Bay, the destroyer Hatsushino struck an air-dropped naval mine, marking the final loss of 129 Japanese destroyers sunk during the war. That night, seven destroyers advanced deep into Suruga Bay, unleashing 1,100 5-inch shells on Shimizu within seven minutes, successfully destroying or damaging 118 industrial buildings. Typhoon weather would impede the operations of the 3rd Fleet for the next two weeks, as Admiral Nimitz ordered Halsey to steer clear of southern Japan, which was set to become the target of a new and deadly weapon: the atomic bomb. The U.S. Army had begun its project to develop an atomic bomb on August 16, 1942, under the auspices of the Manhattan Project. The project was directed by Major-General Leslie Groves and involved renowned scientists such as Robert Oppenheimer, Enrico Fermi, Niels Bohr, Richard Feynman, and Albert Einstein. Over time, it expanded to include a design center at Los Alamos and two production facilities at Hanford and Clinton. By August 1945, the teams at Los Alamos had successfully designed, developed, and built a gun-type atomic bomb capable of forcing five pounds of uranium-235 against another 17 pounds at high speed, thereby achieving critical mass and releasing immense heat, light, blast, and radiation. The team was also experimenting with an even more powerful device: the plutonium bomb, which utilized an implosion method whereby a sphere of plutonium was compressed by conventional explosives to reach criticality. By early August, scientists had managed to produce enough nuclear material to create only one uranium device, known as Little Boy, and one plutonium bomb, referred to as Fat Man. Each weapon had the potential to annihilate an entire city, and American leaders were prepared to use them if it could compel the Japanese Empire to surrender without necessitating an invasion of Japan. A Targeting Committee led by Groves, consisting of Manhattan Project and Air Force personnel, recommended Hiroshima, Niigata, Kokura, and Nagasaki as primary targets. Groves' Targeting Committee employed several criteria to select sites for atomic bomb targets. The chosen targets had to possess strategic value to the Japanese and be situated between Tokyo and Nagasaki. Additionally, the target needed to feature a large urban area with a minimum diameter of three miles and must be relatively untouched by previous bombings, ironically spared for potential atomic destruction at a later stage. A crucial condition was that, to the best of their knowledge, these areas should harbor no concentrations of Allied prisoners of war. However, this requirement was challenging to ascertain accurately due to a lack of reliable information about the locations of prisoners. Initially, the committee considered 17 candidates and selected five primary targets: Hiroshima, Yokohama, Kokura, Niigata, and Kyoto. On May 28, they narrowed the list to three: Kyoto, Niigata, and Hiroshima. Hiroshima was significant as it housed Hata's 2nd General Army headquarters and featured a large shipyard, while Niigata was a major industrial city with an important port. Moreover, Kyoto held considerable cultural and religious significance for the Japanese. Secretary of War Stimson, having previously cautioned General Arnold about the humanitarian consequences of targeting cities with incendiary bombings, insisted on removing Kyoto from the list after intense discussions with Groves. On July 21, President Truman concurred with Stimson during their meetings in Potsdam, deciding that Kyoto should be spared. Subsequently, Kokura, known for its large arsenal and ordnance works, replaced Kyoto. Additionally, LeMay's staff reportedly included Nagasaki as an alternate target due to potential weather issues, as it was home to Mitsubishi's arms factories, electric production facilities, ordnance works, and extensive dockyards, making it a valuable target. Meanwhile, a high-level civilian Interim Committee, under Secretary of War Henry Stimson, ultimately advised President Truman on the use of nuclear weapons, reasoning that their deployment would be no worse than the current incendiary bombing campaigns against Japan. The committee also recommended that an atomic bomb be deployed as soon as possible, without warning, to maximize shock value and target a "war plant… surrounded by workers' houses." Following a successful operational test of the experimental plutonium bomb conducted at Trinity on July 16, President Truman authorized General Spaatz to prepare for the bomb drops before August 3. Colonel Paul Tibbets' 509th Composite Group had been specially organized in secret since September 1944 to deliver nuclear weapons, and by June, it had arrived at Tinian under the command of LeMay's 21st Bomber Command. General Twinning replaced LeMay as commander of the 21st on August 1, and he would ultimately issue the direct orders for Tibbets to drop the atomic bomb. The atomic bomb mission had a convoluted command structure. The Joint Chiefs of Staff were largely left out of the chain of command. LeMay was Tibbet's nominal commander; however, Groves still had extensive control over the operation through his deputy Brigadier General Thomas Farrell on Tinian. The 21st Bomber Command would determine when the atomic bomb mission was launched, based on suitable weather conditions. Even at this stage, General of the Air Force Henry "Hap" Arnold and LeMay were still skeptical about the Manhattan Project; they thought B-29 incendiary and high-explosive bombing operations would suffice to end the war soon. LeMay even questioned the 509th CG pilots' ability to conduct the mission; he wanted seasoned Pacific B-29 veteran crews to drop the nuclear cargo. While the Imperial Japanese Army (IJA) and Imperial Japanese Navy (IJN) prepared for an impending invasion, the U.S. Army Air Forces (USAAF) continued its bombing campaign against Japan. The crews of the 509th Composite Group needed to acclimate to the navigational challenges, varied weather conditions, extensive distances, and the geography of the region, all while becoming accustomed to combat situations. Training commenced at Tinian on June 30, with conventional operational missions over Japan beginning on July 20. To prepare for their atomic missions, the crews trained with "pumpkins," which were specially constructed bombs designed to mimic the appearance and weight of nuclear weapons. This allowed them to practice handling and releasing the bombs. They also rehearsed navigational procedures, visual bomb release techniques, and dropping the weapon at an altitude of approximately 30,000 feet. Following the drop, the crew conducted high-speed, radical turns to evade the nuclear effects after detonation. During their first mission, a B-29 from the 509th sought an alternative target in Tokyo. The crew aimed to drop their 10,000-pound "pumpkin" on the Imperial Palace, but unfortunately, they missed their target. Had they succeeded in killing the emperor, it could have significantly impacted Japan's decision-making process, potentially fortifying the Japanese people's resolve to continue the war. Military leaders might have seized control in the aftermath, pushing their forces to keep fighting. Throughout their training, the units of the 21st Bomber Command intentionally avoided targeting Hiroshima, Niigata, Kokura, and Nagasaki during these practice runs. In total, Tibbets directed his crews on numerous combat missions that targeted 28 cities and involved the dropping of 49 "pumpkins." Remarkably, the 509th lost no aircraft during these operations. While Tibbets focused on perfecting the delivery method, the weapons Little Boy and Fat Man were being transported to Tinian. Some weapon assemblies were delivered by C-54 and B-29 aircraft from Kirtland Field near Albuquerque, while the cruiser Indianapolis delivered the fissionable material for Little Boy from San Francisco on July 26. Four days later, the submarine I-58 unexpectedly attacked the Indianapolis with six torpedoes while the cruiser was en route to Guam, successfully sinking it. Of the crew, 850 Americans survived the sinking, and another 316 were belatedly rescued by August 8. By July 31, most of the assembly of Little Boy had been completed. However, a detonation expert would need to emplace the cordite charges to fire the uranium "bullet" through the gun device to the uranium core after take-off, minimizing the risk of an inadvertent nuclear explosion in the event of a B-29 crash. Additionally, the crew carrying the atomic bomb had to exercise caution when descending once Little Boy was armed because the primary radar or a backup barometric fuse could potentially trigger an explosion if the aircraft descended too rapidly with the fuses in place. On August 2, B-29 crews arrived at Tinian with the assemblies for Fat Man. On that same day, General Twinning and President Truman approved the plan to bomb Hiroshima. Two days later, Colonel Tibbets briefed the crews about the mission, confirming that he would pilot the aircraft carrying the atomic bomb. Tibbets' B-29 No. 82, later named Enola Gay, was supported by three weather reconnaissance aircraft that reported conditions at Hiroshima, Kokura, and Nagasaki, as well as two additional B-29s assigned to conduct scientific and photographic missions. At 02:45 on August 6, Enola Gay took off from Tinian, with diversionary attacks by 604 B-29s throughout Japan also scheduled for that day, as coordinated by Twinning. After passing through Iwo Jima at approximately 05:55, Captain William Parsons and Second-Lieutenant Morris Jeppson armed the bomb at 07:30. Throughout the journey, the B-29s ascended slowly, reaching an altitude of over 30,000 feet as they crossed Shikoku and Honshu, finally reaching Hiroshima at 31,060 feet. At 09:12, Tibbets executed his final approach from the 'initial point', flying east-west over the city towards the intersection of the Ota and Motoyasu Rivers. Approximately at 09:15, Little Boy was released, and Enola Gay immediately began its turn away to escape the impending explosion. However, the bomb mistakenly descended towards the Shima Surgical Hospital rather than the intended target, the Aioi Bridge. At 09:16, Little Boy detonated at an altitude of 1,890 feet, just as Tibbets was about six miles away from the blast point. As a result of the atomic blast, the immediate area around the epicenter was heated to an astonishing 1 million degrees Celsius, instantly incinerating or vaporizing all people, animals, buildings, and other items within that zone. Hiroshima police officials estimated that immediate casualties amounted to 71,379 individuals who were either killed or reported missing. In the surrounding areas, the blast effects crushed unreinforced structures before igniting them, resulting in an additional 68,023 wounded, with 19,691 of those injuries classified as serious. Subsequent assessments, potentially incorporating the impacts of radiation sickness or more precise accounting, recorded 30,524 individuals as seriously wounded and 48,606 as slightly wounded. Just two minutes after detonation, a growing mushroom cloud of highly radioactive dust and debris soared to a height of 20,000 feet. Within eight minutes, Tibbets' crew could observe the mushroom cloud from 390 miles away. Ultimately, the dust cloud peaked at approximately 60,000 feet in altitude. Soon after, a thick, black, radioactive rain fell upon the areas beneath the cloud. The center of the city was utterly devastated; over four square miles of the urban center, which encompassed seven square miles in total, were completely flattened, resulting in about 60% of the city's area being destroyed. An additional 0.6 square miles suffered damage, while more than 75% of the city's 90,000 buildings were obliterated. The ensuing fires compounded the devastation, contributing to countless deaths and injuries. Tragically, some American prisoners of war were present in Hiroshima and lost their lives in the explosion. Meanwhile, Enola Gay safely returned to Tinian at 14:58, where Tibbets was awarded the Distinguished Service Cross, while the rest of the crew received Distinguished Flying Crosses for their participation in the mission. I would like to take this time to remind you all that this podcast is only made possible through the efforts of Kings and Generals over at Youtube. Please go subscribe to Kings and Generals over at Youtube and to continue helping us produce this content please check out www.patreon.com/kingsandgenerals. If you are still hungry after that, give my personal channel a look over at The Pacific War Channel at Youtube, it would mean a lot to me. Japan was broken. To be perfectly honest she had been broken long ago. Her leadership had been spending months trying to figure out the best possible way to surrender, while the civilians and troops were suffering horribly. Aerial mining strangled her of food, high explosive and incendiary bombs, killed untold scores of people, and then the Atomic weapons were let loose upon her. It was over.

Seaweed farms offer many benefits. They provide food for people, habitat for fish and other organisms, and protection against erosion during storms. They can help prevent “red tides,” and could become a source of biofuel. Seaweed stores carbon in the sediments on the ocean floor. That helps reduce the amount of carbon dioxide in the atmosphere, which is the major cause of our warming climate. Wild seaweed forests already stash away huge amounts of carbon. Farms cover a much smaller area, so their benefit is smaller. But seaweed farming is a “growing” business—the yield has been increasing by more than seven percent per year. Almost all of the farming takes place in Asia. The United States is a minor player, but farms have been developed in New England, the Pacific Northwest, and Alaska. Researchers studied the sediments below 20 seaweed farms in various parts of the world. The oldest, in Tokyo Bay, has been around for 320 years. The largest, in China, covers 58 square miles. The scientists found that the amount of carbon in the sediments below the farms was twice that found in the surrounding sediments. And they found that as a farm ages, it becomes more efficient at “planting” the carbon. Estimates say that seaweed farms could cover many times their present area by 2050. And the researchers said that if the farms are efficiently managed, they could become important weapons in the fight against our warming climate. The post Carbon Farms appeared first on Marine Science Institute. The University of Texas at Austin..
Seaweed farms offer many benefits. They provide food for people, habitat for fish and other organisms, and protection against erosion during storms. They can help prevent “red tides,” and could become a source of biofuel.Seaweed stores carbon in the sediments on the ocean floor. That helps reduce the amount of carbon dioxide in the atmosphere, which is the major cause of our warming climate.Wild seaweed forests already stash away huge amounts of carbon. Farms cover a much smaller area, so their benefit is smaller. But seaweed farming is a “growing” business—the yield has been increasing by more than seven percent per year. Almost all of the farming takes place in Asia. The United States is a minor player, but farms have been developed in New England, the Pacific Northwest, and Alaska.Researchers studied the sediments below 20 seaweed farms in various parts of the world. The oldest, in Tokyo Bay, has been around for 320 years. The largest, in China, covers 58 square miles.The scientists found that the amount of carbon in the sediments below the farms was twice that found in the surrounding sediments. And they found that as a farm ages, it becomes more efficient at “planting” the carbon.Estimates say that seaweed farms could cover many times their present area by 2050. And the researchers said that if the farms are efficiently managed, they could become important weapons in the fight against our warming climate.

He led Scotland. Now he's building better leaders one brutal truth at a time. From test matches to Tokyo Bay, Greig Laidlaw shares what leadership really looks like when ego's out, pressure's on, and you've got no place to hide.What happens when the armband comes off and the clipboard goes on?Former Scotland captain Greig Laidlaw has seen leadership from every angle: on the pitch, in the locker room, and now in the coach's box in Japan. In this episode, Greig gets painfully honest about the cost of poor leadership, why some captains shouldn't be captains, and what it really takes to build belief in yourself and your team.This isn't a highlight reel it's a deep dive into cultural collisions, emotional discipline, and the fine line between authority and authenticity.Why listen to this episodeIf you think leadership is about having the loudest voice in the room, this episode might hurt your feelings. And that's the point.You've been handed the title, but not the toolsYou want to build a team culture that actually works under pressureYou're trying to lead in a culture that doesn't like being questionedYou're still figuring out how to lead without losing yourselfYou want to hear from someone who's done the hard yards and still says, “Here's what I'm shit at”“Sometimes leadership isn't about stepping up it's about stepping back.”Because great leaders don't need the armband to lead.“We said yes… but we didn't mean it. We were just being polite.”Culture clash 101: politeness ≠ alignment.“He was a better leader the minute we took the captaincy off him.”Titles don't make leaders. Sometimes they ruin them.“Stop blaming the lack of leaders. Start building them.”Call HR. That one left a bruise.“If you let others lead, they'll surprise you. If you don't, they won't.”Control is not the same as leadership. It's just anxiety in uniform.“Am I doing the right thing here? Am I qualified?”Spoiler: That's what real leaders ask themselves. Not the loud ones.“Ego is the enemy and if you don't check it, the game will.”Turns out the pitch is better at spotting arrogance than your performance review.“The best players walk the line between control and chaos—and never tip red.”This isn't just rugby. This is emotional intelligence under fire.
Last time we spoke about the fall of Wewak. In June 1945, Allied forces, led by General George Stevens, intensified their campaign to capture the strategic town of Wewak in New Guinea. After years of grueling combat, they relentlessly pressed against entrenched Japanese defenses, including the remnants of General Mano's 41st Division. The Australians achieved critical victories by securing vital supply routes and establishing new airfields, facilitating their advance. By May 8, after intense fighting, Australian troops effectively seized Wewak Point, eliminating entrenched Japanese soldiers in bunkers and caves. Despite suffering casualties, the Australians distinguished themselves through bravery and tactical ingenuity. Ultimately, the successful capture of Wewak marked a pivotal moment in the Pacific campaign, showcasing the determination and spirit of the Allies as they pushed towards victory in the Pacific Theater, bringing an end to a crucial chapter of the war. This episode is Operation Downfall Welcome to the Pacific War Podcast Week by Week, I am your dutiful host Craig Watson. But, before we start I want to also remind you this podcast is only made possible through the efforts of Kings and Generals over at Youtube. Perhaps you want to learn more about world war two? Kings and Generals have an assortment of episodes on world war two and much more so go give them a look over on Youtube. So please subscribe to Kings and Generals over at Youtube and to continue helping us produce this content please check out www.patreon.com/kingsandgenerals. If you are still hungry for some more history related content, over on my channel, the Pacific War Channel you can find a few videos all the way from the Opium Wars of the 1800's until the end of the Pacific War in 1945. After the fall of Okinawa, the Allies were mopping up campaigns across the Asia-Pacific and planning for what was assumed to be the most cataclysmic battle yet, the invasion of the Japanese home islands. First we are going to travel back to Luzon. By mid-June, General Krueger's 6th Army had successfully captured all key objectives in northern Luzon, southern Luzon, and the area east of Manila, which serves as the capital of the Philippines. Although General Yokoyama's poorly equipped 41st Army had been rapidly scattered and forced into hiding, General Yamashita's Shobu Group still retained enough strength to continue its resistance in northern Luzon. The Shobu Group was primarily gathering its units in a desperate last-stand position along the rugged valley of the Asin River, an area known for its difficult terrain. Interestingly, General Krueger underestimated Yamashita's strategic intentions, still expecting him to make his final stand in the Cagayan Valley, located in the northern part of Luzon. With this assumption, Krueger believed that if General Beigthler's 37th Division could maintain its rapid advance towards Aparri, situated at the northern tip of Luzon, they might be able to conclude the Luzon Campaign in a pivotal stroke. However, intelligence indicated that units of the Shobu Group were retreating into the Cordillera Central mountain range, a formidable natural barrier, located between Routes 4 and 11. In response, Krueger ordered the 1st Corps to exert strong pressure on this mountainous region from the north, south, and west. To implement this strategy, General Swift directed the 6th, 25th, and 33rd Divisions to clear the supply route between Baguio and Aritao, ultimately sealing off Yamashita's last-stand position from the south. Meanwhile, Colonel Volckmann's guerrilla forces were instructed to advance east from Cervantes to capture the crucial junction of Routes 4 and 11 at Sabangan. Recognizing the importance of controlling key roadways, the 63rd Regiment was tasked with pushing up Route 4 to seize the strategic location of Kiangan. In the south, the 130th Regiment began probing southeast towards Pigkian, while the 20th Regiment continued to apply pressure on the remnants of the now-battered 2nd Tank Division. Ultimately, General Iwanaka's weakened forces narrowly avoided entrapment along the Bambang-Pingkian road, retreating northward via treacherous mountain trails and river valleys. They reached the Tubliao area just as early July arrived, illustrating the persistent and relentless nature of this campaign. Looking northward from Cervantes, Volckmann's guerrilla fighters launched attacks toward both Mankayan and Sabangan. By the end of June, their efforts had pressured the beleaguered 19th Division to hastily withdraw from Bontoc, a significant town located in central Luzon, and Sabangan. However, General Ozaki's forces maintained a formidable defensive position at the Lepanto Mine, an area known for its mineral wealth and strategic significance. On June 16, the 63rd Regiment began its advance up Route 4, which runs north through the central highlands toward Kiangan, a town that was critical for controlling the region. By the evening of the following day, American forces had successfully breached the defensive line established by the 105th Division at the Rayambugan Farm School, a local educational institution that was repurposed for military use during the conflict. Continuing their push, the 63rd Regiment encountered the main defenses of General Tsuda on June 19 along Route 4. However, over five days of fierce fighting, utilizing only one battalion for the attack, gained little ground for the Americans. Recognizing the need for greater force, they reinforced their assault on June 24. By June 26, the 63rd began to break through towards Hucab, a small settlement, and by June 29, they had overcome the last organized resistance in the area. Meanwhile, the 37th Division also made significant advances. Resuming its drive up Route 5 on June 17, the 148th Regiment successfully pushed forward to Naguilian, a town that marks a key waypoint on this route. Two days later, the front-line troops reached Bangag, yet here they encountered increased resistance. They were now facing elements of Major-General Yuguchi Shuntaro's 80th Brigade, which was attempting to move south along Route 5. In a series of running engagements from June 19 to 23, the 37th Division inflicted heavy casualties, killing over 600 Japanese soldiers and capturing nearly 285 more in the challenging fifteen-mile stretch between Bangag and Balasig. The remnants of the Yuguchi Force were ultimately forced to retreat eastward into the rugged and uncharted wilderness of the Sierra Madre mountain range, illustrating the intense and chaotic nature of the conflict. General Krueger deemed it essential to execute an airborne operation over the northern Cagayan Valley to ensure the success of the 37th Division's advance. It's possible that Krueger's motivation also stemmed from a desire to secure northern Luzon before the 8th Army took control of operations, which was scheduled for July 1. Despite contrary reports from various sources, including the United States Armed Forces in the Philippines Northern Luzon, 1st Corps, the 37th Division, and ALAMO scout teams, Krueger concluded that Japanese forces in the Cagayan Valley were retreating "in wild disorder on Highway 5 towards Aparri." It's worth noting that, in actuality, the general movement of Japanese troops had been southward for weeks, and no Japanese unit intended to take refuge in Aparri, a flatland area surrounded by mountains that made it a poor defensive position. Based on his assessment of the situation, Krueger decided that in order to achieve the complete destruction of the fleeing enemy forces, he would launch a vertical envelopment of airborne troops to close any escape routes and prevent the Japanese from evading capture in Aparri. Consequently, on June 21, Krueger ordered a battalion combat team from the 511th Parachute Infantry of the 11th Airborne Division to parachute near Aparri on June 23. However, on June 21, the Connolly Task Force entered Aparri without facing any opposition. By the evening of June 22, elements of the Task Force had advanced ten miles south along Route 5, managing to secure the Camalaniugan Airstrip, a crucial airfield integral to the logistics of both sides. Despite the successes of the reinforced Connolly Task Force, Krueger did not change his mind about the desirability and necessity for the airdrop. Instead, he concluded that the "seizure of Aparri without opposition by elements of the Connolly Task Force on 21 June 1945, together with the almost unopposed advance of the 37th Division, indicated clearly that the time had come for mounting the airborne troops to block the enemy's retreat in the Cagayan Valley." It is not clear just what retreat Krueger expected to block. On the morning of June 23, the paratroopers dropped into Camalaniugan unchallenged and immediately began their advance southward to make contact with the 37th Division. That same day, the 129th Regiment took over the offensive, heading north towards Tuguegarao, a significant town in the region. Tuguegarao fell without resistance by June 25. By nightfall, forward elements of the 129th had pushed ten miles beyond Tuguegarao, reaching the town of Iguig. The following day, June 26, the forces made contact with the paratroopers at the Paret River, further solidifying their position. By the close of June, Japanese resistance in the Cagayan Valley had subsided, and General Yamashita's Shobu Group, still capable of fighting, found itself encircled in a last-stand area that would become known as the Kiangan Pocket, named by the Filipino-American forces engaged in its reduction. As the campaign progressed, the last elements of the 25th and 33rd Divisions were relieved. General Gill's 32nd Division took over control of the Baguio-Ambuclao sector, while the bulk of General Hurdis' 6th Division assembled at Hucab. This marked a significant transition as it signaled the conclusion of operations for Krueger's 6th Army and Swift's 1st Corps. The command would soon shift to General Eichelberger's 8th Army and General Griswold's 14th Corps, who would carry out further operations throughout Luzon. General Griswold's plans called for relentless pressure to be maintained against the Shobu Group, which was concentrated in an area known as the Kiangan Pocket. In line with this strategy, Volckmann's guerrilla fighters continued their assaults towards key locations such as Mankayan, Sabangan, and Bontoc. The 126th and 127th Regiments advanced north along Route 11 and into the Agno Valley, engaging mixed forces from the 58th Independent Mixed Brigade and the 19th Division. Simultaneously, the 20th and 63rd Regiments were preparing to renew their attack against the 105th Division located at Kiangan, as the advance led by General Hurdis had been halted by torrential rains that had severely damaged roads and bridges. Meanwhile, the 1st Regiment made its own push northward along Route 4 towards Banaue, a town famous for its rice terraces and mountainous landscape. On July 9, Volckmann's 15th Regiment finally secured Sabangan. The following day, the 11th Regiment captured Bontoc while the 66th Regiment began to break through the defenses set up by General Ozaki in the Lepanto Mines-Mankayan area. By July 12, Kiangan fell to the 63rd Regiment; however, they soon faced even heavier rains, which compelled General Hurdis to halt his advance once again. On July 20, the 1st Regiment reached Banaue. The next day, they made contact with elements of the guerrilla 11th Regiment at Polis Pass before turning east along Route 389. Here, they aimed to engage a concentration of around 2,500 Japanese soldiers from the 103rd Division and the 4th Air Division. Back in the west, Mankayan also fell on July 20. Five days later, elements of the 15th and 66th Regiments made contact at the junction where Routes 11 and 393 intersect. The 19th Division was withdrawing into the upper Agno Valley to establish defensive positions, blocking the northern, western, and southern approaches to Toccucan, a small but strategically important area. The 15th and 121st Regiments began their assaults toward Toccucan, but they soon encountered remnants of the 19th Division, who proved to be still capable of effective resistance. At the same time, the 66th Regiment moved south along Route 11 to establish contact with troops from the 32nd Division, pressing the offensive forward. Looking east on July 24, the 20th Regiment took over positions at Kiangan and began an advance towards Kiangkiang and the Asin River. However, the Americans encountered greater resistance than anticipated along this route, making only a meager gain of three miles by August 15. At the same time, other units were dispatched south towards Tubliao to block the retreat of General Iwanaka's remaining forces. On July 29, elements of the 66th and 127th Regiments finally established contact near Gambang. They then shifted east into the Agno Valley, close to Buguias, and initiated a southward drive to link up with the 126th Regiment, which they successfully met on August 8. By August 15, Volckmann's guerrillas found themselves four miles short of Toccucan from the northwest and a mile and a half short from the west. In the eastern front, elements of the 1st and 11th Regiments advanced south from Banaue along Route 390, reaching a point about five miles south of Banaue by August 9. That same day, they also cleared Route 389 to the east, securing additional pathways for movement. Additionally, during this time, the 37th Division conducted vigorous patrols east of the Cagayan River, pushing enemy troops deeper into the Sierra Madre mountains. Unfortunately, this relentless pressure resulted in an estimated 1,000 Japanese casualties by August 15. Throughout a month and a half of grueling fighting in steep, treacherous terrain and under miserable weather conditions, the Filipino-American forces struggled to project any significant strength into the Asin Valley. They suffered approximately 1,650 casualties in total. In contrast, the 8th Army estimated that Japanese casualties during the same period reached around 13,500, with many killed or succumbing to starvation and disease. This marked the effective conclusion of the Luzon Campaign, a campaign that would soon be overshadowed by Japan's surrender. General Yamashita estimated in June that he had sufficient supplies to sustain his forces until mid-September. Given the scale of effort the 8th Army was willing to dedicate to the campaign between July 1 and August 15, it seems likely that Yamashita would have met this deadline. When food supplies were depleted, Yamashita planned for his most effective remaining troops to attempt a breakout from the Asin Valley into the mountains of far northwestern Luzon, where he hoped to find more provisions. Those not involved in the breakout were to conduct banzai attacks along all fronts to cover the retreat of the main forces. Yamashita anticipated that whether or not the breakout succeeded, it would signal the complete disintegration of his forces. He even planned to commit hara-kiri amidst the chaos of battle. As a result, the end of the war arrived about a month before Yamashita was prepared to officially acknowledge his defeat. By any measure, the Shobu Group accomplished the delaying mission that Yamashita had envisioned. Throughout the 6th Army's control of operations on Luzon, the maximum commitment of major ground forces against the Shobu Group included four reinforced U.S. Army infantry divisions, one separate regiment combat team, an armored group, Volckmann's , and the Buena Vista Regiment. When hostilities ceased on August 15, the Shobu Group was still "entertaining" three reinforced divisions: the 6th, 32nd, and 37th. Additionally, it had a significantly strengthened, the Buena Vista Regiment, and various other guerrilla units. After the war concluded, approximately 50,500 Japanese troops emerged from the mountains of northern Luzon, with nearly 40,000 of these coming from the Asin Valley's last-stand area. Ultimately, the war ended with about a third of the Shobu Group's peak strength still alive and capable of conducting organized and determined delaying operations. It is clear that, over the seven and a half months since January 9, the Shobu Group executed a remarkably effective delaying action. Despite the circumstances, the 14th Area Army had achieved its objective of tying down as many Allied forces as possible in Luzon. This diversion was critical, as it allowed the Japanese Empire valuable time to fortify its defenses in the Home Islands. Reflecting back to January, General Prince Higashikuni Naruhiko's General Defense Command was operating with a modest force for the land and air defense of Honshu, Shikoku, Kyushu, and the Izu Islands. The primary focus had been on building naval and air power for Operation Sho-Go. In Kyushu and southwestern Honshu, the Western District Army, led by Lieutenant-General Yokoyama Isamu, consisted of only the 86th Division and the 12th Air Division. Meanwhile, the Central District Army, commanded by Lieutenant-General Kawabe Masakazu in central Honshu and Shikoku, had the 44th and 73rd Divisions supported by the 11th Air Division. To the northeast, in Honshu and the Izu Islands, General Fujie Keisuke's Eastern District Army maintained the 72nd Division, along with both the 1st and 3rd Imperial Guards Divisions, the 66th and 67th Independent Mixed Brigades, and the 10th Air Division. Additionally, Lieutenant-General Uemura Toshimichi's 36th Army was positioned as a mobile reserve in the Kanto and Shizuoka area, comprised of the 81st and 93rd Divisions, along with the 4th Tank Division. Further north, Lieutenant-General Higuchi Kiichiro's 5th Area Army had deployed the 7th and 77th Divisions, the 1st Air Division, and the 12th Air Fleet stationed in Hokkaido. It also maintained a mixed brigade at Karafuto. Lieutenant-General Terakura Shozo commanded the 27th Army in the Kuril Islands, which included the 42nd and 91st Divisions, along with the 43rd and 69th Independent Mixed Brigades, and the 3rd and 4th Amphibious Brigades, as well as the Chishima 1st Brigade and Naval Base Force. The air situation was equally dire; Japan had only around 550 aircraft available for offensive operations and a total of about 770 aircraft and 1,200 anti-aircraft guns designated for defensive roles. As preparations for Operation Ten-Go unfolded, the air and ground units in Japan underwent significant reorganization in February. This restructuring led to the formation of several military commands, including Admiral Ugaki's 5th Air Fleet based in Kyushu, Vice-Admiral Maeda Minoru's 10th Air Fleet in Kanto, Lieutenant-General Yoshimoto Teiichi's 11th Area Army in northeast Honshu, derived from the now-defunct 27th Army, and additional area armies such as Fujie's 12th in east-central Honshu, Lieutenant-General Okada Tasuku's 13th in west-central Honshu, Kawabe's 15th in western Honshu and Shikoku, and Yokoyama's 16th in Kyushu. The reorganization of high-level military headquarters was not the sole initiative at this time. The Japanese Empire also approved a large-scale mobilization plan that called for the deployment of 42 divisions, 18 independent mixed brigades, and six tank brigades, amounting to approximately 1.5 million personnel. Following the fall of Iwo Jima and Okinawa, and with intelligence indicating that the Soviet Union was redeploying troops from the European theater to the Far East, Japan began preparing for the defense of its homeland. This preparation involved activating the 1st and 2nd General Armies to replace the General Defense Command and implementing Operation Ketsu-Go. The strategy for Operation Ketsu-Go outlined that the Imperial Japanese Army would strive to defeat American forces while their invasion fleet remained at sea. The plan aimed to deliver a decisive blow against the American naval forces by first destroying as many aircraft carriers as possible, utilizing the special attack units from both the Air Force and Navy. As the amphibious forces approached the range of homeland airbases, the entire air combat strength would be deployed for continuous day and night assaults against these ships. The focus of these air operations was to disrupt American landing plans, targeting primarily troop and equipment transports. Should any American forces successfully land, these would be swiftly assaulted by the IJA to secure a decisive victory. The primary objective of the ground operation was to eliminate the American landing force right on the beach. Operation Ketsu-Go was designed as a comprehensive joint defense effort, mobilizing the full capabilities of the Army, Navy, and Air Force. The Navy's essential role was to protect the coasts by attacking invasion fleets using combined surface, submarine, and air forces. The Air General Army would closely coordinate with the Navy to locate and destroy American transports at sea. If the invasion forces succeeded in landing, the local Area Army would take command of all naval ground forces in its assigned territory and would exercise operational control over air units in support of the ground operations. A key component of the Ketsu-Go operational planning involved reinforcing sectors under attack by units transferred from other regions. Given that U.S. air raids had already severely impacted the transportation network, plans were made for troop movements to be conducted on foot. If the battle at the beach held no promise of a successful outcome, the conflict would inevitably shift to fighting inland. To prepare for this, interior resistance was planned. Guard units and Civilian Defense Corps personnel, along with elements of field forces serving as a nucleus, would be utilized as resistance troops. Their mission would involve attriting American forces through guerrilla warfare, espionage, deception, disruption of supply areas, and blockades as enemy landing forces advanced inland. This operation divided Japanese territory into seven zones, where air and naval special attack forces were directed to eliminate invading forces at sea and to establish an aggressive coastal defense. Field Marshal Sugiyama Hashime's 1st General Army established its headquarters in Tokyo, assuming control over the 11th, 12th, and 13th Area Armies. Meanwhile, Field Marshal Hata Shunroku's 2nd General Army set up its headquarters in Hiroshima, overseeing the 15th and 16th Area Armies. Additionally, to provide a cohesive command structure for all Army air units participating in the campaign, an Air General Army headquarters was formed under Kawabe. On the naval front, Admiral Toyoda took command of the General Navy Command, granting him supreme operational authority over all Navy surface and air forces. In the coming months, the Japanese continued to prepare for the anticipated invasion by mobilizing new units and diverting existing forces from Manchuria and other regions. By August, Yoshimoto's 11th Area Army had been reinforced to include seven infantry divisions and two infantry brigades. The 12th Area Army, now under General Tanaka Shizuichi, was significantly larger, comprising 20 infantry divisions, two tank divisions, eight infantry brigades, three tank brigades, three artillery brigades, and one anti-aircraft brigade. Okada's 13th Area Army was organized with six infantry divisions, three infantry brigades, one tank brigade, one artillery brigade, and one anti-aircraft brigade. The 15th Area Army, under the command of Lieutenant-General Uchiyama Eitaro, was formed with eight infantry divisions, three infantry brigades, one artillery brigade, one anti-aircraft brigade, and two tank regiments. Yokoyama's 16th Area Army included a substantial force of 15 infantry divisions, eight infantry brigades, three tank brigades, three artillery brigades, and one anti-aircraft brigade. Additionally, Higuchi's 5th Area Army consisted of six infantry divisions and two infantry brigades. In tandem with these ground preparations, Lieutenant-General Sugawara Michio's 6th Air Army and Ugaki's 5th Air Fleet were assigned the critical role of launching a powerful air counterattack against the American invasion fleet, targeting carriers, gunnery ships, and transport vessels. In conjunction with elements from the 1st Air Army, 5th Air Army, 3rd Air Fleet, and 10th Air Fleet, the Japanese strategy focused on executing strikes against US carriers. For this task, 330 IJNAF aircraft were specifically assigned. An additional 250 aircraft from both the IJAAF and IJNAF were designated to target gunnery ships, while transports would be subjected to round-the-clock suicide attacks over a span of 10 days. Various aircraft types,including trainers, transports, float planes, bombers, and obsolete fighters, would be used in kamikaze missions. The air assaults on the transports would also incorporate all available aircraft not assigned to other operational duties. Although Japanese fighters had limited effectiveness against B-29 raids, they were expected to inflict damage on the invasion fleet. It was essential, however, that IJAAF and IJNAF fighters first establish air superiority over the targeted areas. Achieving this goal was a questionable assumption, especially given the formidable strength of US air power. By the end of June, nearly 8,000 aircraft, predominantly kamikazes, had been assembled for what was expected to be a decisive battle, with an estimated additional 2,500 planes likely to be produced by the end of September. To enhance their efforts, Kaiten suicide midget submarines and various special attack units were also designated to target any invading fleet, underscoring the significance of suicide attacks in Japanese military strategy. The hope was that these suicide, or tokko, units would inflict a 30 to 50 percent loss on the invading forces. However, as of June 30, only 1,235 surface special-attack boats and 324 underwater types had been produced, significantly hampering Japan's preparations for the impending decisive battle. In preparation for the seizure of Japan's industrial heart through an amphibious invasion, General MacArthur was laying the groundwork for a significant military operation. On April 3, the Joint Chiefs of Staff designated him as the Commander in Chief of the United States Army Forces in the Pacific. This appointment granted him administrative control over all Army resources in the Pacific, with the exceptions of the 20th Air Force, the Alaskan Command, and the Southeast Pacific forces. Additionally, all naval resources in the Pacific, except those in the Southeast Pacific Area, were placed under Admiral Nimitz's control, making them available for major operations against Japan. With the conclusion of the war in Europe, plans were proposed to redeploy 10 infantry divisions, 5 armored divisions, and 72 air groups to the Pacific. Consequently, the total forces in the Pacific were set to increase from approximately 1.4 million Army troops as of June 30 to nearly 2,439,400 by December 31. On June 2, the 20th Air Force was reorganized into the U.S. Army Strategic Air Force under General Carl Spaatz. This command would oversee the newly formed 20th Air Force led by Lieutenant-General Nathan Twinning, which had been reorganized from the 21st Bomber Command, and Lieutenant-General James Doolittle's 8th Air Force, which was restructured from the 20th Bomber Command and slated for deployment in the Ryukyus. Simultaneously, MacArthur was developing plans for Operation Downfall, the ambitious strategy for invading Japan. This operation envisaged a massive offensive against the islands of Kyushu and Honshu, utilizing all available combined resources from the Army, Navy, and Air Forces. The invasion plan consisted of two key operations: Operation Olympic and Operation Coronet. The American plan for the invasion of Kyushu focused on seizing only the southern part of the island, delineated by a line extending from Tsuno on the east coast to Sendai on the west. The 3,000 square miles included within this boundary were considered sufficient to provide the necessary air bases for short-range support in the final operations planned against the industrial centers of Honshu. Within the selected southern region for invasion, known as the "Olympic" plan, there were four lowland areas identified as suitable for the development of major airfields. The first area extended from Kagoshima, located on the western shore of Kagoshima Bay, through a narrow corridor to the Kushikino plain along the East China Sea. The second area ran northward from Shibushi on Ariake Bay, traversing a winding valley to Miyakonojo. The third area began at Kanoya, situated east of Kagoshima Bay, and followed the coastline of Ariake Bay. The fourth and largest area was located north of Miyazaki on the east coast. Four months after American troops first landed on Kyushu, the next decisive amphibious operation against Japan was set to be launched. Code-named Coronet, this invasion targeted the Kanto Plain area of Honshu and was scheduled for March 1, 1945. The operation was tasked to two armies: the First and the Eighth, assigned to conduct a major assault against the heartland of Japan. Their immediate objective was to destroy all opposition and secure the Tokyo-Yokohama area. General MacArthur would personally command the landing forces and oversee ground operations on the mainland. Accompanying him would be the advance echelon of his General Headquarters, which would operate as the Army Group Headquarters in the field. The initial landings would involve 10 reinforced infantry divisions, 3 marine divisions, and 2 armored divisions. These forces, launched from the Philippines and Central Pacific bases, would be continuously protected by the ships and aircraft of the Pacific Fleet, alongside land-based air support. Thirty days after the initial assault, each army was set to be reinforced by a corps of 3 additional divisions. Five days following this reinforcement, an airborne division and an AFPAC Reserve Corps consisting of another 3 divisions would be made available. In total, these 25 divisions were tasked with seizing the Kanto Plain, including the general areas of Tokyo and Yokohama, and carrying out any further operations necessary to overcome Japanese resistance. The strategic reserve for the entire operation would comprise a corps of 3 divisions located in the Philippines, along with sufficient reinforcements from the United States, allowing for the deployment of 4 divisions per month. For Operation Olympic, General Krueger's 6th Army was appointed to lead the effort, employing a total of 14 divisions that were already positioned in the Pacific. Meanwhile, the 1st and 8th Armies were designated to conduct Operation Coronet, comprising a total of 25 divisions primarily sourced from the redeployment of troops and equipment from the European theater. Eichelberger's 8th Army planned to land on Sagami Bay and subsequently fan out to secure the western shores of Tokyo Bay, reaching as far north as Yokohama. Concurrently, General Courtney Hodges' 1st Army was set to land at the Kujukuri beaches, with the objective of pushing west and south to clear the eastern shores of both Tokyo and Sagami Bays. To mitigate the risks associated with landing on the heavily fortified and well-garrisoned islands of Japan, a comprehensive campaign of air-sea blockade and bombardment was advocated. The 20th Air Force, launching from bases in the Marianas and the Ryukyus, aimed to cripple Japan's industrial capacity by ruthlessly attacking factories and transportation systems. This steady assault from the massive B-29 bombers was expected to severely diminish Japan's ability to sustain its large military organization and effectively distribute its remaining power. Simultaneously, carrier task forces would conduct repeated raids on crucial coastal areas, targeting enemy naval and air forces, disrupting shore and sea communications, and supporting long-range bombers in their strikes against strategic objectives. The Far East Air Force, also based in the Ryukyus, would focus on selected targets intended to dismantle Japan's air capabilities both in the homeland and in nearby regions of North China and Korea. By intercepting shipping and shattering communication lines, the Far East Air Force aimed to complete the isolation of southern Kyushu, preparing it for an amphibious assault. As the target date approached, it was planned that these air raids would intensify, culminating in an all-out effort from X-10 to X-Day. In the final ten days before the landing phase, the combined bombing power of all available planes, both land-based and carrier-based, would be unleashed in a massive assault. The objectives included reducing enemy defenses, destroying remaining air forces, isolating the target area, and facilitating preliminary minesweeping and naval bombardment operations. The fortifications within the designated landing areas would be overwhelmed by tons of explosives, while naval vessels and engineering units worked to eliminate underwater mines and barriers. With such concentrated power backing them, it was anticipated that the amphibious forces would be able to execute their assault landings with minimal losses. This strategy aimed to minimize casualties, further diminish Japan's air capabilities, and cut off reinforcements from Asia. There was even a possibility that such measures could compel Japan to surrender, thus eliminating the need for a significant landing on the Home Islands. In a notable first, Admiral Spruance's 5th Fleet and Admiral Halsey's 3rd Fleet were to operate simultaneously. Admiral Spruance's fleet would focus on the landing operations, while Admiral Halsey's fleet would provide strategic support through raids on Honshu and Hokkaido. On July 28, the 16 fast carriers of Admiral McCain's Task Force 38 and the four British carriers of Admiral Rawlings' Task Force 37 commenced operations to weaken the air, naval, and shipping capabilities of the Home Islands. By mid-August, Vice-Admiral John Towers was assigned command of a reinforced Task Force 38, tasked with executing a series of strikes against Japan east of the 135th meridian, while General Kenney's Ryukyus-based Far Eastern Air Forces targeted objectives to the west. Additionally, Rawlings' Task Force 37, enhanced to nine carriers, launched diversionary strikes against Hong Kong and Canton. Starting on October 18, the 3rd Fleet began aggressive operations against aircraft, airfields, and shipping in Kyushu, Shikoku, and Honshu to isolate the assault area for the upcoming Kyushu invasion. Six days later, the Fast Carrier Task Force was divided into Task Force 38 and Task Force 58. Task Force 38 retained 12 fast carriers specifically for strikes against Japan. The pre-invasion air strikes, surface bombardments, and minesweeping operations in the Kyushu landing zones commenced, steadily increasing in intensity as they approached X-Day on November 1. The ten fast carriers of Vice-Admiral Frederick Sherman's Task Force 58 would provide direct support for the Kyushu landings, which were to be conducted by Admiral Turner's Task Force 40, consisting of 800 warships and 1,500 transports. In this effort, three Fire Support groups, each accompanied by an escort carrier group, would launch preemptive assaults on the designated Olympic landing zones. Off southeastern Kyushu's Ariake Bay, Rear Admiral Richard Connolly's 3rd Fire Support Group (TG 41.3), comprising 6 old battleships, 6 cruisers, 13 destroyers, and 34 support craft, was tasked with eliminating coastal batteries at Toi Misaka, Hi Saki, and Ariake Bay. Additionally, they would target seaplane bases and suicide boat/submarine pens at Oshima, Odatsu, Biro Jima, and Sakida, followed by softening defenses at the XI Corps landing beaches. Meanwhile, approximately 30 miles north along Kyushu's southeastern coast, Rear Admiral Ingolf Kiland's 7th Fire Support Group (TG 41.7), consisting of 3 old battleships, 8 cruisers, 11 destroyers, and 35 support craft, would bombard coastal batteries, suicide-boat nests, and seaplane bases located at Tozaki Hana, Hososhima, and Miyazaki. This group would also destroy rail junctions at Tsumo Jogasaki and Tsuno to disrupt reinforcements heading south, before finally shelling the I Corps invasion beaches near Miyazaki. Off southwestern Kyushu, Rear Admiral Giraud Wright's 5th Fire Support Group (TG 41.5), with 4 old battleships, 10 cruisers, 14 destroyers, and 74 support craft, was set to hammer fortifications within the Koshiki Retto and at the beaches between Kaminokawa and Kushikino. Their mission included knocking out Noma Misaki and Hashimi Saki coastal batteries, the Akune seaplane base, and Kushikino's airfield, while also cutting the Akune–Kushikino road and rail lines. Ultimately, they would provide heavy fire support for the V Amphibious Corps landing beaches. Meanwhile, General Krueger planned to first secure Kagoshima and Ariake Bays as crucial ports of entry. Following that, the objective was to push inland as far as the Tsuno-Sendai line to block mountain defiles and prevent any enemy reinforcements from the north. As a preliminary operation, on October 28, the reinforced 40th Division, now under Brigadier-General Donald Myers, was assigned to seize positions in the Koshiki Island group opposite Sendai. The objective was to establish emergency naval and seaplane bases on these islands while also clearing the sea routes to the coastal invasion area of Kushikino. The 40th Division was also tasked with making preliminary landings on the four islands of Tanega, Make, Take, and Lo off the southern tip of Kyushu, with the goal of safeguarding the passage of friendly shipping through the strategic Osumi Strait. On November 1, General Krueger's three main corps were set to conduct simultaneous assault landings in the designated objective areas. Major-General Harry Schmidt's 5th Amphibious Corps would land near Kushikino, drive eastward to secure the western shore of Kagoshima Bay, and then turn north to block the movement of enemy reinforcements from upper Kyushu. Meanwhile, General Hall's 11th Corps was to land at Ariake Bay, capture Kanoya, advance to the eastern shore of Kagoshima Bay, and then move northwestward to Miyakonojo. Following this, Swift's 1st Corps would assault Miyazaki on the east coast, subsequently moving southwest to occupy Miyakonojo and clear the northern shore of Kagoshima Bay, thereby protecting the northeast flank. Additionally, Major-General Charles Ryder's 9th Corps, initially held in reserve, was selected to execute a diversionary feint off the island of Shikoku while the other three assault corps advanced on the actual landing beaches. Finally, Krueger kept the 77th Division and the 11th Airborne Division in Area Reserve, prepared to follow up the invasion forces. Should these units prove insufficient to fulfill their assigned tasks, a buildup from units earmarked for Coronet would be initiated at a rate of three divisions per month. On the other side, the Japanese anticipated that Kyushu would be the next target and identified the same beaches selected for Operation Olympic as the most likely landing sites. In response, Generals Hata and Yokoyama concentrated the formidable 57th Army under Lieutenant-General Nishihara Kanji around the areas of Ariake Bay and Miyazaki. Meanwhile, Lieutenant-General Nakazawa Mitsuo commanded the 40th Army, which was positioned in the Ijuin-Kagoshima sector to the west. Hata's mobile reserves were stationed near Mount Kurishima, consisting of at least five divisions and several independent brigades, prepared to swiftly engage enemy forces before they could establish secure beachheads. Although Yokoyama and Hata did not anticipate an invasion in northern and central Kyushu, they had many units distributed throughout the region. The Japanese government prioritized defensive preparations for Kyushu over those for Honshu, hoping that a fierce defense of Kyushu would deter American forces from attempting a similar operation on Honshu. I would like to take this time to remind you all that this podcast is only made possible through the efforts of Kings and Generals over at Youtube. Please go subscribe to Kings and Generals over at Youtube and to continue helping us produce this content please check out www.patreon.com/kingsandgenerals. If you are still hungry after that, give my personal channel a look over at The Pacific War Channel at Youtube, it would mean a lot to me. General Krueger's forces tackled Japan's Shobu Group in Luzon, while preparing for Operation Downfall, the invasion of Japan itself. Despite tough terrain, American forces made significant gains, encircling the Japanese. Meanwhile, Japan readied for defense, mobilizing troops and launching air counterattacks. As the Allies pressed forward, the impending invasion loomed, with strategies developed to land on Kyushu and Honshu. Ultimately, intense battles shaped the eve of an operation that would determine the war's fate and change history forever.

The transformation of Japan from hermit kingdom to imperial power happened with breathtaking speed. When American Commodore Perry's "black ships" steamed into Tokyo Bay in the 1850s, they shattered Japan's 250-year isolation with technology that seemed to come "from 200 years in the future." This technological gap created a constitutional crisis that would ultimately topple the Tokugawa Shogunate and usher in the Meiji Restoration of 1868.Jonathan Clements guides us through this pivotal period where Japan found itself facing what one historian calls "an invitation to an alien game" - forced to adopt international norms and institutions they never agreed to. Rather than becoming colonized like China or India, Japan's new leaders determined to become players in this global power game. They systematically studied Western nations, adopting what they perceived as the best elements of each: a German-style army, British naval technology, and aspects of French law.This selective modernization happened against a backdrop of growing militarism and expansionism, particularly toward Korea - strategically described as "the dagger at the heart of Japan." The 1894-95 Sino-Japanese War demonstrated Japan's new capabilities, but the subsequent "Triple Intervention" by Russia, France and Germany (forcing Japan to abandon territorial gains) created a humiliation that would fuel future aggression.Throughout this period, the Japanese government struggled with "gekokujō" - military insubordination where officers initiated "incidents" that expanded Japanese influence without authorization. The assassination of Korea's Queen Min by Japanese agents exemplifies this dangerous pattern where unauthorized actions expanded imperial control while undermining civilian government - creating precedents that would ultimately lead Japan toward its catastrophic Pacific War.Whether you're interested in East Asian history, imperial expansion, or the roots of 20th century conflict, this exploration of Japan's rapid transformation reveals how quickly a nation can reinvent itself - for better or worse.You can send a message to the show/feedback by clicking here. The system doesn't let me reply so if you need one please include your email.

Patlabor: The Movie We (finally) return to the far-off future of 1998 to check on Patlabor pilot Noa Izumi and the rest of the Special Vehicles Division's Unit 2. Thanks to advancements in Labor technology, Project Babylon is now underway. The project involves building a series of artificial islands in Tokyo Bay, all centered around a massive control tower known as the Ark. After the mastermind behind Project Babylon mysteriously dies, Labors start going berserk and rampaging. Asuma, Noa, Gotoh, and the other members of Unit 2 must race against time to solve this crisis before an even greater disaster makes landfall. Remember to update your operating system, plant some tomatoes, and feed those ravens for today's towering episode of Anime Was (Not) A Mistake! Rate, Review, Subscribe, and Listen to Us on Podbean/iTunes/Stitcher/Spotify Follow us on Instagram:@animewasnotamistakepodcast Or on Facebook:@animewasnotamistakepod Music Provided: “Sis Puella Magica!” – Yuki Kajiura – Aniplex – Puella Magi Madoka Magica - Puella Magi Madoka Magica Music Collection - 2011 “Zoltraak” – Evan Call feat Alina Lesnik – Frieren: Beyond Journey's End - 2023 “Dungeon Meshi Main Theme” – Yasunori Mitsuda feat. Lauren McGlynn [ANÚNA] – Delicious in Dungeon/Dungeon Meshi - 2024
Last time we spoke about the breakthrough on Okinawa. Despite relentless attacks on critical positions like Sugar Loaf Hill and Wana Ridge, American Marines encountered heavy casualties. Yet, they persisted, inching forward against tenacious resistance. As mid-May approached, the situation for Japanese commanders deteriorated. Encircled and suffering significant losses, they began plotting a retreat to more defensible positions. On the ground, Marines battled through mud and enemy fire, showcasing incredible resolve amidst dire circumstances. Communication crumbled, supplies dwindled, and morale waned, yet the determination of both sides was undeniable. By late May, the tides shifted further in favor of the Allies, marking pivotal breakthroughs despite the challenges. Amidst ruin and chaos, the relentless struggle for control over Okinawa symbolized the brutal nature of war and the unwavering spirit of those fighting on both sides, setting the stage for an eventual Allied victory. This episode is the Fall of Shuri Welcome to the Pacific War Podcast Week by Week, I am your dutiful host Craig Watson. But, before we start I want to also remind you this podcast is only made possible through the efforts of Kings and Generals over at Youtube. Perhaps you want to learn more about world war two? Kings and Generals have an assortment of episodes on world war two and much more so go give them a look over on Youtube. So please subscribe to Kings and Generals over at Youtube and to continue helping us produce this content please check out www.patreon.com/kingsandgenerals. If you are still hungry for some more history related content, over on my channel, the Pacific War Channel you can find a few videos all the way from the Opium Wars of the 1800's until the end of the Pacific War in 1945. As we last left off, the battle for Okinawa was reaching a critical juncture. General Buckner's 10th Army had made significant gains, successfully breaking through the fortified Japanese defenses on both flanks. The 6th Marine Division, under General Shepherd, had effectively established control over the Naha area, while General Arnold's 7th Division achieved an impressive penetration at Yonabaru. However, despite these advancements, the remainder of the American forces faced formidable obstacles. They were grappling with relentless rain, fierce enemy resistance, and severe supply shortages, which left them effectively stalled in front of Shuri. In response to the encroaching American forces, General Ushijima had dispatched General Fujioka's 62nd Division to launch a counter-offensive aimed at driving the invaders out of Yonabaru. Meanwhile, Ushijima was preparing his 32nd Army for a strategic withdrawal south to the Kiyamu Peninsula. Fortunately for the Americans, they had caught wind of the defenders' intentions. Recognizing the urgency of the situation, on May 27, General Buckner ordered his troops to apply strong and unrelenting pressure on the enemy. The goal was clear: keep the Japanese forces off balance and prevent an easy transition to new defensive positions. Although the continuing downpour hindered the possibility of a large-scale, coordinated army-wide attack, it did not deter Buckner's strategy. Instead, he initiated a series of strong combat patrols along the front lines, which immediately encountered stiff resistance from Japanese troops that had not yet begun their withdrawal. On the west coast, as patrols from Colonel Roberts' 22nd Marines scouted the area, they discovered that the Japanese had largely abandoned Naha. This news spurred the 2nd Battalion into action. They crossed the Asato River, moved through the lines established by Shepherd's Reconnaissance Company, and pressed deeper into the western part of Naha. Simultaneously, Colonel Shapley's 4th Marines made their last desperate push to extend American control into eastern Naha, fighting valiantly against the entrenched enemy. Farther east, Colonel Finn's 32nd Regiment once again faced fierce resistance from the hastily committed 62nd Division, which staunchly defended its position. However, not all was lost; patrols from Colonel Green's 184th Regiment managed to reach Inasomi, meeting only scattered resistance. This breakthrough provided a crucial indication that the enemy had no intention of withdrawing into the Chinen Peninsula. As the clocks struck midnight, a significant yet largely unnoticed transition occurred in the waters off Okinawa: Admiral Halsey's 3rd Fleet relieved Admiral Spruance's 5th Fleet. For the troops ashore, this change in command went by without a hint of recognition. The same ships and task groups continued their crucial support for ground operations, now operating under new numerical designations and leadership. However, Halsey faced an immediate challenge as Admiral Ugaki launched an extensive Kikisui attack, a large-scale kamikaze assault involving 110 enemy aircraft. The day of May 27 proved costly, with three destroyers, one destroyer minesweeper, two transports, one subchaser, and two auxiliary ships all suffering damage. The following morning brought clear skies, which only heightened the danger for American naval forces. Several kamikaze aircraft succeeded in sinking the destroyer USS Drexler, while also inflicting damage on a transport ship, three freighters, and a landing craft throughout the day. Meanwhile, on land, Colonel Whaling's rehabilitated 29th Marines took over from the battered 4th Marines along the west coast. The 1st Battalion executed a concerted attack alongside the 22nd Marines, advancing successfully by 250 yards through the rubble-strewn city of Naha. In an impressive display of momentum, Roberts' men pushed forward unopposed toward the Kokuba estuary, eventually encountering resistance near Ono-Yama Island. To the east, the improvement in weather allowed Colonel Mason's 1st Marines to launch a coordinated offensive. The 2nd Battalion fought valiantly, climbing to the peak of 110 Meter Hill. The forward elements of Company E gained the hill crest but were forced to withdraw by vicious enemy fire which raked their positions. Lieutenant Colonel Magee felt that his depleted battalion, down to a total strength of 277 men in the rifle companies, might recapture the hill, but "it could not possibly hold it against a strong enemy counterattack." Although new replacements were available to regiments for training or other use, a division order prevented their being sent to front line units during a battle situation that called for the utmost in skill and knowledge of veterans. Throughout most of the morning and all of the afternoon, 2/1 concentrated the fire of its supporting weapons on the reverse slopes of 110 Meter Hill and engaged the Japanese in a fierce and continuous fire fight. Nightfall brought no cessation of enemy resistance, and many infiltrators were killed in the battalion's lines. In contrast, the 3rd Battalion experienced relatively little opposition, allowing some patrols to penetrate into Wana Draw. At the same time, Colonel Griebel's 3rd Battalion effectively moved its front line to the Asato River, while his 1st Battalion achieved a significant milestone by capturing Beehive Hill. However, despite the break in the rain, the conditions on the ground rendered large-scale movements impractical, stalling further advances across the battlefield. Despite Arnold's determined efforts to push west through Fujioka's blocking positions, progress was minimal. Nevertheless, he was able to consolidate his grip on the Ozato hill mass as Green's 2nd Battalion advanced to a position within 1,000 yards of Shinazato, strategically located at the neck of the Chinen Peninsula. The lack of success from the 62nd Division in driving back the breaching American forces reinforced General Ushijima's resolve to evacuate Shuri while the opportunity still existed. In light of this, he ordered the withdrawal to commence the following evening. On May 29, while the 7th Reconnaissance Troop managed to scout a significant portion of the Chinen Peninsula without incident, the 7th and 96th Divisions faced fierce resistance as they attacked toward the road network south of Shuri. The enemy's resolute defense resulted in only minimal gains for the American assault units. General Bruce's 77th Division, after what can be described as "a day almost entirely spent in hand-to-hand combat," found itself unable to penetrate the intense cordon of defensive fire that protected the Japanese positions. In stark contrast, to the west, Griebel's 1st Battalion made a rapid advance, quickly gaining the crest of Shuri Ridge. They launched a bold assault on Shuri Castle. On May 25, as part of the final stages of the Okinawa campaign, the American battleship USS Mississippi bombarded the castle for three days, and by May 27, it was engulfed in flames. That night, the Japanese forces retreated, abandoning Shuri while US troops pursued them southward. The 1st Battalion of the 5th Marines had started its attack on 29 May with Companies B and C in assault and Company A following in trace of Company C. The Marines quickly gained the crest of Shuri Ridge and Lieutenant Colonel Shelburne requested permission for one of his companies to storm Shuri Castle which commanded his position. Although the castle was in the zone of action of the 77th Infantry Division, General del Valle gave his assent to the request in view of the great danger of enemy action from the strong point. The 1st Marine Division commander felt that "at that time the position of the 77th Division was such that it would have taken several hard day's fighting through enemy resistance" before the castle could be taken. Company A drove east along the muddy ridge line, overwhelming the few Japanese in its path, and by 1015 the castle, core of the Shuri bastion, had been secured. The Marine unit entered Shuri through a gap in the covering forces caused by the withdrawal of the 3d Battalion, 15th Independent Mixed Regiment of the 44th Independent Mixed Brigade, in the course of the Japanese retreat from Shuri. This seems to have been the only notable instance of confusion and mistake in the Japanese withdrawal operation as a whole. Everywhere else around Shuri the Japanese still held their covering positions in the front lines. The 77th Division, which had scheduled air strikes and a heavy artillery bombardment on the castle heights for 29 May, received little prior warning of the Marines' assault and "was barely able to avert [its] called strikes in time." Without taking any credit away from Company A of the 5th Marines for its feat of capturing Shuri Castle, its success was clearly the result of the combined effort of all the assault and support troops of Tenth Army which had maintained relentless pressure on the enemy defenses and paved the way for the breakthrough. Capitalizing on this momentum, General Del Valle swiftly reorganized his forces to bypass Wana Draw and consolidate these crucial gains. Meanwhile, Griebel's 3rd Battalion maneuvered down the division boundary, reaching a position just 2,000 yards from the village of Kokuba, prompting Whaling's 3rd Battalion to push their lines forward by approximately 600 yards. In a coordinated effort, the 29th Marines executed a wheeling assault on 29 May with 1/29 pivoting on 3/29 and attacking south and then east to bring the regiment on line with the 22d Marines. The ultimate objective of the 1st Battalion's attack was the high ground northwest of Shichina. The approach to the objective was over low and open terrain which drew the comment from regiment that it was "about as suitable to fighting as a billiard table." Fire from strong points in tombs and caves on the small hills and ridges to the front kept the advance to a slow pace, and the assault companies, A and C, dug in slightly to the left rear of the positions of the 22d Marines at nightfall. On another front, Roberts' 1st Battalion successfully crossed the Kokuba River and advanced toward Telegraph Hill in east Naha. However, despite their efforts, intense fighting erupted throughout the day without yielding any significant gains. Back at sea, the threat of kamikaze attacks returned with ferocity, yet this time, American defenses held strong, resulting in only a single destroyer and one transport sustaining damage. As night fell, the Japanese began their long-anticipated withdrawal. General Amamiya's 24th Division commenced disengagement, moving southward while leaving a small force, including the 22nd Independent Battalion, to cover their retreat at Shuri. Meanwhile, General Suzuki's 44th Independent Mixed Brigade held their defensive lines outside Naha, and the 62nd Division maintained its positions near Chan and Karadera. By dawn on May 30, the bulk of the 32nd Army had successfully evacuated the Shuri lines, slipping away from the flanking maneuvers of Buckner's 10th Army. Thanks to a continuous curtain of rain, General Ushijima executed a meticulously planned "properly deft withdrawal." His covering forces were strategically positioned to provide him with the necessary time to organize a defensive stance on the Kiyamu Peninsula. However, the Americans, ever vigilant, were quick to capitalize on the enemy's disarray, maintaining relentless pressure on the faltering Japanese front. On the west coast, Roberts' 2nd and 3rd Battalions crossed the canal, seamlessly moving through the 1st Battalion to take up the assault. They pushed forward tenaciously until they captured the entire area encompassing Telegraph Hill and Hill 27. A network of Japanese machine gun positions hidden in the clusters of tombs on the low hills to the Marines' front made progress slow and costly. Enemy machine guns emplaced in burial tombs on Hill 27 in east Naha temporarily checked the infantry. Heavy sniper fire whipped the lines and killed Lieutenant Colonel Woodhouse of 2/22 who was forward controlling his battalion's attack. Major John G. Johnson, the executive officer, took command immediately and continued a steady pressure. During most of the day tanks were unable to reach the position, but in the afternoon three worked their way along the road north of the hill, and their direct fire enabled the marines to seize it. The advance consisted of a series of local assaults and mop-up actions that brought the battalion to secure hill positions overlooking the Kokuba Estuary and the rail line leading to the north by nightfall. Lieutenant Colonel Shisler's 3d Battalion passed through 1/22 during the morning's attack and behind a screen of artillery, mortars, naval gunfire, and rockets drove onto the high ground at the eastern outskirts of Naha. By means of a series of holding attacks and flank assaults, Shisler was able to move his companies into the maze of enemy defenses where close quarter grenade and small-arms exchanges decided the issue. Once the dominating ground was won, the battalion was subjected to intense artillery and mortar fire. At the same time, Whaling's 1st Battalion joined the offensive, encountering fierce resistance as they pressed through 600 yards of enemy territory. To the east, the Marines under Del Valle shifted their focus to vigorous patrolling, as the supply situation gradually improved thanks to dedicated carrying parties and aerial air drops. Despite their efforts, the 306th Regiment's assault on 110 Meter Hill encountered heavy opposition once again. However, Colonel Hamilton's 307th Regiment finally achieved a breakthrough, seizing the strategic Three Sisters. Dorothy Hill, a fortress directly east of Shuri and a tower of strength in the enemy's inner line for the past two weeks, was attacked by the 3d Battalion, 307th Infantry, 77th Division. The first platoon to reach the base of the hill was pinned down by heavy fire, the platoon leader and all noncommissioned officers being wounded. Other platoons maneuvered into position and finally one squad reached the crest at the right end. This entering wedge enabled two companies to reach the top, from which they discovered three levels of caves on the reverse slope. They went to work methodically, moving from right to left along the top level, burning and blasting each cave and dugout, the flame-thrower and satchel-charge men covered by riflemen. When work on the top level was finished, the second level of caves and tunnels received similar treatment, and then the third and lowest level. That night fifteen Japanese who had survived the day's fighting crawled out of the blasted caves and were killed by Americans from their foxholes. A great amount of enemy equipment, including ten destroyed 150-mm- guns and twenty-five trucks, was found on the south (reverse) side of Dorothy Hill, testifying to the enemy fire power at this strong point. On 30 May, the 77th Division also took Jane Hill on its left flank and then almost unopposed took Tom Hill, the highest point of ground in the Shuri area, by 1700. This critical victory paved the way for Colonel Smith's forces to advance into the northern outskirts of Shuri through Ishimmi. In a remarkable display of coordination, Colonel Dill's 382nd Regiment finally secured the strategic Hen Hill and Oboe Hill areas, while also capturing Hector Hill on their left flank. For nine days elements of the 96th Division had been stalemated at the base of Hen Hill, just northeast of Shuri. On the 30th, Company F and one platoon of Company G, 382d Infantry, resumed the attack on Hen Hill. Pfc. Clarence B. Craft, a rifleman from Company G, was sent out ahead with five companions to test the Japanese positions. As he and his small group started up the slope, they were brought under heavy fire from Japanese just over the crest, and a shower of grenades fell on them. Three of the men were wounded and the other two were stopped. Craft, although a new replacement and in his first action, kept on going, tossing grenades at the crest. From just below the crest he threw two cases of grenades that were passed up to him from the bottom, those of the enemy going over his head or exploding near him. He then leaped to the crest and fired at point-blank range into the Japanese in a trench a few feet below him. Spurred by Craft's example, other men now came to his aid. Reloading, Craft pursued the Japanese down the trench, wiped out a machine gun nest, and satchel-charged the cave into which the remaining Japanese had retreated. Altogether, in the taking of Hen Hill as a result of Craft's action, about seventy Japanese were killed, at least twenty-five of whom were credited to Craft himself. This daring action won him the Congressional Medal of Honor. To the left (east), Company F at the same time engaged in a grenade battle for Hector Hill, using ten cases of grenades in the assault on the crest. It was finally won after a satchel charge was hurled over the top and lit in the enemy trench on the other side, parts of Japanese bodies and pieces of enemy equipment hurtling into the sky in the blast. Hen and Hector Hills had fallen by 1400. Southeast of their position, Colonel May's 2d Battalion, 383d Infantry, reached Love Hill and dug in, although scattered fire was still received from a machine gun in a nook of Charlie Hill and there were a few live Japanese on Love itself. In the afternoon the 3d Battalion, 383d Infantry, left its foxholes on Oboe, where it had experienced so great an ordeal, and proceeded down the reverse slope of the hill, finding only a few scattered Japanese. That night the 383d Infantry expressed a heartfelt sentiment when it reported "infinite relief to have Conical Hill behind us." Although there had been suicidal stands in a few places by the last of the holding force, the advances had been rapid. Simultaneously, Colonel Halloran's 381st Regiment effectively reduced the Conical Hill-Cutaway area and seized Roger Hill, both regiments then advancing toward the vital Naha-Yonabaru road. At the same time, the 32nd Regiment launched a coordinated offensive that allowed them to successfully capture Oak, Ella, and June Hills. This advance brought Finn's troops directly into confrontation with Mabel and Hetty Hills, facing the formidable defenses of Chan. Meanwhile, strong patrols from the 184th Regiment ventured into the Chinen Peninsula's strongholds, encountering only light enemy resistance, a turn of events that buoyed American morale. As night fell, the 44th Independent Mixed Brigade and the 24th Division began their long-anticipated evacuation from Shuri. They pulled back behind the second line of blocking positions north of Tsukasan, executing their withdrawal amidst a progressively decreasing barrage of artillery and mortar fire. Consequently, when Buckner's assault troops launched their offensive against the Shuri positions on the morning of May 31, they were met with an eerie silence, the stillness only interrupted by sporadic sniper fire and the distant crack of machine guns.The 77th Division swiftly took 110 Meter Hill and advanced into Shuri with little to no resistance. Concurrently, Mason's units surrounding Shuri Castle moved north unopposed, aiding in the occupation of the battered ruins and the troublesome Wana Draw. Shuri, the second town of Okinawa, lay in utter ruin. There was no other city, town, or village in the Ryukyus that had been destroyed so completely. Naha too had been laid waste. Certain villages which had been strong points in the enemy's defense, such as Kakazu, Dakeshi, Kochi, Arakachi, and Kunishi, had been fought over and leveled to the ground. But none of these compared with the ancient capital of the Ryukyus. It was estimated that about 200000 rounds of artillery and naval gunfire had struck Shuri. Numerous air strikes had dropped 1000-pound bombs on it. Mortar shells by the thousands had arched their way into the town area. Only two structures, both of concrete, the big normal school at the southwestern corner and the little Methodist church, built in 1937, in the center of Shuri, had enough of their walls standing to form silhouettes on the skyline. The rest was flattened rubble. The narrow paved and dirt streets, churned by high explosives and pitted with shell craters, were impassable to any vehicle. The stone walls of the numerous little terraces were battered down. The rubble and broken red tile of the houses lay in heaps. The frame portion of buildings had been reduced to kindling wood. Tattered bits of Japanese military clothing, gas masks, and tropical helmets-the most frequently seen items-and the dark-colored Okinawan civilian dress lay about in wild confusion. Over all this crater of the moon landscape hung the unforgettable stench of rotting human flesh. To the west, Griebel's 1st Battalion built upon Mason's gains, but it was the 3rd Battalion that led the main effort, successfully pushing to the hills just north of Shichina.Meanwhile, General Bradley's advancing battalions moved rapidly toward their assigned objectives, spending much of the day mopping up isolated enemy holdouts. This relentless advance effectively pinched off the 77th Division, further consolidating American control in the region. On the extreme left flank, Halloran's 1st Battalion faced enemy forces defending the Tsukasan line, marking the only area where the 96th Division failed to reach the corps boundary. However, the Shuri area had now been completely secured, and contact was made with Del Valle's Marines in the center. On the flanks, though, Buckner's units continued to encounter fierce resistance from the tenacious Japanese defenders. The 32nd Regiment, battling bravely through a series of heavily fortified strongpoints held stubbornly by Fujioka's troops, managed to seize Duck Hill, consolidate its positions on Turkey Hill, and capture the forward face of Mabel. Ultimately, they halted their advance just short of Chan. Meanwhile, on the west coast, Shepherd's Marines pushed forward with support from tanks and artillery, targeting the strategic high ground west of Shichina and Kokuba. However, their advance was stalled by intense enemy fire emanating from Hill 46. During the night, the battered 44th Independent Mixed Brigade executed a withdrawal southeast towards the Kiyamu Peninsula, covered by the 62nd Division, which quickly established a new defensive line along the Kokuba River and around Tsukasan. With the fall of Shuri and the withdrawal of Japanese forces, Buckner's troops had emerged victorious in one of the most difficult and bloody battles of the Pacific War. By the end of May, reports indicated that approximately 62,548 Japanese soldiers had been confirmed killed, with another estimated 9,529 thought to have perished, 64,000 of whom were believed to have fallen in the fierce fighting within the Shuri fortified zone alone. While these casualty figures may be somewhat exaggerated, there is little doubt that Japanese forces, especially their infantry combat units, had suffered severe depletion. In contrast, General Geiger's 3rd Amphibious Corps recorded significant losses of its own, with 1,718 killed, 8,852 wounded, and 101 missing during the fighting around Shuri. Additionally, the losses for General Hodge's 24th Corps over two months of combat totaled an alarming 26,044 casualties. On June 1, the American forces faced surprisingly little opposition from the enemy. A frustrated General Buckner, who had hoped to trap the defenders at Shuri, ordered his troops to advance rapidly in pursuit of the retreating Japanese units. With the 77th Division methodically mopping up remnants in the Shuri zone, General Hodge made a strategic decision. He shifted the 7th Division toward the east and ordered the 96th Division to move south to relieve the 32nd Regiment, taking up the western end of the Corps line. This strategic relief enabled Arnold to immediately push south with both the 17th and 184th Regiments in assault, managing to advance approximately 1,100 yards toward Okota and Batan despite increasingly stiff resistance from smaller enemy units. To the northwest, a coordinated attack by the Marine divisions successfully secured all high ground overlooking the primary east-west road in the Kokuba Valley. The 5th Marines anchored their position on the hills east of Shichina, while Shepherd's regiments seized the dominating heights north of Kokuba. Recognizing the strategic importance of the Oroku Peninsula, General Geiger planned a shore-to-shore landing there. To gather intelligence, Shepherd dispatched his Reconnaissance Company to conduct an amphibious reconnaissance of the peninsula that evening. Their findings confirmed that the peninsula was not fortified with significant enemy strength. The following day, Colonel Snedeker's 7th Marines advanced to relieve the 6th Marine Division on the west coast. The 2nd Battalion continued the momentum by crossing the Kokuba River, moving into the hills on the south bank. Meanwhile, to the east, the 5th Marines also crossed the upper branch of the river and pressed forward to secure the ridgeline that controlled the approaches to Tsukasan. This maneuver effectively placed the entire Naha-Yonabaru road firmly in American hands, further tightening their grip on the battlefield. That evening, Shepherd dispatched his Reconnaissance Company to conduct an amphibious reconnaissance of the Oroku Peninsula. Their mission revealed that the peninsula was not heavily defended, opening up opportunities for American forces. Further east, the 383rd Regiment successfully cleared out Chan and seized the high ground just north of Tera and Kamizato. Meanwhile, the 381st Regiment conducted repeated assaults on hill positions that impeded its advance, ultimately managing to penetrate to Karadera. The 7th Division maintained relentless pressure on the retreating garrison of the Chinen Peninsula, advancing its lines by 2,400 yards toward Itokazu and Kerabaru. Now, it's time to shift our focus away from Okinawa and examine the latest operations of General LeMay's 21st Bomber Command. Since the invasion of Okinawa, Admiral Nimitz had requested that the B-29 Superfortress heavy bombers assist his naval forces in countering the deadly kamikaze attacks. In response, LeMay dispatched 53 bombers to target airfields at Kanoya on April 8, although the city of Kagoshima ended up being bombed instead. On April 17, 134 B-29s were sent against Kyushu, successfully neutralizing enemy airfield operations for 18 hours. However, as we've observed, the Japanese continued to launch both scattered and mass kamikaze attacks. To address this ongoing threat, the 21st Bomber Command, bolstered by the arrival of Brigadier General Roger Ramey's 58th Bombardment Wing, dedicated 75% of its combat effort to providing direct tactical support for the Okinawa campaign up to May 11. During this period, they flew a total of 2,104 sorties against 17 airfields in Kyushu and Shikoku. Although they did not fully neutralize these targets, significant damage was inflicted on enemy storage, maintenance, and repair facilities. The bombers also served to keep the Japanese off balance, significantly disrupting their ability to plan and execute large, coordinated attacks. In total, 24 B-29s were destroyed and 233 damaged during these operations, while 134 enemy interceptors were shot down. Between the strikes on Kyushu, General LeMay managed to fit in several medium-strength precision attacks against the Japanese aircraft industry, along with two large-scale night incendiary missions in the Tokyo Bay area. The first of these missions took place on April 13, when 327 B-29s dropped an impressive 2,139 tons of ordnance on the arsenal district of Tokyo, located northwest of the Imperial Palace. The resulting fires consumed 11.4 square miles of this crucial industrial zone, destroying arsenal plants responsible for manufacturing and storing small arms, machine guns, artillery, bombs, gunpowder, and fire-control mechanisms. Just two nights later, on April 15, 303 bombers executed another incendiary attack, dropping 1,930 tons of explosives with equal success. This raid devastated 6 square miles in Tokyo, 3.6 square miles in Kawasaki, and 1.5 square miles in Yokohama, which suffered collateral damage from the fire spills. Cumulatively, these two raids resulted in the destruction of 217,130 buildings in Tokyo and Yokohama and 31,603 in Kawasaki. On April 24, 131 B-29s conducted a highly successful precision strike against the Tachikawa plant of the Hitachi Aircraft Corporation. Although the next planned attack was thwarted by inclement weather, 148 B-29s struck Kure on May 5, delivering devastating damage. After being relieved from support for the Okinawa operation on May 11, LeMay initiated a month of heavy fire raids to complete the campaign that had begun in March, while also addressing top-priority precision targets as opportunities arose. Accordingly, on May 14, 529 B-29s were dispatched to strike northern Nagoya, with 472 successfully dropping 2,515 tons of munitions, resulting in the burning of 3.15 square miles and inflicting significant damage to Mitsubishi's No. 10 engine works. Just two nights later, 522 bombers returned to Nagoya, with 457 of them effectively delivering 3,609 tons over the dock and industrial areas in the southern part of the city, burning 3.82 square miles and causing extensive damage to Mitsubishi's No. 5 aircraft works. These two incendiary attacks finished Nagoya as an objective for area attacks. Good targets remained in the city, and the command was to return six more times for precision attacks before V-J Day. But the industrial fabric of the city had been ruined in the earlier precision attacks and in the fire raids that had burned out twelve square miles of a total built-up urban area of about forty square miles. In all, 113460 buildings had been destroyed, 3866 persons had been killed and 472701 rendered homeless. The displacement of workers aggravated the difficulties caused by physical damage and had an important effect on civilian morale. After a week of respite, temporarily interrupted by a 318-plane precision attack on the Tachikawa Aircraft Company, 562 B-29s were dispatched to strike Tokyo once more on May 23. Out of these, 520 bombers reached their target, dropping an impressive 3,646 tons of explosives over the district stretching southward from the Imperial Palace along the west side of Tokyo Harbor. Despite encountering strong opposition, this attack resulted in the destruction of 5.3 square miles of area. Two nights later, 502 B-29s returned to Tokyo, targeting the area just north of their previous hit. They faced heavy resistance again, dropping 3,262 tons of incendiaries on the city, which resulted in the destruction of 16.8 square miles, marking the largest area devastated in a single Tokyo raid. In light of the heavy casualties suffered during these last two strikes, General LeMay decided to assign P-51s from Iwo Jima to escort future attacks. As a result, on May 29, 517 B-29s were escorted by 101 P-51 fighters during an assault on Yokohama. These bombers successfully dropped 2,570 tons of munitions, burning out 6.9 square miles while the escorting fighters engaged in fierce battles against about 150 aggressive interceptors. Meanwhile, General Whitehead's 5th Air Force was conducting an extensive program of area bombing against Formosa, experimenting with various types of bombs and tactics in preparation for future attacks on the Japanese mainland. Taihoku, the capital and political and financial center of Taiwan, was subjected to constant aerial bombardment. The largest strike against modern-day Taipei, known as the Taihoku Air Raid, occurred on May 31, when units of the Fifth Air Force consisting of 117 Consolidated B-24 Liberator heavy bombers were sent to conduct the largest air raid ever on Taiwan. The bombing began from around ten o'clock in the morning and lasted until one o'clock in the afternoon, during which the attack was non-stop. The Americans met virtually no resistance from the Japanese, mainly due to the attrition the Japanese air forces had suffered in the Aerial Battle of Taiwan-Okinawa, which completely exhausted Japan's fighter units in Taiwan. They successfully dropped approximately 3,800 bombs targeting military units and governmental facilities. The Office of the Governor-General of Taiwan suffered a direct hit, in spite of the building being heavily camouflaged to avoid being targeted. The building suffered extensive damage from fire caused by the bombs and almost collapsed on itself; it was rendered unoccupiable and was not repaired until the Nationalist Chinese takeover. Other facilities hit during the bombing included the residence of the Assistant Governor-General, Taiwan Railway Hotel, Office of Governor-General Library, Army Headquarters, Taihoku Imperial University, Taihoku Station, Bank of Taiwan, Taihoku High Court, Taihoku New Park, and many other facilities. Many civilian installations were damaged, including Taihoku Prefectural Taihoku First Girls' High School, Huashan Catholic Church of Taihoku, and the famous Lungshan Temple of Manka, which was hit in the main building and the left corridor; many precious artifacts and art works in the temple were lost in the ensuing fire. As a result of the extensive bombing campaigns, more than 3,000 civilians lost their lives. Tens of thousands were displaced or left homeless, and countless buildings were destroyed, either directly by the attacks or by the fires they ignited. This devastation left a profound impact on the local population and infrastructure, marking yet another tragic chapter in the toll of the war. I would like to take this time to remind you all that this podcast is only made possible through the efforts of Kings and Generals over at Youtube. Please go subscribe to Kings and Generals over at Youtube and to continue helping us produce this content please check out www.patreon.com/kingsandgenerals. If you are still hungry after that, give my personal channel a look over at The Pacific War Channel at Youtube, it would mean a lot to me. In the midst of the brutal Battle of Okinawa, American Marines faced relentless resistance as they pushed towards Shuri. Despite heavy casualties and daunting conditions, the tide turned when General Buckner ordered aggressive assaults that outmaneuvered the encircled Japanese forces. After days of relentless combat, they captured the stronghold, leading to the collapse of Japanese defenses. As the dust settled, Shuri lay in ruins, marking a pivotal moment in the Pacific War and showcasing the indomitable spirit of both American and Japanese soldiers.
Last time we spoke about Operation Chahar. In the turbulent year of 1935, tensions surged in North China as the Kwantung Army defied Tokyo's orders, encroaching deeper into Chahar province. This period was marked by widespread anti-Japanese sentiments, fueled by local revolts and the assassination of pro-Japanese figures, which infuriated Japanese authorities. On May 20, the Kwantung Army launched an offensive against a bandit group led by Sun Yungqin, seeking to exert control over the demilitarized regions established by earlier agreements. Their swift victory forced the resignation of local officials opposing Japanese interests. As chaos escalated, the Chinese government, under pressure to appease Japan, dismantled anti-Japanese factions and dismissed key leaders. The climax in this saga came with the signing of the He-Umezu Agreement, stripping China of authority in Hubei and Chahar, signaling Japan's increasing dominance and setting the stage for further exploitation of the region. #150 The February 26 Incident Welcome to the Fall and Rise of China Podcast, I am your dutiful host Craig Watson. But, before we start I want to also remind you this podcast is only made possible through the efforts of Kings and Generals over at Youtube. Perhaps you want to learn more about the history of Asia? Kings and Generals have an assortment of episodes on history of asia and much more so go give them a look over on Youtube. So please subscribe to Kings and Generals over at Youtube and to continue helping us produce this content please check out www.patreon.com/kingsandgenerals. If you are still hungry for some more history related content, over on my channel, the Pacific War Channel where I cover the history of China and Japan from the 19th century until the end of the Pacific War. While this podcast is supposed to be given through the Chinese perspective, I apologize but yet again I need to jump over to the Japanese side. You see, a very pivotal moment during the Showa era would occur in the year of 1936. I think it's crucial to understand it, and the underlying issues of it, to better understand what we will be stuck in for the unforeseeable future, the Second Sino-Japanese War. I've briefly mentioned the two factions within the Japanese military at this time, but now I'd really like to jump into them, and a major incident that made them collide. In the aftermath of WW1, 2 prominent factions emerged during this tumultuous period: the Kodoha, or Imperial Way Faction, and the Toseiha, or Control Faction. Each faction represented distinct visions for Japan's future, deeply influencing the nation's course leading up to World War II. The Kodoha rose to prominence in the 1920s, driven by a fervent belief in Japan's divine destiny and its right to expand its imperial reach across Asia. This faction was characterized by its adherence to traditional Japanese values, rooted in the samurai ethos. They viewed the Emperor as the embodiment of Japan's spirit and sought to return to the moral foundations they believed had been eroded by “Western influence”. The Kodoha was often critical of the West, perceiving the encroachment of Western thought and culture as a threat to Japan's unique identity. Their ideology emphasized a robust military force, advocating for aggressive campaigns in regions like Manchuria and China to assert Japan's dominance. Contrasting sharply with the Kodoha, the Toseiha began to emerge as a more dominant political force in the late 1930s. The Toseiha embraced a pragmatic approach, advocating for a disciplined military that could engage effectively with the complexities of modern warfare. They recognized the importance of retaining some traditional values while also integrating Western military techniques. Rather than rejecting Western influence entirely, the Toseiha believed in adapting to global shifts to ensure Japan's strength and security. The Toseiha's moderation extended to their governance strategies, as they prioritized political stability and control over radical ideology. They saw this approach as crucial for creating a robust state capable of managing Japan's expansionist ambitions without provoking the backlash that Kodoha tactics elicited. Their more calculated approach to military expansion included securing partnerships and pursuing diplomatic solutions alongside military action, thereby presenting a less confrontational image to the world. Now after Manchuria was seized and Manchukuo was ushered in, many in the Japanese military saw a crisis emerge, that required a “showa restoration' to solve. Both factions aimed to create military dictatorships under the emperor. The Kodoha saw the USSR as the number one threat to Japan and advocated an invasion of them, aka the Hokushin-ron doctrine, but the Toseiha faction prioritized a national defense state built on the idea they must build Japans industrial capabilities to face multiple enemies in the future. What really separated the two, was the Kodoha sought to use a violent coup d'etat to make ends meet, whereas the Toseiha were unwilling to go so far. The Kodoha faction was made up mostly of junior and youthful officers, typically country boys as we would call them. These were young men whose families were not the blue bloods, farmer types. They viewed the dramatic changes of Japan in light of their own family experiences, many were impoverished by the dramatic changes. A very specific thing these Kodoha boys hated were the Zaibatsu. The Zaibatsu were large Japanese business conglomerates, primarily active from the Meiji period until WW2. They combined various industries, including banking, manufacturing, and trading. Prominent examples included Mitsubishi and Sumitomo. The reason they hated the Zaibatsu was because they believed they were influenced by western thought and that they super succeeded the authority of the emperor. More or less you can think of it as “we hate the fat cats who are really running things”. Now the Toseiha faction were willing to work with the Zaibatsu to make Japan stronger. Basically they believed them to just be a necessary evil, you had to play ball to get things rolling. Random note, Hirohito's brother Prince Chichibu sympathized with the Kodoha faction and repeatedly counseled his brother that he should implement direct imperial rule even if it meant suspending the constitution, aka a show restoration. Hirohito believed his brother who was active in the IJA at the time was being radicalized. Now I cant go through the entire history of it, but this time period is known as the “government by assassination” period for Japan. Military leaders in the IJA, IJN and from within the Kodoha and Toseiha factions kept assassinating politicians and senior officers to push envelopes forward. Stating all of that, I now want to talk about the February 26th incident and I will add I am using a specific source, simply because it's my favorite. That is Herbert P Bix's Hirohito and the Making of Modern Japan. In late 1934, several officers from the Imperial Way faction at the Army Cadet School were arrested for plotting a coup. Although there were no immediate repercussions, the following year, two of the same Kodoha officers, named Isobe Asaichi and Muranaka Takaji were arrested again for distributing a document accusing Toseiha faction officers, like Major General Nagata Tetsuzan, of previously drafting coup plans against the government. This time, the army's upper echelons responded firmly, condemning Isobe and Muranaka's accusations as acts of disloyalty, resulting in both officers losing their commissions. Meanwhile, other Imperial Way officers sought retaliation against Nagata, who was rumored to be planning a major purge to eliminate factionalism within the army. Tatsukichi Minobe was a Japanese statesman and scholar of constitutional law and in the 1930s he began a movement bringing up the very real issue with the Meiji constitution in relation to the role of the emperor. In August 1935, amid a populist movement denouncing Minobe's interpretation of the constitution, Lt colonel Aizawa Saburo from Kodoha faction entered Nagata's office and fatally attacked him with his katana. This marked a significant escalation in the military struggle over state reform and the push for increased military funding, which was intertwined with the movement against Minobe. Meanwhile anti- Prime Minister Okada factions within the army, continuing to use slogans like “kokutai clarification” and “denounce the organ theory,” intensified their attacks on the emperor's advisers and hereditary peers. Senior generals from the Kodoha faction arranged a public court-martial for Aizawa, held by the 1st Division, a group heavily populated by Kodoha officers based in Tokyo. When Aizawa's trial commenced on January 12, 1936, his defense team transformed it into an emotional condemnation of the Okada cabinet, the court entourage, and Minobe's constitutional theories. This strategy garnered support across the nation, even reaching unexpected places like the imperial palace, where Dowager Empress Teimei Kogo, a staunch rightist, expressed sympathy for Aizawa. However, before the trial could progress, a military mutiny disrupted proceedings in the capital. Shockwaves rippled through the army after Army Minister Hayashi dismissed Kodoha member General Mazaki from his position overseeing military education and ordered the transfer of the 1st Division to Manchuria, which ignited the largest army uprising in modern Japanese history. The uprising was orchestrated through a series of meetings held from February 18 to 22 by key individuals including Nishida, Yasuhide Kurihara, Teruzō Andō, Hisashi Kōno, Takaji Muranaka, and Asaichi Isobe. Their plan was relatively straightforward: the officers would assassinate the most prominent adversaries of the kokutai, seize control of the administrative center of the capital and the Imperial Palace, and present their demands, which included the dismissal of certain officials and the establishment of a new cabinet led by Mazaki. They did not establish long-term goals, believing that those should be determined by the Emperor. However, it is suspected that they were prepared to replace Hirohito with Prince Chichibu if necessary. The young Kodoha officers felt they had at least implicit support from several influential Imperial Japanese Army officers after making informal inquiries. This group included figures such as Araki, Minister of War Yoshiyuki Kawashima, Jinzaburō Mazaki, Tomoyuki Yamashita, Kanji Ishiwara, Shigeru Honjō, as well as their immediate superiors, Kōhei Kashii and Takeo Hori. Later, Kawashima's successor as Minister of War remarked that if all the officers who had endorsed the rebellion were forced to resign, there would not have been enough high-ranking officers left to replace them. To articulate their intentions and grievances, the young officers prepared a document titled "Manifesto of the Uprising" “Kekki Shuisho”, which they intended to present to the Emperor. Although the document was authored by Muranaka, it was written under the name of Shirō Nonaka, the highest-ranking officer involved in the plot. The document aligned with Kokutai Genri-ha ideals, criticizing the genrō, political leaders, military factions, zaibatsu, bureaucrats, and political parties for jeopardizing the kokutai with their selfishness and disregard for the Emperor, and emphasized the need for direct action: “Now, as we face immense foreign and domestic challenges, if we do not eliminate the disloyal and unjust who threaten the kokutai, if we do not remove the villains obstructing the Emperor's authority and hindering the Restoration, the Imperial vision for our nation will come to naught [...] Our duty is to purge the malevolent ministers and military factions surrounding the Emperor and eradicate their influence; we shall fulfill this mission.” Seven targets were selected for assassination for "threatening the kokutai". Keisuke Okada served as Prime Minister, where he notably advocated for the London Naval Treaty and supported the "organ theory" of the kokutai. His actions reflect a commitment to international agreements and specific ideological principles at the time. Saionji Kinmochi, a Genrō and former Prime Minister, also supported the London Naval Treaty. However, his influence extended further, as he played a role in prompting the Emperor to establish inappropriate cabinets, impacting political stability. Makino Nobuaki, the former Lord Keeper of the Privy Seal and Foreign Minister, was another key figure who supported the London Naval Treaty. He notably prevented Prince Fushimi from voicing protests to the Emperor during this period, and he established a court faction in collaboration with Saitō, further entrenching political alliances. In his capacity as Grand Chamberlain, Kantarō Suzuki supported the London Naval Treaty but faced criticism for "obstructing the Imperial virtue," suggesting tensions between political decisions and traditional values. Saitō Makoto, who served as Lord Keeper of the Privy Seal and former Prime Minister, was involved in advocating for the London Naval Treaty and played a significant role in Mazaki's dismissal. He, too, formed a court faction with Makino, indicating the intricacies of court politics. Takahashi Korekiyo, as Finance Minister and former Prime Minister, engaged in party politics with the aim of diminishing military influence. His approach was focused on maintaining the existing economic structure amid the shifting political landscape. Finally, Jōtarō Watanabe, who replaced Mazaki as Inspector General of Military Education, supported the "organ theory" of the kokutai yet faced criticism for refusing to resign, despite being considered unsuitable for his position. On the night of February 25, Tokyo experienced a heavy snowfall, which uplifted the rebel officers as it evoked memories of the 1860 Sakuradamon Incident. During this event, political activists known as shishi assassinated Ii Naosuke, the chief advisor to the Shōgun, in the name of the Emperor. The rebel forces, organized into six groups, began mobilizing their troops and departing from their barracks between 3:30 and 4:00 AM. At 5:00 AM, they launched simultaneous attacks on key targets, including Okada, Takahashi, Suzuki, Saito, the Ministry of War, and the headquarters of the Tokyo Metropolitan Police. At around five o'clock on the morning of February 26, 1936, a rebellion erupted, fueled by the long-standing tensions surrounding the kokutai issues that had plagued 1935. Twenty-two junior officers led over 1,400 armed soldiers and non-commissioned officers from three regiments of the 1st Division and an infantry unit of the Imperial Guards in a mutiny in snow-covered Tokyo. The attack on Okada involved a contingent of 280 men from the 1st Infantry Regiment, commanded by 1st Lieutenant Yasuhide Kurihara. The troops encircled the Prime Minister's Residence and compelled its guards to open the gates. Upon entering the compound, they attempted to locate Prime Minister Okada but were met with gunfire from four policemen stationed there. All four policemen were killed, wounding six rebel soldiers in the process. However, the shots served as a warning for Okada, prompting his brother-in-law, Colonel Denzō Matsuo, to help him find refuge. Matsuo, who closely resembled Okada, was eventually discovered by the soldiers and killed. After comparing Matsuo's wounded face to a photograph of the prime minister, the attackers mistakenly believed they had accomplished their mission. Okada managed to escape the following day, but this information was kept confidential, and he did not play any further role in the events. After Matsuo's death, Kurihara's men took up guard positions around the compound, reinforced by sixty soldiers from the 3rd Imperial Guard. In another key operation, Captain Kiyosada Kōda led a group of 160 men to seize control of the Minister of War's residence, the Ministry of War, and the General Staff Office. Upon entering the Minister's residence at 6:30 AM, they demanded to see Minister Kawashima. Once admitted, they read their manifesto aloud and presented a document detailing several demands, including: A prompt resolution to the situation that would further "advance the cause of the Restoration." A call to prevent the use of force against the Righteous Army. The arrest of Kazushige Ugaki (Governor-General of Korea), Jirō Minami (commander of the Kwantung Army), Kuniaki Koiso (commander of the Korean Army), and Yoshitsugu Tatekawa for their roles in undermining military command. The immediate dismissal of Lieutenant Colonel Akira Mutō, Colonel Hiroshi Nemoto, and Major Tadashi Katakura from the Imperial Japanese Army for promoting "factionalism." The appointment of Araki as the new commander of the Kwantung Army. Ugaki, who served as Minister of War during two separate terms, had overseen significant reductions and modernization efforts within the army. He had also failed to support the March Incident plotters, who had hoped to install him as Prime Minister. Minami, Mutō, Nemoto, and Katakura were all influential members of the Tōsei-ha faction; Katakura had been partly responsible for reporting on the Military Academy Incident. Later that morning, Isobe encountered Katakura outside the Ministry of War and shot him non-fatally in the head. During this tumultuous period, several officers sympathetic to the rebels, including General Mazaki, General Tomoyuki Yamashita, and General Ryū Saitō, joined the uprising. Saitō praised the young officers' spirit and encouraged Kawashima to accept their demands. Shortly before 9:00 am, Kawashima indicated he needed to speak with the Emperor and left for the Imperial Palace. Meanwhile, Captain Hisashi Kōno led a team of seven, comprised mostly of civilians, to attack Makino Nobuaki, who was staying at Kōfūsō, part of the ryokan Itōya in Yugawara, Kanagawa Prefecture, with his family. Arriving at 5:45 am, they stationed two men outside while entering the inn with weapons drawn. Inside, policemen opened fire, leading to a lengthy exchange of gunfire. A policeman managed to alert Makino and his party of the danger, guiding them to a rear exit. Although the assassins fired at the escaping group, Makino successfully evaded capture. Kōno sustained a gunshot wound to the chest, and one policeman, Yoshitaka Minagawa, was killed. As Kōno was evacuated from the scene, the assailants set fire to the building. Hearing a gunshot, Kōno assumed that Makino had shot himself inside. After his recovery at a nearby military hospital, Kōno and his team were arrested by military police. Around 10:00 am, Kurihara and Nakahashi loaded a fleet of three trucks with sixty men and drove from the Prime Minister's Residence to the offices of the Asahi Shimbun, a significant liberal newspaper. They stormed the building, ordering the evacuation of employees and declaring their actions as "divine retribution for being an un-Japanese newspaper." The rebels then overturned and scattered the newspaper's type trays, containing 4,000 different characters, temporarily halting its publication. Following this attack, the men distributed copies of the uprising's manifesto to nearby newspapers before returning to the Prime Minister's Residence. On another front, 1st Lieutenant Motoaki Nakahashi of the 3rd Imperial Guard gathered 135 men and, under the pretext of paying respects at Yasukuni Shrine, marched to Takahashi Korekiyo's residence. There, he divided his forces, sending one group to attack while the other remained to guard the entrance. After breaking into the compound, Nakahashi and Lieutenant Kanji Nakajima found Takahashi in bed, where Nakahashi shot him while Nakajima delivered a fatal sword strike. Takahashi died without waking. Once his target was eliminated, Nakahashi regrouped with the soldiers and proceeded to the Imperial Palace, aiming to secure it. Entering through the western Hanzō Gate at 6:00 am, Nakahashi informed Major Kentarō Honma, the palace guard commander, that he had been dispatched to reinforce the gates due to earlier attacks. Honma, already aware of the uprisings, accepted Nakahashi's arrival. He was assigned to help secure the Sakashita Gate, the primary entrance to the Emperor's residence. Nakahashi planned to signal nearby rebel troops at police headquarters once he controlled access to the Emperor. However, he struggled to contact his allies, and by 8:00 am, Honma learned of his involvement in the uprising and ordered him, at gunpoint, to vacate the palace grounds. Nakahashi complied and returned to join Kurihara at the Prime Minister's Residence, while his soldiers remained at the gate until relieved later that day, preventing their inclusion in the government's official count of rebel forces. Elsewhere, 1st Lieutenant Naoshi Sakai led a detachment of 120 men from the 3rd Infantry Regiment to Saitō Makoto's home in Yotsuya. After surrounding the policemen on guard, five soldiers entered the residence and found Saitō and his wife, Haruko, in their bedroom. They shot Saitō dead, prompting Haruko to plead for her life, saying, "Please kill me instead!" While they pulled her away, she was unwittingly wounded by stray gunfire. Following Saitō's assassination, two officers directed another group to target General Watanabe, while the remaining men moved to strategically position themselves northeast of the Ministry of War. In Kōjimachi, Captain Teruzō Andō commanded 200 men from the 3rd Infantry Regiment to assault Suzuki's residence across from the Imperial Palace. After disarming the police on duty, they located Suzuki in his bedroom and shot him twice. When Andō moved to deliver the coup de grâce with his sword, Suzuki's wife implored to be allowed to do it herself, believing her husband to be fatally wounded. Andō obliged and, apologizing for the act, explained it was for the nation's sake. After saluting Suzuki, the soldiers left to guard the Miyakezaka junction north of the Ministry of War. Following the assault on Saitō, a party of twenty men, led by 2nd Lieutenants Tarō Takahashi and Yutaka Yasuda, headed to Watanabe's residence in Ogikubo after 7:00 AM. Despite the two-hour delay since previous attacks, no measures had been taken to alert Watanabe. As they attempted to storm the front entrance, military police inside opened fire, wounding Yasuda and another soldier. The troops then gained entry through the rear, confronting Watanabe's wife outside their bedroom. After shoving her aside, they found Watanabe using a futon as cover. He opened fire, prompting one soldier to retaliate with a light machine gun. Takahashi then rushed in and fatally stabbed Watanabe, witnessed by his nine-year-old daughter, Kazuko, who hid nearby. The soldiers departed, taking their wounded to a hospital before positioning themselves in northern Nagatachō. In a significant move, Captain Shirō Nonaka led nearly a third of the rebel forces, comprising 500 men from the 3rd Infantry Regiment, to assault the Tokyo Metropolitan Police headquarters. Their objective was to secure communication equipment and prevent dispatch of the police's Emergency Service Unit. Meeting no resistance, they quickly occupied the building, possibly due to a strategic decision to leave the situation in the military's hands. After securing the police headquarters, 2nd Lieutenant Kinjirō Suzuki led a small group to attack Fumio Gotō's residence, the Home Minister's, but found that Gotō was not home, thus allowing him to escape. This attack appeared to result from Suzuki's independent decision, rather than a coordinated effort among the officers. Despite all of these actions, the Kodoha boys had failed to secure the Sakashita Gate to the palace, which allowed the palace to maintain communication with the outside world, and they neglected to address potential naval interventions. At the Yokosuka naval base, Rear Adm. Yonai Mitsumasa and his chief of staff, Inoue Shigeyoshi, positioned marines to defend the Navy Ministry and prepared warships in Tokyo Bay to suppress the rebellion. By the morning of February 28, after unsuccessful negotiations through sympathetic officers at army headquarters, the commander under martial law transmitted an imperial order to disperse. Most troops returned to their barracks, one officer committed suicide, and the remaining leaders surrendered, resulting in the uprising ending with minimal further violence. Nevertheless, martial law in Tokyo continued for nearly five months. The rebel officers had initially planned for General Kawashima, a staunch ally of the Kodoha, to relay their intentions to the emperor, who they assumed would issue a decree for a “Showa restoration.” Despite their radical objectives of overthrowing the political order, the mutineers, like other military and civilian extremists of the 1930s, sought to operate within the imperial framework and maintain the kokutai. They believed the emperor was under the control of his advisers and lacked a genuine will of his own. Once the Lord Keeper of the Privy Seal and the Grand Chamberlain were removed, they expected the emperor to appoint General Mazaki as prime minister, a leader they believed would reinforce the military and effectively address the China issue. At the onset of the insurrection, they had a real chance of success. The Tokyo military police commander, General Kashii Kohei, sympathized with their cause, and the emperor's chief aide, General Honjo, was related to rebel officer Capain Yamaguchi Ichitaro. Support for the mutineers was present at military bases nationwide. Historian Hata Ikuhiko notes that the rebels contacted General Honjo by both phone and written message before attacking the Okada cabinet. As the first in the imperial entourage to learn of the mutiny, Honjo could have warned the intended targets but chose not to do so. By the time he arrived at court at 6:00 am. on the 26th, key advisors like Chief Secretary Kido, Imperial Household Minister Yuasa Kurahei, and Vice Grand Chamberlain Hirohata Tadakata were already aware of the potential danger. Suzuki was murdered, and the emperor was deeply affected, awakening to the news at 5:40 am from the chamberlain on night duty, Kanroji Osanaga. He learned that his old ministers had been attacked and a coup was underway. Upon receiving this information, Hirohito resolved to suppress the uprising. He was outraged by the killing of his ministers and feared that the rebels might use his brother, Prince Chichibu, to force him to abdicate. He donned his army uniform and summoned Honjo, ordering him to “end it immediately and turn this misfortune into a blessing.” Hirohito adopted a strategy proposed by Kido, who had acted swiftly earlier that morning, instructing Honjo to assess the Imperial Guard Division's potential actions if the mutineers advanced on the Palace. Kido aimed to prevent the establishment of a new provisional cabinet until the mutiny was fully quelled. At 9:30 am Army Minister Kawashima, who had previously met with one of the rebel officers, arrived at court. He urged the emperor to form a cabinet that would “clarify the kokutai, stabilize national life, and fulfill national defense.” Surprised by Kawashima's tone, Hirohito reprimanded him for not prioritizing the suppression of the mutiny. He also expressed his frustration to Chief of the Navy General Staff Prince Fushimi, dismissing him when he inquired about forming a new cabinet. Later that day, Kawashima met with the Supreme Military Council, consisting mainly of army officers sympathetic to the rebels. The council decided to attempt persuasion before relaying the emperor's orders a move contrary to Hirohito's directive. According to historian Otabe Yuji, an “instruction” was issued to the rebel officers at 10:50 am, acknowledging their motives and suggesting the emperor might show them leniency. This message was communicated to the ringleaders by martial law commander General Kashii. That evening, when members of the Okada cabinet came to submit their resignations, Hirohito insisted they remain in power until the mutiny was resolved. On February 27, the second day of the uprising, Hirohito announced “administrative martial law” based on Article 8 of the Imperial Constitution. This invoked his sovereign powers to address the crisis while freeing him from needing cabinet approval for his actions. Hirohito displayed remarkable energy throughout the subsequent days, sending chamberlains to summon Honjo for updates and threatening to lead the Imperial Guard Division himself when dissatisfied with the reports. Honjo, however, resisted the emperor's demands and exhibited sympathy for the rebels. During the uprising, Hirohito met with Prince Chichibu, who had recently returned from Hirosaki. Their discussions reportedly led Chichibu to distance himself from the rebels. However, rumors of his sympathy for them persisted, leading to concerns about potential conflicts within the imperial family. On the second day, Rear Admiral Yonai and his chief of staff demonstrated their loyalty to Hirohito. By February 29, the fourth day of the uprising, Hirohito had reasserted his authority, troops were returning to their barracks, and most rebel leaders were captured. Seventeen of these leaders were court-martialed and executed in July without legal representation. Shortly after, during the obon festival, Hirohito allegedly instructed a military aide to secure seventeen obon lanterns for the palace. This action, though secret, may have provided him some personal comfort amidst the turmoil. An investigation following the mutiny revealed that the rebels' sense of crisis was amplified by the recent general elections, which had shown an anti-military sentiment among voters. Despite their populist rhetoric, most ringleaders were not motivated by the agricultural depression; their goal was to support the kokutai by advocating for increased military rearmament. During this period, military spending steadily rose from 3.47% of GNP in 1931 to 5.63% in 1936. Intriguingly, the ringleaders and their senior commanders shared a desire for state control over production to mobilize resources fully for total war. While united in this goal, their ideas about how to achieve a “Showa restoration” varied greatly, with some leaders, like Isobe, calling for complete economic consolidation and a return to strong state power. The February mutiny reinforced Hirohito's belief in the constitutional framework that underpinned his military authority. He became increasingly cautious about decisions that could compromise his command and developed closer ties to the army's Control faction, justifying military spending increases. Yet, the memory of the mutiny left him feeling uncertain about the throne's stability. Now you know me, whenever I can bring up Hirohito's involvement in the war related times I gotta do. After WW2, in an apparent effort to downplay his role as supreme commander, Hirohito provided a deliberately distorted account of the February events. “I issued an order at that time for the rebel force to be suppressed. This brings to mind Machida Chuji, the finance minister. He was very worried about the rebellion's adverse effect on the money market and warned me that a panic could occur unless I took firm measures. Therefore I issued a strong command to have [the uprising] put down. As a rule, because a suppression order also involves martial law, military circles, who cannot issue such an order on their own, need the mutual consent of the government. However, at the time, Okada's whereabouts were unknown. As the attitude of the Army Ministry seemed too lenient, I issued a strict order. Following my bitter experiences with the Tanaka cabinet, I had decided always to wait for the opinions of my advisers before making any decision, and not to go against their counsel. Only twice, on this occasion and at the time of the ending of the war, did I positively implement my own ideas. Ishiwara Kanji of the Army General Staff Office also asked me, through military aide Chojiri [Kazumoto], to issue a suppression order. I don't know what sort of a person Ishiwara is, but on this occasion he was correct, even though he had been the instigator of the Manchurian Incident. Further, my chief military aide, Honjo, brought me the plan drafted by Yamashita Hobun, in which Yamashita asked me to please send an examiner because the three leaders of the rebel army were likely to commit suicide. However, I thought that sending an examiner would imply that they had acted according to their moral convictions and were deserving of respect. . . . So I rejected Honjo's proposal, and [instead] issued the order to suppress them. I received no report that generals in charge of military affairs had gone and urged the rebels to surrender.” On February 26, when Hirohito ordered the immediate suppression of the rebels, his anger was directed not only at the insurgents who had assassinated his closest advisors but also at senior army officers who were indecisive in executing the crackdown. The following day, in addition to his role as Minister of Commerce and Industry, Machida took on the responsibilities of finance minister. Concerns over economic panic and confusion contributed to the emperor's sense of urgency, despite not being the primary motivation for his actions. Hirohito believed that every hour of delay tarnished Japan's international reputation. Since the Manchurian Incident, the emperor had frequently clashed with the military regarding encroachments on his authority, though never about fundamental policy issues. At times, he had managed to assert his political views during policy discussions, similar to his earlier influence under the Hamaguchi cabinet. The February 26 mutiny highlighted to Hirohito and Yuasa his privy seal from March 1936 to June 1940, and the first lord keeper of the privy seal to attend court regularly the necessity of fully exercising the emperor's supreme command whenever the situation demanded it. Even when faced with opposition from Honjo, Hirohito managed to gain support and assert his authority through a decisive approach. His resolution marked the end of a period during which alienated “young officers” attempted to leverage his influence as a reformist figure to challenge a power structure they could not manipulate effectively. However, Hirohito learned how to adeptly manage that establishment in most situations. The decision-making process within the government was characterized by secrecy, indirect communication, vague policy drafting, and information manipulation, creating a landscape of confusion, misunderstanding, and constant intrigue aimed at achieving consensus among elites. This was the modus operandi in Tokyo and a reflection of how the emperor operated. Once again, Hirohito reminded the tightly-knit elite that he was essential to the functioning of the system. On May 4, 1936, during his address at the opening ceremony of the Sixty-ninth Imperial Diet, while Tokyo remained under martial law, Hirohito closed the chapter on the February mutiny. Initially, he contemplated sending a strong message of censure to the military, but after considerable deliberation over three months, he ultimately chose to issue a brief, innocuous statement: “We regret the recent incident that occurred in Tokyo.” The response from his audience of Diet members and military officials was one of startled awe, with some privately expressing disappointment. Once again, at a critical juncture, Hirohito avoided an opportunity to publicly rein in the military through his constitutional role. Nonetheless, due to his behind-the-scenes actions, the drift in domestic policy that had characterized Japan since the Manchurian Incident came to an end. In the following fourteen months, the emperor and his advisors largely aligned with the army and navy's demands for increased military expansion and state-driven industrial development. I would like to take this time to remind you all that this podcast is only made possible through the efforts of Kings and Generals over at Youtube. Please go subscribe to Kings and Generals over at Youtube and to continue helping us produce this content please check out www.patreon.com/kingsandgenerals. If you are still hungry after that, give my personal channel a look over at The Pacific War Channel at Youtube, it would mean a lot to me. So some very unruly young Japanese officers got the bright idea of forcing a showa restoration by killing all the culprits they believed held their emperor hostage. Little did they know, this event spelt the end of the Kodoha faction and rise of the Toseiha faction. Henceforth the military was even more in charge and would get even more insane.

Technology doesn't force us to do anything — it merely opens doors. But military and economic competition pushes us through.That's how today's guest Allan Dafoe — director of frontier safety and governance at Google DeepMind — explains one of the deepest patterns in technological history: once a powerful new capability becomes available, societies that adopt it tend to outcompete those that don't. Those who resist too much can find themselves taken over or rendered irrelevant.Links to learn more, highlights, video, and full transcript.This dynamic played out dramatically in 1853 when US Commodore Perry sailed into Tokyo Bay with steam-powered warships that seemed magical to the Japanese, who had spent centuries deliberately limiting their technological development. With far greater military power, the US was able to force Japan to open itself to trade. Within 15 years, Japan had undergone the Meiji Restoration and transformed itself in a desperate scramble to catch up.Today we see hints of similar pressure around artificial intelligence. Even companies, countries, and researchers deeply concerned about where AI could take us feel compelled to push ahead — worried that if they don't, less careful actors will develop transformative AI capabilities at around the same time anyway.But Allan argues this technological determinism isn't absolute. While broad patterns may be inevitable, history shows we do have some ability to steer how technologies are developed, by who, and what they're used for first.As part of that approach, Allan has been promoting efforts to make AI more capable of sophisticated cooperation, and improving the tests Google uses to measure how well its models could do things like mislead people, hack and take control of their own servers, or spread autonomously in the wild.As of mid-2024 they didn't seem dangerous at all, but we've learned that our ability to measure these capabilities is good, but imperfect. If we don't find the right way to ‘elicit' an ability we can miss that it's there.Subsequent research from Anthropic and Redwood Research suggests there's even a risk that future models may play dumb to avoid their goals being altered.That has led DeepMind to a “defence in depth” approach: carefully staged deployment starting with internal testing, then trusted external testers, then limited release, then watching how models are used in the real world. By not releasing model weights, DeepMind is able to back up and add additional safeguards if experience shows they're necessary.But with much more powerful and general models on the way, individual company policies won't be sufficient by themselves. Drawing on his academic research into how societies handle transformative technologies, Allan argues we need coordinated international governance that balances safety with our desire to get the massive potential benefits of AI in areas like healthcare and education as quickly as possible.Host Rob and Allan also cover:The most exciting beneficial applications of AIWhether and how we can influence the development of technologyWhat DeepMind is doing to evaluate and mitigate risks from frontier AI systemsWhy cooperative AI may be as important as aligned AIThe role of democratic input in AI governanceWhat kinds of experts are most needed in AI safety and governanceAnd much moreChapters:Cold open (00:00:00)Who's Allan Dafoe? (00:00:48)Allan's role at DeepMind (00:01:27)Why join DeepMind over everyone else? (00:04:27)Do humans control technological change? (00:09:17)Arguments for technological determinism (00:20:24)The synthesis of agency with tech determinism (00:26:29)Competition took away Japan's choice (00:37:13)Can speeding up one tech redirect history? (00:42:09)Structural pushback against alignment efforts (00:47:55)Do AIs need to be 'cooperatively skilled'? (00:52:25)How AI could boost cooperation between people and states (01:01:59)The super-cooperative AGI hypothesis and backdoor risks (01:06:58)Aren't today's models already very cooperative? (01:13:22)How would we make AIs cooperative anyway? (01:16:22)Ways making AI more cooperative could backfire (01:22:24)AGI is an essential idea we should define well (01:30:16)It matters what AGI learns first vs last (01:41:01)How Google tests for dangerous capabilities (01:45:39)Evals 'in the wild' (01:57:46)What to do given no single approach works that well (02:01:44)We don't, but could, forecast AI capabilities (02:05:34)DeepMind's strategy for ensuring its frontier models don't cause harm (02:11:25)How 'structural risks' can force everyone into a worse world (02:15:01)Is AI being built democratically? Should it? (02:19:35)How much do AI companies really want external regulation? (02:24:34)Social science can contribute a lot here (02:33:21)How AI could make life way better: self-driving cars, medicine, education, and sustainability (02:35:55)Video editing: Simon MonsourAudio engineering: Ben Cordell, Milo McGuire, Simon Monsour, and Dominic ArmstrongCamera operator: Jeremy ChevillotteTranscriptions: Katy Moore
#JAPAN: Watching the PRC from Tokyo Bay. Gregory Copley, Defense & Foreign Affairs 1930 TOKYO
GOOD EVENING: The show begins in the markets, excited by POTUS and waiting for Chairman Powell... 1870 Manhattan CBS EYE ON THE WORLD WITH JOHN BATCHELOR FIRST HOUR 9-9:15 MARKETS: Fed pause. Liz Peek, The Hill, Fox News and Fox Business 9:15-9:30 MARKETS: POTUS momentum. Liz Peek, The Hill, Fox News and Fox Business 9:30-9:45 GAZA: POTUS recommends resettlement of Gazans 9:45-10:00 LEBANON: The LAF collaborates with Hezbollah. Jonathan Schanzer, FDD SECOND HOUR 10-10:15 Ukraine: Deploying the Army on the Mexican border. Colonel Jeff McCausland, USA (retired) @mccauslj @CBSNews @dickinsoncol 10:15-10:30 Ukraine: IRON DOME and POTUS. Colonel Jeff McCausland, USA (retired) @mccauslj @CBSNews @dickinsoncol 10:30-10:45 LondonCalling: POTUS gives license to the EU to discard Global Tax and Net-Zero. @JosephSternberg @WSJOpinion 10:45-11:00 LondonCalling: POTUS asks how much for Greenland? @JosephSternberg @WSJOpinion THIRD HOUR 11:00-11:15 AI: End of AI supremacy. John Cochrane, Hoover 11:15-11:30 HOUSING: Government made housing prices. John Cochrane, Hoover 11:30-11:45 BERLIN: CDU entertains a coalition with AFD. Judy Dempsey, Senior Scholar, Carnegie Endowment for International Peace in Berlin 11:45-12:00 BERLIN: Trump and Germany. Judy Dempsey, Senior Scholar, Carnegie Endowment for International Peace in Berlin FOURTH HOUR 12-12:15 JAPAN: Watching the PRC from Tokyo Bay. Gregory Copley, Defense & Foreign Affairs 12:15-12:30 AFRICA: ECOWAS crumbles; Rwanda attacks; Africa Alone. Gregory Copley, Defense & Foreign Affairs 12:30-12:45 Panama and Greenland: Defense of the Americas. Gregory Copley, Defense & Foreign Affairs 12:45-1:00 am KING CHARLES REPORT: The King to Auschwitz. Gregory Copley, Defense & Foreign Affairs
REMEMBERING PEARL HARBOR AND THE FIGHT BACK: 5/8: Nimitz at War: Command Leadership from Pearl Harbor to Tokyo Bay by Craig L. Symonds https://www.amazon.com/Nimitz-War-Command-Leadership-Harbor-ebook/dp/B09Y64QMZT From America's preeminent naval historian, the first full-length portrait in over fifty years of the man who won the war in the Pacific in World War Two. Only days after the Japanese attacked Pearl Harbor, President Franklin D. Roosevelt tapped Chester W. Nimitz to assume command of the Pacific Fleet. Nimitz transformed the devastated and dispirited Pacific fleet into the most powerful and commanding naval force in history. Facing demands from Washington to mount an early offensive, he had first to revive the depressed morale of the thousands of sailors, soldiers, and Marines who served under him. And of course, he also confronted a formidable and implacable enemy in the Imperial Japanese Navy, which, until the Battle of Midway, had the run of the Pacific. Craig Symonds's Nimitz at War captures Nimitz's composure, discipline, homespun wisdom, and most of all his uncanny sense of when to assert authority and when to pull back. As Symonds's absorbing, dynamic, and authoritative portrait reveals, it required qualities of leadership exhibited by few other commanders in history, qualities that are enduringly and even poignantly relevant to our own moment. 1941 PEARL HARBOR
REMEMBERING PEARL HARBOR AND THE FIGHT BACK: 7/8: Nimitz at War: Command Leadership from Pearl Harbor to Tokyo Bay by Craig L. Symonds https://www.amazon.com/Nimitz-War-Command-Leadership-Harbor-ebook/dp/B09Y64QMZT From America's preeminent naval historian, the first full-length portrait in over fifty years of the man who won the war in the Pacific in World War Two. Only days after the Japanese attacked Pearl Harbor, President Franklin D. Roosevelt tapped Chester W. Nimitz to assume command of the Pacific Fleet. Nimitz transformed the devastated and dispirited Pacific fleet into the most powerful and commanding naval force in history. Facing demands from Washington to mount an early offensive, he had first to revive the depressed morale of the thousands of sailors, soldiers, and Marines who served under him. And of course, he also confronted a formidable and implacable enemy in the Imperial Japanese Navy, which, until the Battle of Midway, had the run of the Pacific. Craig Symonds's Nimitz at War captures Nimitz's composure, discipline, homespun wisdom, and most of all his uncanny sense of when to assert authority and when to pull back. As Symonds's absorbing, dynamic, and authoritative portrait reveals, it required qualities of leadership exhibited by few other commanders in history, qualities that are enduringly and even poignantly relevant to our own moment. 1941 USS HONOLULU
REMEMBERING PEARL HARBOR AND THE FIGHT BACK: 6/8: Nimitz at War: Command Leadership from Pearl Harbor to Tokyo Bay by Craig L. Symonds https://www.amazon.com/Nimitz-War-Command-Leadership-Harbor-ebook/dp/B09Y64QMZT From America's preeminent naval historian, the first full-length portrait in over fifty years of the man who won the war in the Pacific in World War Two. Only days after the Japanese attacked Pearl Harbor, President Franklin D. Roosevelt tapped Chester W. Nimitz to assume command of the Pacific Fleet. Nimitz transformed the devastated and dispirited Pacific fleet into the most powerful and commanding naval force in history. Facing demands from Washington to mount an early offensive, he had first to revive the depressed morale of the thousands of sailors, soldiers, and Marines who served under him. And of course, he also confronted a formidable and implacable enemy in the Imperial Japanese Navy, which, until the Battle of Midway, had the run of the Pacific. Craig Symonds's Nimitz at War captures Nimitz's composure, discipline, homespun wisdom, and most of all his uncanny sense of when to assert authority and when to pull back. As Symonds's absorbing, dynamic, and authoritative portrait reveals, it required qualities of leadership exhibited by few other commanders in history, qualities that are enduringly and even poignantly relevant to our own moment. 1941 USS CALIFORNIA SINKING
REMEMBERING PEARL HARBOR AND THE FIGHT BACK: 8/8: Nimitz at War: Command Leadership from Pearl Harbor to Tokyo Bay by Craig L. Symonds https://www.amazon.com/Nimitz-War-Command-Leadership-Harbor-ebook/dp/B09Y64QMZT From America's preeminent naval historian, the first full-length portrait in over fifty years of the man who won the war in the Pacific in World War Two. Only days after the Japanese attacked Pearl Harbor, President Franklin D. Roosevelt tapped Chester W. Nimitz to assume command of the Pacific Fleet. Nimitz transformed the devastated and dispirited Pacific fleet into the most powerful and commanding naval force in history. Facing demands from Washington to mount an early offensive, he had first to revive the depressed morale of the thousands of sailors, soldiers, and Marines who served under him. And of course, he also confronted a formidable and implacable enemy in the Imperial Japanese Navy, which, until the Battle of Midway, had the run of the Pacific. Craig Symonds's Nimitz at War captures Nimitz's composure, discipline, homespun wisdom, and most of all his uncanny sense of when to assert authority and when to pull back. As Symonds's absorbing, dynamic, and authoritative portrait reveals, it required qualities of leadership exhibited by few other commanders in history, qualities that are enduringly and even poignantly relevant to our own moment. 1941 USS OGLALA CAPSIZED
REMEMBERING PEARL HARBOR AND THE FIGHT BACK: 4 /8: Nimitz at War: Command Leadership from Pearl Harbor to Tokyo Bay by Craig L. Symonds https://www.amazon.com/Nimitz-War-Command-Leadership-Harbor-ebook/dp/B09Y64QMZT From America's preeminent naval historian, the first full-length portrait in over fifty years of the man who won the war in the Pacific in World War Two. Only days after the Japanese attacked Pearl Harbor, President Franklin D. Roosevelt tapped Chester W. Nimitz to assume command of the Pacific Fleet. Nimitz transformed the devastated and dispirited Pacific fleet into the most powerful and commanding naval force in history. Facing demands from Washington to mount an early offensive, he had first to revive the depressed morale of the thousands of sailors, soldiers, and Marines who served under him. And of course, he also confronted a formidable and implacable enemy in the Imperial Japanese Navy, which, until the Battle of Midway, had the run of the Pacific. Craig Symonds's Nimitz at War captures Nimitz's composure, discipline, homespun wisdom, and most of all his uncanny sense of when to assert authority and when to pull back. As Symonds's absorbing, dynamic, and authoritative portrait reveals, it required qualities of leadership exhibited by few other commanders in history, qualities that are enduringly and even poignantly relevant to our own moment 1941 PEARL HARBOR
REMEMBERING PEARL HARBOR AND THE FIGHT BACK: 3/8: Nimitz at War: Command Leadership from Pearl Harbor to Tokyo Bay by Craig L. Symonds https://www.amazon.com/Nimitz-War-Command-Leadership-Harbor-ebook/dp/B09Y64QMZT From America's preeminent naval historian, the first full-length portrait in over fifty years of the man who won the war in the Pacific in World War Two. Only days after the Japanese attacked Pearl Harbor, President Franklin D. Roosevelt tapped Chester W. Nimitz to assume command of the Pacific Fleet. Nimitz transformed the devastated and dispirited Pacific fleet into the most powerful and commanding naval force in history. Facing demands from Washington to mount an early offensive, he had first to revive the depressed morale of the thousands of sailors, soldiers, and Marines who served under him. And of course, he also confronted a formidable and implacable enemy in the Imperial Japanese Navy, which, until the Battle of Midway, had the run of the Pacific. Craig Symonds's Nimitz at War captures Nimitz's composure, discipline, homespun wisdom, and most of all his uncanny sense of when to assert authority and when to pull back. As Symonds's absorbing, dynamic, and authoritative portrait reveals, it required qualities of leadership exhibited by few other commanders in history, qualities that are enduringly and even poignantly relevant to our own moment 1941 PEARL HARBOR
REMEMBERING PEARL HARBOR AND THE FIGHT BACK: 2/8: Nimitz at War: Command Leadership from Pearl Harbor to Tokyo Bay by Craig L. Symonds https://www.amazon.com/Nimitz-War-Command-Leadership-Harbor-ebook/dp/B09Y64QMZT From America's preeminent naval historian, the first full-length portrait in over fifty years of the man who won the war in the Pacific in World War Two. Only days after the Japanese attacked Pearl Harbor, President Franklin D. Roosevelt tapped Chester W. Nimitz to assume command of the Pacific Fleet. Nimitz transformed the devastated and dispirited Pacific fleet into the most powerful and commanding naval force in history. Facing demands from Washington to mount an early offensive, he had first to revive the depressed morale of the thousands of sailors, soldiers, and Marines who served under him. And of course, he also confronted a formidable and implacable enemy in the Imperial Japanese Navy, which, until the Battle of Midway, had the run of the Pacific. Craig Symonds's Nimitz at War captures Nimitz's composure, discipline, homespun wisdom, and most of all his uncanny sense of when to assert authority and when to pull back. As Symonds's absorbing, dynamic, and authoritative portrait reveals, it required qualities of leadership exhibited by few other commanders in history, qualities that are enduringly and even poignantly relevant to our own moment 1941 HICKAM FIELD PEARL HARBOR
REMEMBERING PEARL HARBOR AND THE FIGHT BACK: 1/8: Nimitz at War: Command Leadership from Pearl Harbor to Tokyo Bay by Craig L. Symonds https://www.amazon.com/Nimitz-War-Command-Leadership-Harbor-ebook/dp/B09Y64QMZT From America's preeminent naval historian, the first full-length portrait in over fifty years of the man who won the war in the Pacific in World War Two. Only days after the Japanese attacked Pearl Harbor, President Franklin D. Roosevelt tapped Chester W. Nimitz to assume command of the Pacific Fleet. Nimitz transformed the devastated and dispirited Pacific fleet into the most powerful and commanding naval force in history. Facing demands from Washington to mount an early offensive, he had first to revive the depressed morale of the thousands of sailors, soldiers, and Marines who served under him. And of course, he also confronted a formidable and implacable enemy in the Imperial Japanese Navy, which, until the Battle of Midway, had the run of the Pacific. Craig Symonds's Nimitz at War captures Nimitz's composure, discipline, homespun wisdom, and most of all his uncanny sense of when to assert authority and when to pull back. As Symonds's absorbing, dynamic, and authoritative portrait reveals, it required qualities of leadership exhibited by few other commanders in history, qualities that are enduringly and even poignantly relevant to our own moment 1941 PEARL HARBOR

Newt is joined by Nathan Canestaro, author of “The Mighty Moo: The USS Cowpens and Her Epic World War II Journey from Jinx Ship to the Navy's First Carrier into Tokyo Bay”. He discusses the history of the USS Cowpens, a WWII aircraft carrier. Despite initial setbacks and being considered a "jinx ship", the USS Cowpens served with distinction from 1943 to 1945, participating in nearly every major carrier operation. The ship and its crew, made up of second-string reservists and citizen sailors, faced a deadly typhoon and were the only U.S. aircraft carrier in Tokyo Bay to witness the Japanese surrender. Canestaro's research into his grandfather's service on the ship led him to uncover the story of the USS Cowpens and its crew.See omnystudio.com/listener for privacy information.
© 2020-2026 Ivy Podcast Discovery LLC
